INMARSAT-C Mobile Earth Station
V 9 9
Safety Instructions
Antenna Unit
Contents
System Initialization
INMARSAT-C Communications
Transmitting message stored on floppy disk multiple address
International Telex/Telephone Country Code List
AP-10
AP-11
AP-12
Vii
Numerals in parenthesis are page numbers
Operational Overview
Viii
Program Number
This page is intentionally left blank
Foreword
Introduction
Features
About This Manual
Felcom 12 System Configuration
Felcom 12 system configuration
INMARSAT-C System
Inmarsat System Configuration
Inmarsat-C satellite communication system
Inmarsat system satellites
Coverage area of satellites
Communications Network
Types of MES
Peripheral Equipment
Distress/Urgent Receiving Unit IC-303
Distress Alert Unit IC-302
Distress Message Controller DMC-5Option
This page is intentionally left blank
When the audible alarm sounds
Communication Unit
Self test
This chapter provides an overview of the Felcom 12 system
Terminal Unit
Floppy disk drive
Floppy disk
Printer PP-510 optional supply
Printer PP-510
Keyboard
Key description Esc
Appears on the display when the keyboard
Cannot enter alphabet when the Num LED
Selects upper or lower case letters. Press
Hold down the key to get upper case letters
Function Menus
Shortcut key operation
Felcom 12 provides the keyboard shortcuts shown below for
Commonly used functions
Selecting menu, menu options
Function menu description
Sample menu operation
Press F6 to display the Logs menu
Press 1 to display the send message log
Communication network mode
Display Indications
Distress alert information
Communication unit status
Communication unit remarks and DCE version number
Frame synchronization
Ocean region receiving
Error Messages and Alerts
Logging status
Other information
Date and time display
Silencing the Audible Alarm
Silencing the alarm by the Setup menu
Press F8 to display the Setup menu
OFF
Sync NCS
NCS IOR Logout
Contents of program disk
System Settings
Two sets of DTEs installed
System setup
Press 2 to display the System Setup screen
Press Enter to open the date window
YY-MM-DD
DTE1POR
DTE1IOR
Offegc
EXT DTE1
INT
DTE1 ALL
IOR INMARSAT-C DTE1 OFF
DTE2 PC/DATA Auto
Terminal Setup
Press Esc to open the update window
Login and Logout
Login
Press 1 to display the Login screen
Press Enter to start login
Logout
Calling NCS IOR
LAT
LON
NCS IOR Login LAT
Calling NCS IOR Logout LAT
EGC Settings
What is the EGC Enhanced Group Call service?
EGC setup
Press 5 to display the EGC Setup screen
OFF Navtex
22 EGC setup screen, Navarea window
Press Enter to open the Waypoint window
Offon Navtex OFF
26 EGC setup screen, update window
Programming EGC channels
Programming NCS Channels
Press Enter to open the text window
Select Yes and press Enter to register input
Press Enter to register input Press Esc
AOR West AOR East POR IOR
Freq
LES List Operations
Programming the LES list
Press 2 to display the LES List
Southbury Goonhilly
Southbury
Fucino
Kumsan IOR
Deleting and changing the LES list
Printing the LES list
LES ID
USA
LES IDs
Station List Operations
Programming the station list
Operate / to place the cursor on a blank line Press Enter
Telex
Press Enter to open the destination type window
Telex FAX
Csdn Psdn
Dnid Spec
Prefix Code Function
Editing the station list
Printing the station list
Press F8, 9 and 1 to display the Station List
Entering Own Ship’s Position
Press Enter to open the window for latitude entry
LAT LON
Setting Directories
ABC DIR
Coieki
Comtest
Mail Service List
Press 5 to display the E-mail Service List
AOR.W AOR.E POR IOR
EIK
53 Service station list
Mail Setup
AOR.W AOR.E POR
Press Enter to the update window
This page is intentionally left blank
Preparing a Message
Preparing a routine message
Press F1 to display the File menu
Explanation of addressee code and password
Preparing a confidential message
Cursor is on the first line. Type your message
Editor menu setup
NCS POR Logout
Cutting and pasting text
Press F2 to select the Edit menu
Copying and pasting text
Select the text you want to copy
Insert with Citation
Select All
Search and Replace
Go to line
Saving a Message
Formatting a floppy disk
Select media type Press Enter
Saving a message
Save message, retain place on screen
Press Enter. Saving appears on display
\SEIZOU
Save message, clear screen
Enter a file name Press Enter
\SEIZOUSE
Felcom
Opening a File
Opening a file
Switching between files
Opening a file where a working area is occupied
Saving a File Under a New Name
23 Save screen, prompt for saving a message before closing
Printing a File
Combining Files
Deleting a File
Coieki Comtest
Mime Multipurpose Internet Mail Extensions
Press Enter. The prompt OK to delete file? appears
Press Enter to delete the file, or press Enter to escape
Select the file you want to decode Press Enter
Rename
Do the following to change file name Press F1
Select a file you want to rename Press Enter
Transmitting
Code description
Common procedure for transmitting a message
Transmitting prepared message
UNTITLED1 Ascii
Press Enter to close selection window
Transmit message menu, country/ocean code window
Transmit message menu, station ID window opened
Press Enter to open the window for address entry
Inet Santa Paula Transmit
Procedure for transmitting a message con’t from
Select LES ID Press Enter to close the selection window
11 Transmit message menu, option window opened
IA5
Transmit Message Status
Transmitting message stored on floppy disk multiple address
DEG LES ID Yamaguchi
DEG KTS Transmit
NCS IOR Logout LAT
JJJ
Frninmbtsts Telex
LES ID DEG
Furuno
Frninmbtsts
Japan EIK
Norway Thermopylae
Arvi
India Kumsan
Canceling transmission
NCS POR Login
Santa Paul
Press Enter to open the Cancel window
Confirming delivery status message status list
Felcom Fusa
NCS POR
Message status list description
Manually requesting delivery status
24 Request delivery status display
2-digit code services
26 Transmit message menu
For maritime safety service
For general utility
Inserting the destinations of a fax terminal
27 Transmit message menu, FAX selected
When a message is received
Received alarm
Receiving
Registration
Setting the receive alarm
Display log
Printing
Saving and filing
Displaying receive messages
Printing receive messages
Screen can be scrolled with the up and down arrow keys
Press F8 Press 6 to display Auto Mode Setup menu
Saving receive messages to a floppy disk
Automatically saving receive messages
Press F6 Press 2 to display the Receive Message Log
Deleting receive messages
Press F6 Press 2 to display list of receive messages
Display Log
Distress/Urgent Receiving Call Unit IC-303
Displaying and printing the display log
Press F6 Press 4 to display the Display Log
Automatic printing of display log
EGC Messages
Display send message log or receive message log
Displaying and reprinting EGC messages
Press F6 Press 3. The Display EGC Message screen appears
Displaying EGC closed network ID Enid
40 EGC network ID list
TX message is printed when the message result is Success
Tx Message Example Printout
Receiving EGC distress or urgent message
Confirmation OFF
Confirmation on
Delivery Confirmed
This page intentionally left blank
Setting a data report
Data Reporting
Press F5 to display the Position Reports menu
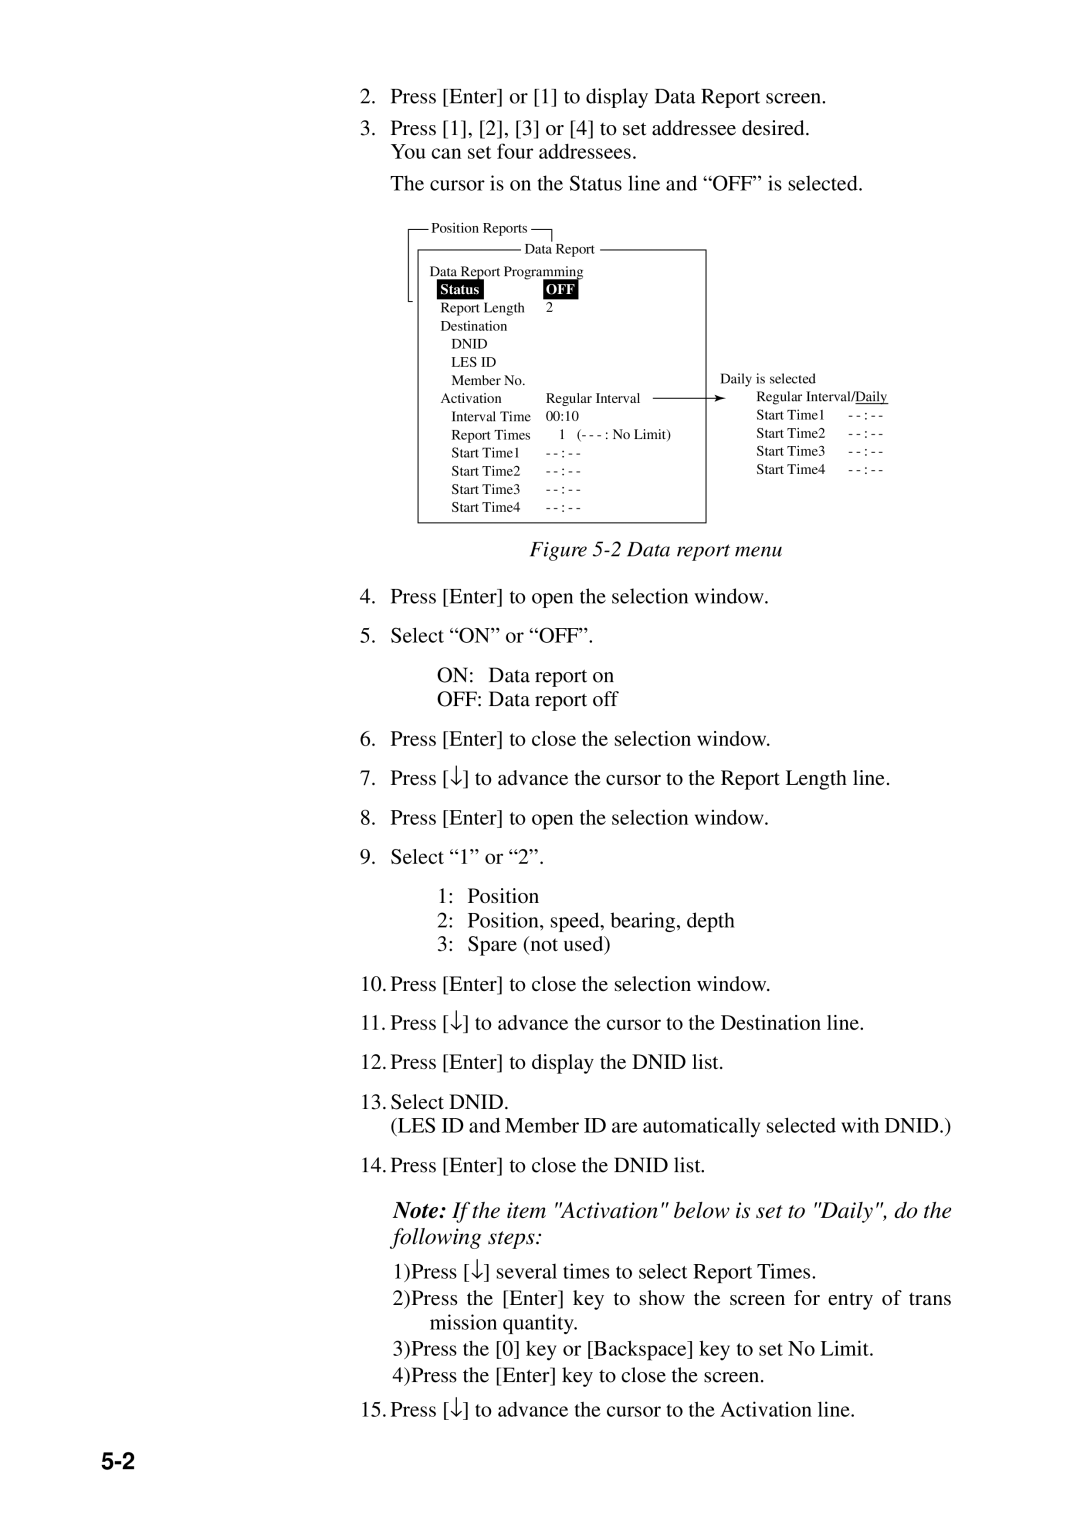
Data report menu
Dnid LES ID
Select Yes Press Enter to close the Data Report window
Setting a message report
NAV+SEA INF
Page
Polling command
Polling command on MES signalling channel
Polling
Select Yes Press Enter to finish
Other polling command
Polling reception
Sample MES message channel printout
Press F8, 6 to display the Auto Print Mode Setup screen
Dnid Data Network Identification
Displaying Dnid
Dnid LES
11 Sample MES signalling channel printout
Enabling/Disabling Dnid
Distress Alert
Preparing a Distress Alert
Distress Alert setup, requesting confirmation of settings
Press Enter to register data you’ve just entered
Transmitting a Distress Alert
Distress Alert Unit IC-302
Testing Distress Button
Test Menu
Distress Communications
Mayday Mayday Mayday Name is
Need Help
Press Enter to transmit the distress message to the LES
Search and Rescue
Aborting an Operation
Press 3 to select Abort
Scanning NCS
Press Enter to start the scanning
Selecting EGC Receiving Channel
NCS CC
Bber
Selecting NCS Channel
AOR West AOR East POR IOR Freq
Maintenance
Safety Information
General Checking and Maintenance
Cleaning the terminal unit and communication unit
Checking connectors and earth terminal
When the power can’t be turned on power lamp does not light
Self test at power application communication unit
Testing the communication unit through the keyboard
Self Tests
Performance Verification PV Test
PV test sequence
ROM OK RAM OK DP-RAM OK
ROM OK RAM1 OK RAM2 OK Eeprom OK GPS OK DP-RAM OK
PV test procedure
Press Enter to transmit the PV test request to NCS
Results of PV test
Interpreting the PV tests results display
Date and time of test
System Status Monitor
Interpreting the system status monitor
Replacing Internal Battery
Water temperature
Tidal current direction
Tidal current speed
Error Messages
Error message Meaning Action
PV Test
Dnid
Error message Meaning Action
This page is intentionally left blank
Specifications
SP-1
SP-2
IC-112 & IC-212 Receiving 25W, Transmitting 120W
International Telex/Telephone Country Code List
AP-1
AP-2
AP-3
AP-4
NTT
AP-5
AP-6
AP-7
Area and Country Telephone Telex Country Country Code
AP-8
International Telex Abbreviations
AP-9
Glossary of Acronyms
AP-10
International Telegraphy Alphabet
AP-11
AP-12
AP-13
AP-14
LES IDs List
AP-15
Digital Interface IEC
Input sentences
Output sentences
Transmission interval
Schematic diagrams
NAV in port listener
Load requirements
Isolation Optocoupler Input Impedance 486ohm Max. Voltage ±
Data sentences
AP-18
Input sentences BWC Bearing and distance to waypoint
AP-19
BWR Bearing and distance to waypoint -rhumb line
DBT Depth below transducer
AP-20
GGA Global positioning system GPS fix data
MTW Water temperature
AP-21
GLL Geographic position latitude and longitude
AP-22
RMA Recommended minimum navigation information Loran C data
AP-23
RMB Recommended minimum navigation information
AP-24
VDR Set and drift
AP-25
VTG Course over ground and ground speed
WPL Waypoint location
AP-26
ZDA Date and time
Index
IN-1