Setup Mode Details
Calibration 1 and 2 (Screens 22 and 23)
NOTE: See Pump Calibration, page 31, for detailed instructions.
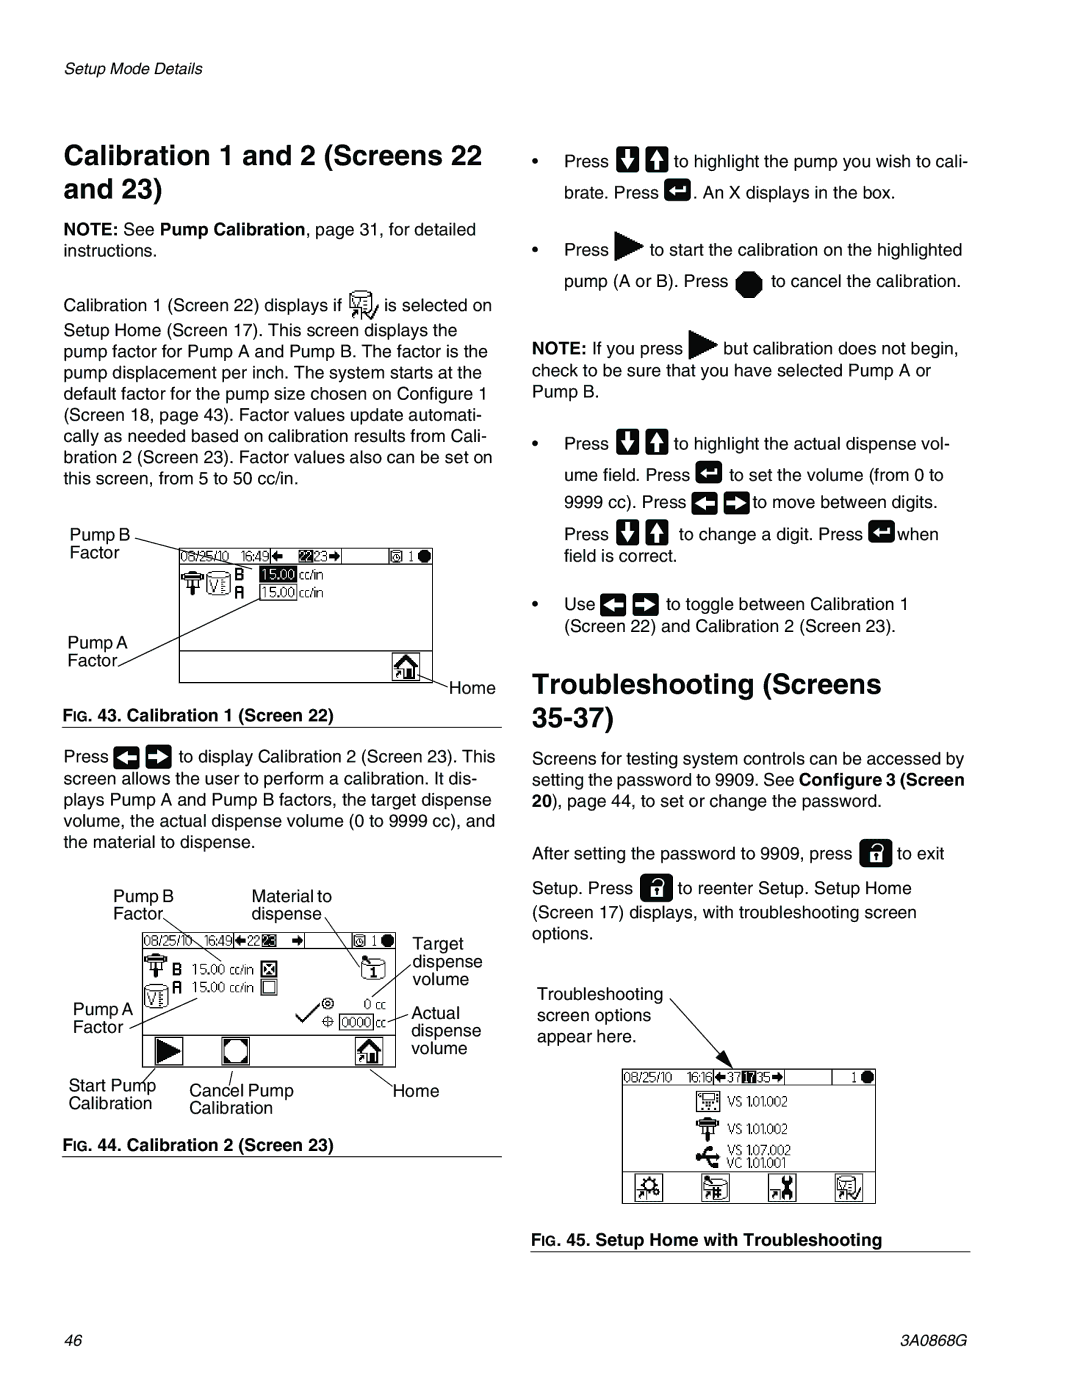
Calibration 1 (Screen 22) displays if ![]() is selected on Setup Home (Screen 17). This screen displays the pump factor for Pump A and Pump B. The factor is the pump displacement per inch. The system starts at the default factor for the pump size chosen on Configure 1 (Screen 18, page 43). Factor values update automati- cally as needed based on calibration results from Cali- bration 2 (Screen 23). Factor values also can be set on this screen, from 5 to 50 cc/in.
is selected on Setup Home (Screen 17). This screen displays the pump factor for Pump A and Pump B. The factor is the pump displacement per inch. The system starts at the default factor for the pump size chosen on Configure 1 (Screen 18, page 43). Factor values update automati- cally as needed based on calibration results from Cali- bration 2 (Screen 23). Factor values also can be set on this screen, from 5 to 50 cc/in.
Pump B
Factor
Pump A
Factor
Home
FIG. 43. Calibration 1 (Screen 22)
Press ![]()
![]() to display Calibration 2 (Screen 23). This screen allows the user to perform a calibration. It dis- plays Pump A and Pump B factors, the target dispense volume, the actual dispense volume (0 to 9999 cc), and the material to dispense.
to display Calibration 2 (Screen 23). This screen allows the user to perform a calibration. It dis- plays Pump A and Pump B factors, the target dispense volume, the actual dispense volume (0 to 9999 cc), and the material to dispense.
Pump B | Material to |
|
Factor | dispense |
|
|
| Target |
|
| dispense |
|
| volume |
Pump A |
| Actual |
Factor |
| dispense |
|
| volume |
Start Pump | Cancel Pump | Home |
Calibration | Calibration |
|
FIG. 44. Calibration 2 (Screen 23)
•Press ![]()
![]() to highlight the pump you wish to cali- brate. Press
to highlight the pump you wish to cali- brate. Press ![]() . An X displays in the box.
. An X displays in the box.
•Press ![]() to start the calibration on the highlighted
to start the calibration on the highlighted
pump (A or B). Press ![]() to cancel the calibration.
to cancel the calibration.
NOTE: If you press ![]() but calibration does not begin, check to be sure that you have selected Pump A or Pump B.
but calibration does not begin, check to be sure that you have selected Pump A or Pump B.
•Press ![]()
![]() to highlight the actual dispense vol-
to highlight the actual dispense vol-
ume field. Press ![]() to set the volume (from 0 to
to set the volume (from 0 to
9999 cc). Press ![]()
![]() to move between digits.
to move between digits.
Press ![]()
![]() to change a digit. Press
to change a digit. Press ![]() when field is correct.
when field is correct.
•Use ![]()
![]() to toggle between Calibration 1 (Screen 22) and Calibration 2 (Screen 23).
to toggle between Calibration 1 (Screen 22) and Calibration 2 (Screen 23).
Troubleshooting (Screens 35-37)
Screens for testing system controls can be accessed by setting the password to 9909. See Configure 3 (Screen 20), page 44, to set or change the password.
After setting the password to 9909, press ![]() to exit
to exit
Setup. Press ![]() to reenter Setup. Setup Home (Screen 17) displays, with troubleshooting screen options.
to reenter Setup. Setup Home (Screen 17) displays, with troubleshooting screen options.
Troubleshooting screen options appear here.
FIG. 45. Setup Home with Troubleshooting
46 | 3A0868G |
