Setup Mode Details
Troubleshooting System Inputs (Screen 35)
From Setup Home (Screen 17) with Troubleshooting
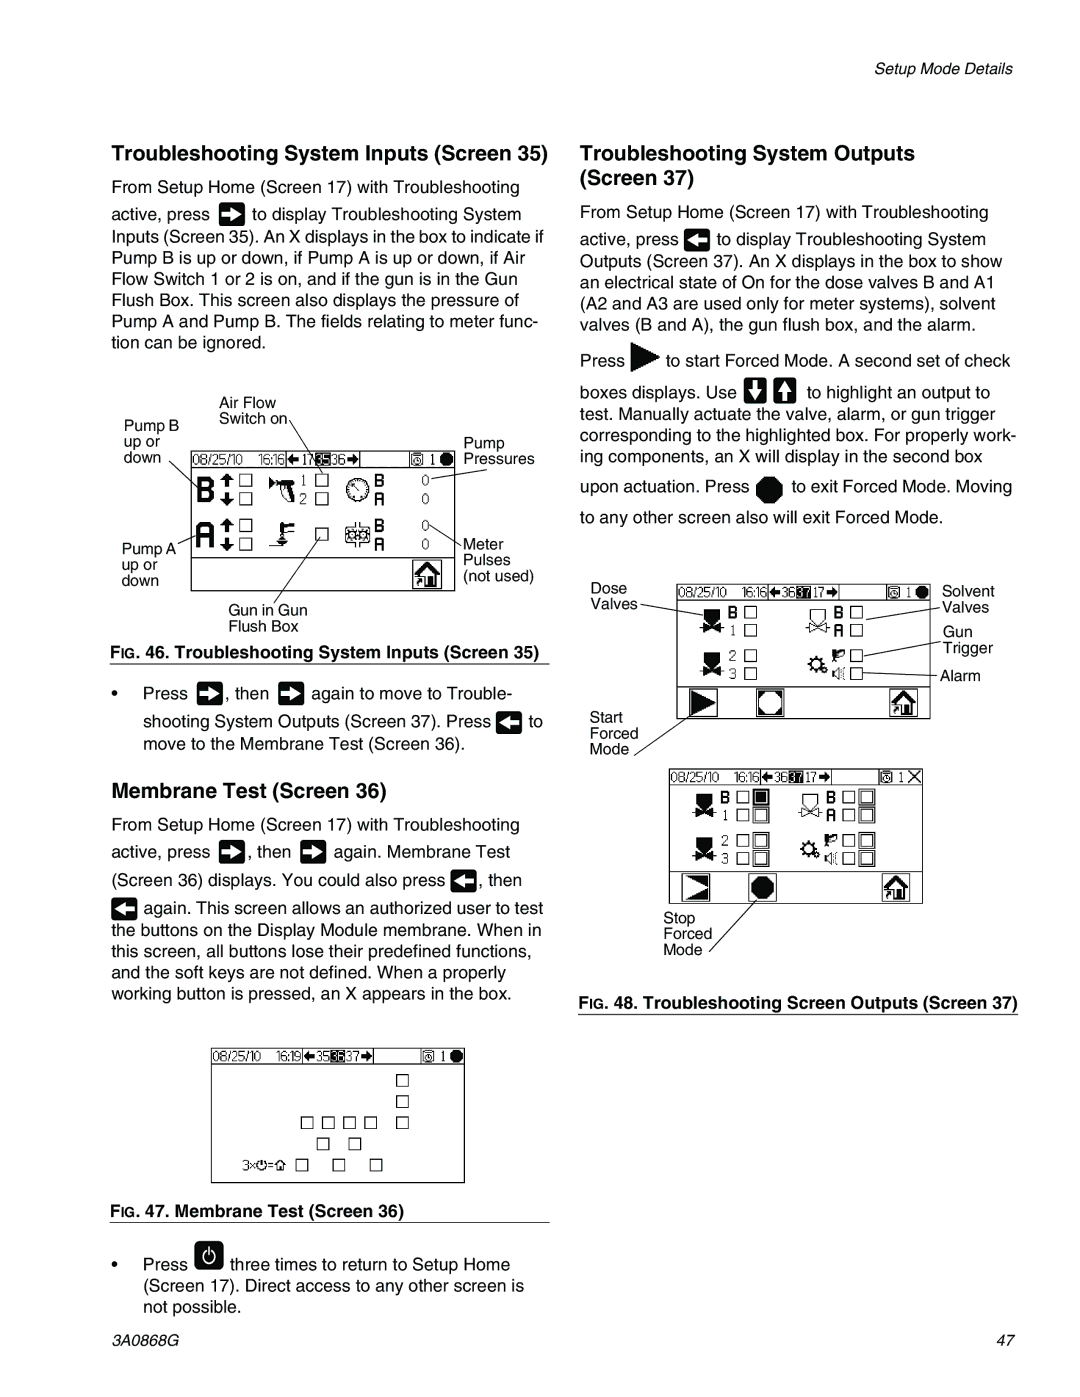
active, press ![]() to display Troubleshooting System Inputs (Screen 35). An X displays in the box to indicate if Pump B is up or down, if Pump A is up or down, if Air Flow Switch 1 or 2 is on, and if the gun is in the Gun Flush Box. This screen also displays the pressure of Pump A and Pump B. The fields relating to meter func- tion can be ignored.
to display Troubleshooting System Inputs (Screen 35). An X displays in the box to indicate if Pump B is up or down, if Pump A is up or down, if Air Flow Switch 1 or 2 is on, and if the gun is in the Gun Flush Box. This screen also displays the pressure of Pump A and Pump B. The fields relating to meter func- tion can be ignored.
| Air Flow | |
Pump B | Switch on | |
| ||
up or | Pump | |
down | Pressures | |
Pump A | Meter | |
Pulses | ||
up or | ||
(not used) | ||
down | ||
|
Gun in Gun
Flush Box
FIG. 46. Troubleshooting System Inputs (Screen 35)
•Press ![]() , then
, then ![]() again to move to Trouble-
again to move to Trouble-
shooting System Outputs (Screen 37). Press ![]() to move to the Membrane Test (Screen 36).
to move to the Membrane Test (Screen 36).
Troubleshooting System Outputs (Screen 37)
From Setup Home (Screen 17) with Troubleshooting
active, press ![]() to display Troubleshooting System Outputs (Screen 37). An X displays in the box to show an electrical state of On for the dose valves B and A1 (A2 and A3 are used only for meter systems), solvent valves (B and A), the gun flush box, and the alarm.
to display Troubleshooting System Outputs (Screen 37). An X displays in the box to show an electrical state of On for the dose valves B and A1 (A2 and A3 are used only for meter systems), solvent valves (B and A), the gun flush box, and the alarm.
Press ![]() to start Forced Mode. A second set of check
to start Forced Mode. A second set of check
boxes displays. Use ![]()
![]() to highlight an output to test. Manually actuate the valve, alarm, or gun trigger corresponding to the highlighted box. For properly work- ing components, an X will display in the second box
to highlight an output to test. Manually actuate the valve, alarm, or gun trigger corresponding to the highlighted box. For properly work- ing components, an X will display in the second box
upon actuation. Press ![]() to exit Forced Mode. Moving to any other screen also will exit Forced Mode.
to exit Forced Mode. Moving to any other screen also will exit Forced Mode.
Dose | Solvent |
Valves | Valves |
Gun
![]() Trigger
Trigger
![]() Alarm
Alarm
Start
Forced
Mode
Membrane Test (Screen 36)
From Setup Home (Screen 17) with Troubleshooting
active, press ![]() , then
, then ![]() again. Membrane Test (Screen 36) displays. You could also press
again. Membrane Test (Screen 36) displays. You could also press ![]() , then
, then
![]() again. This screen allows an authorized user to test the buttons on the Display Module membrane. When in this screen, all buttons lose their predefined functions, and the soft keys are not defined. When a properly working button is pressed, an X appears in the box.
again. This screen allows an authorized user to test the buttons on the Display Module membrane. When in this screen, all buttons lose their predefined functions, and the soft keys are not defined. When a properly working button is pressed, an X appears in the box.
FIG. 47. Membrane Test (Screen 36)
•Press ![]() three times to return to Setup Home (Screen 17). Direct access to any other screen is not possible.
three times to return to Setup Home (Screen 17). Direct access to any other screen is not possible.
Stop
Forced
Mode
FIG. 48. Troubleshooting Screen Outputs (Screen 37)
3A0868G | 47 |
