Getting Started Guide
Page
Getting Started Guide
Copyright 2000, 2003-2005 Hewlett-Packard Development Company, L.P
Hewlett-Packard Company P.O. Box Cupertino, CA USA
The information in this document is subject to change without notice
Using the Keyboard
Table of Contents
Setting Up Your PC
Setting Up Sound
Playing CDs and DVDs
Using the HP Personal Media Drive
Working with Digital Images
Creating Audio and Data Discs
Getting Help
Creating Video Discs and Movies
Index
viii Getting Started Guide
Setting Up Your PC
Putting Your PC Together
symbol
Connecting to the PC
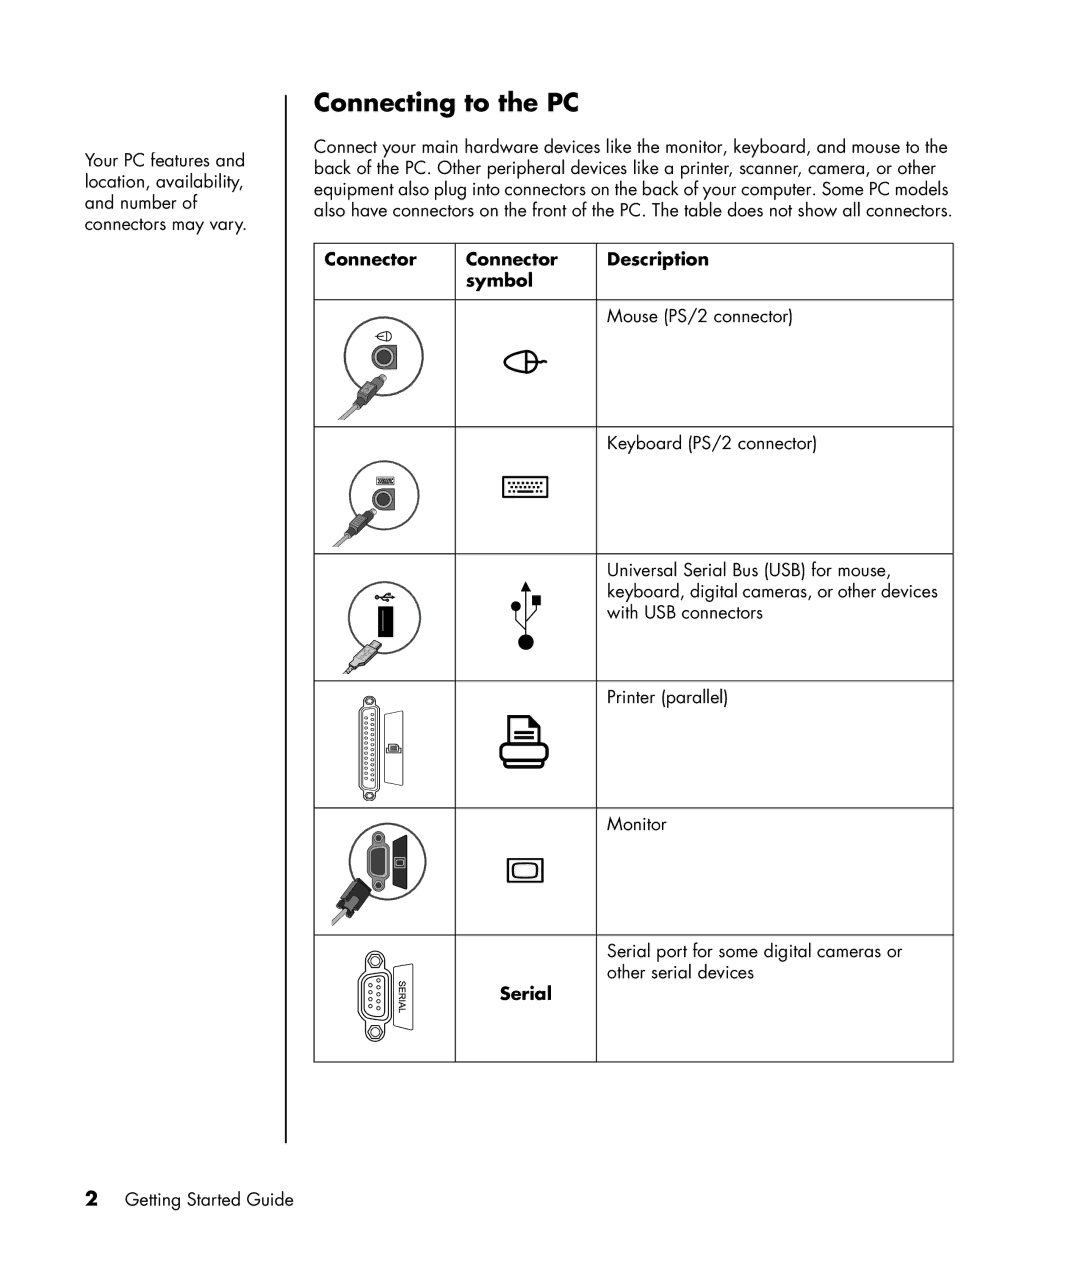
Connector
Mouse PS/2 connector
Connector
Audio Line Out powered speakers
Turning On Your PC for the First Time
Connector
Setting Up and Connecting to Your Internet Account
Online Services, and then click Easy Internet Sign-up
Installing Software and Hardware Devices
Transferring your old PC information and files to your new PC
Icon
Using Desktop Icons
Using Compaq Organize software
Opens
Identifying Special Keyboard Buttons
Using the Keyboard
Feature
Compaq or
Icon
Feature
Description
3 Click Printers and Other Hardware, if it is present
Customizing the keyboard buttons
2 Choose Control Panel
Feature
10 Getting Started Guide
Setting Up Sound
Using Speakers
Configuring the Multi-Channel Sound Manager 3-connector
Setting up 3-connector sound
Connecting the speaker system to the PC 3-connector
connector
Using the microphone with the Multi-Channel Sound Manager 3-connector
Configuring multi-channel audio output for the DVD player
4 Click the Speaker Configuration tab
Identifying the audio connectors 6-connector
Setting up 6-connector sound
A B C D E F
5 Click the Speaker Configuration button
Configuring the Sound Effect Manager 6-connector
Connecting the speaker system to the PC 6-connector
Connect speaker cable plug for
2 Choose Control Panel
4 Click Sounds and Audio Devices
3 If it is present, click Sounds, Speech, and Audio Devices
The Sound Effect Manager control screens
Using the Sound Effect Manager 6-connector
To open the Sound Effect Manager
2 Choose Control Panel
Retasking using the Audio Wizard 6-connector
Using the Audio Wizard in the Sound Effect Manager 6-connector
To enable the Audio Wizard
Name
Card
Using the Memory Card Reader
4-slot reader
Using the memory card reader
Working with the Safely Remove Hardware utility
Insert
Memory card reader
A BD CE
Into reader slot
22 Getting Started Guide
Connecting to a TV Set
Using a TV as a Monitor
Identifying Cables You May Need
Viewing the PC Image on Your TV Screen
Ge Force tab
nView tab
1 Click the Ge Force FX xxxx tab
Disabling the TV Option
Displays tab
Displays tab disabling
nView tab disabling
Ge Force tab disabling
1 Click the Ge Force FX xxxx tab
2 Turn off the TV and the PC
Disconnecting the TV
1 Disable the TV option. See the previous procedure
3 Remove the video cable from the TV and the PC
Using the HP Personal Media Drive
Connecting the Drive
Inserting the Drive
A B C
Locating the Drive and Assigning a Drive Letter
2 Click My Computer
5 Select Change Drive Letter and Paths
Using the Drive
4 Right-click the HP Personal Media Drive
2 Click My Computer
Disconnecting the Drive
34 Getting Started Guide
Working with Digital Images
36 Getting Started Guide
Playing CDs and DVDs
Playing Music CDs with iTunes
Playing CDs and DVDs with Windows Media Player
Playing DVD Movies with InterVideo WinDVD
Page
2 Select Play DVD movie using InterVideo WinDVD, and click OK. Or
Using country/region codes
Playing Video CDs VCD with InterVideo WinDVD
2 Select Play DVD movie using Windows Media Player, and click OK. Or
Playing Video CDs VCD with Windows Media Player
42 Getting Started Guide
Creating Audio and Data Discs
Working with Audio CDs
Erasing Rewritable Discs Before Recording
4 Click the Quick Erase or Full Erase option, and then Erase Disc
Verifying audio disc recorded without errors
Audio CD tips
Creating audio CDs
Creating jukebox discs
Verifying data disc recorded without errors
Working with Data DVDs and CDs
Data disc tips
Creating data discs
Copying a DVD or CD
Archiving Files on a CD or DVD
Working with Image Files
Creating an image file
Disc Labeling with LightScribe
Burning from an image file
Burning a LightScribe label with Sonic Express Labeler
LightScribe requirements
1 Click Start, All Programs, Sonic, and then click Express Labeler
Burning a LightScribe label after burning with iTunes
Using adhesive disc labels
Compatibility Information
File
Disc Features and Compatibility Table
Plays in
Can be
DVD+RW/+R
Optical Drive Quick Reference Table
Optical drive can
Double-Layer
With this program
Software Quick Reference Table
You can
With this program
You can
Creating Video Discs and Movies
Before You Begin Capturing Video
Creating a Video Project
Sonic MyDVD Video Projects
1 Click Start, choose All Programs, Sonic, and then DigitalMedia Home
Capturing video to a video project
Adding files to a video project
2 Click Add Files
Adding slide shows to a video project
Adding submenus to a video project
2 Click Edit Style
Editing the style of a video project
Editing movie files
To This Menu
Burning a video project to disc
Creating a Video Project with Direct-to-Disc Wizard
2 Click Start, choose All Programs, Sonic, and then DigitalMedia Home
Video Quality and Disc Size
Video Quality
DVD Recording Time
Estimated Time per Disc Size
Audio Format
68 Getting Started Guide
Finding Guides on the Web
Getting Help
Finding Onscreen Guides
2 Choose All Programs 3 Choose Documentation
Using Compaq Connections
Using the Onscreen Help and Support Center
Using Instant Support
2 Click Help and Support 3 Click Connect to Customer Support
2 Choose All Programs 3 Choose PC Help & Tools
Getting messages
Turning off messages
4 Choose Compaq Connections
2 Choose All Programs 3 Choose PC Help & Tools
Using PC Help & Tools
Reactivating messages
4 Choose Compaq Connections
Index
74 Getting Started Guide
Page
76 Getting Started Guide
Page
Part Number