Version
Intel NetStructure 7110/7115 e-Commerce Accelerator
Trademarks
Copyright
Table of Contents
Theory of Operation
Scenarios
Remote Management
Alarms and Monitoring
Troubleshooting Appendix a Front Panel
List of Figures
Xii
About this User Guide
Introduction
Remote Management
New in This Release
Before You Begin
Who Should Use this Book
How to Use this Book
Glossary defines terms appearing in this User Guide
Page
Installation and Initial Configuration
Rack Installation
Installing the 7110/7115 Free- Standing or in a Rack
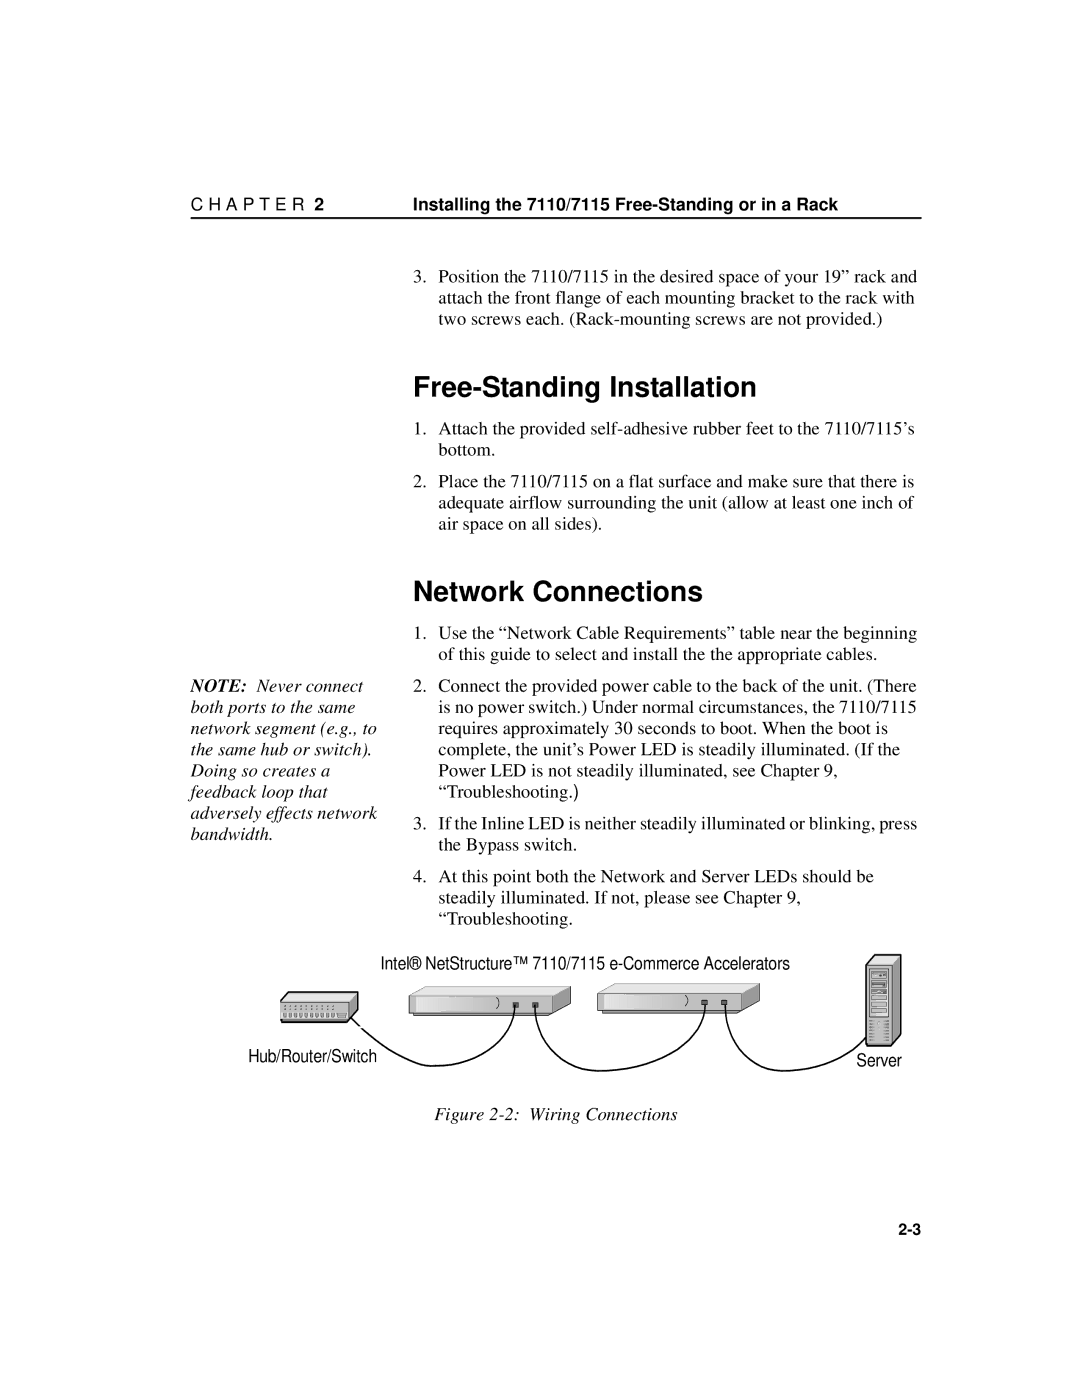
Network Connections
Free-Standing Installation
Inline LED
Admin Terminal Connection
Status Check
Network and Server LEDs
HyperTerminal§ Paste Operations
Continuing Configuration
Troubleshooting
Server and Network LEDs
Security
Theory of Operation
Single Server Acceleration
Multiple Servers
7110/7115 in Single Server Configuration
Positioning 7110/7115 between ITM Device and Client Network
Working with Internet Traffic Management ITM Devices
Scalability and Cascading
Positioning 7110/7115 between ITM Device and Server
Spilling and Throttling
Availability
Keys and Certificates
Cutting and Pasting with HyperTerminal§
Intel 7115 create sign
Procedure
Create a key Type the create key command at the prompt
Create a Certificate Signing Request
Intel 7115 export sign mywebserver
Certificate REQUEST----- lines
Asciix Enter
Enter
Typically, the CSR will look something like this
Exporting a Key/Certificate from a Server
Save the configuration when the server has been mapped
Apache Interface to Open SSL§ modssl
Apache SSL§
Importing into the 7110/7115
Stronghold§
Intel 7115 import key mywebserver
Save the configuration when the server has been mapped
Intel 7115 create cert mywebserver
Enter the create cert command with the keyID
Creating a new Key/Certificate on the 7110/7115
Create a key as follows
Overview
Global Site Certificates
Example
Global Site Certificate Paste Procedure
Intel 7115 import cert keyID
Intel 7115 set redirect
A P T E R Redirection Clients and Unsupported Ciphers
Intel 7115 set redirect 2 none Intel 7115 show redirect
Client Authentication
To disable a redirect URL for a mapping
Intel 7115 show redirect
Intel 7115 import clientca
Next, import the client CA certificate for Map ID
Generate the client CA certificate
Creating a Client CA Certificate using OpenSSL§
Generate a certificate signing request
Mapping
SSL Processing
Automapping
Manual mapping
Automapping with user-specified key and certificate
Automapping with multiple port combinations
Deleting automapping entries
Combining automapping and manual mapping
Use the show block command to verify
All IPs, Specific Port
Subnet IP, Specific Port
Use show block to verify
Delete a Block
Use the show block command to confirm the block
Intel 7115 delete block
Failure Conditions, Fail-safe, and Fail-through
Scenarios
Syntax
Manual Configuration
Procedure for Scenario
Scenario 1-Single Server
Intel 7115delete map 1 Intel 7115list maps
Scenario 2-Multiple Servers
This scenario shows how to configure two or more servers
ID KeyID
Assumptions
Scenario 3-Multiple 7110/ 7115s, Cascaded
Multiple Cascaded 7110/7115s
Intel 7115 export config
Intel 7115 import config
Save the configuration
After verification y or refusal n, the prompt reappears
Intel 7115set egressmac none
To reverse this process
Online Help
Command Reference
Abbreviation to Uniqueness
Command Line Interface
User Authentication
Command Line Prompt
A P T E R Command Line Interface
Command History
Input Editing Commands
Moving the Insertion Point
Cut and Paste
Command Summary
Nic Password Reboot
Command Command Options Import
Inline List
Command Command Options Set
Command Command Options Show
Ttychar
Setsnmp
Showsnmp
Status
Help Commands
Command Reference
Status Command
Import key
SSL Commands
Command Description Create key
Delete key
Show key
Command Description Export key
List keys
Export cert
Command Description Create cert
Delete cert
Import cert
Set ciphers
Command Description Show cert
Display the expanded certificate including PEM format
Displays all certificates
Show redirect
Command Description Set redirect
Show clientca
Delete clientca
Command Description Import clientca
Create sign
Export sign
Command Description Delete sign
Show sign keyID
Field
Command Description Set defcert
Issuer e-mail address. You can change all, some or none
Display the default certificate creation information
Show clienttmo
Command Description Set kstrength
Show kstrength
Set clienttmo
Show servertmo
Command Description Set servertmo
Displays the currently specified server timeout value
Client request is rejected
Show block
Port Mapping Commands
Command Definition Create block
Delete block
Delete permit
Command Definition Create permit
Show permit
List maps
Command Definition Create map
Delete map mapID
Show map
Command Description Bypass
Operational Commands
Inline
Show spill
Command Description Set spill
Command Description Set ip
Remote Management Commands
Maxremotesessions
Show telnet
Command Description Set telnet
Set telnetport
Set sshport
Command Description Show telnetport
Set ssh
Show ssh
Showsnmp snmp
Command Description Setsnmp snmp
Setsnmp snmpinfo
Snmpcommunity
CommandDescription
Delete Snmp community strings
Trapcommunity
Command Description Setsnmp trapauthen
List trapcommunity
Intel 7115 delete trapcommunity
Delete trapcommunity Delete Snmp trap community strings
Set rscwindow
Alarms and Monitoring Commands
Command Description Set alarms
Show alarms
Set utlwindow
Command Description Show rscwindow
Set utlhighwater
Show utllowwater
Command Description Set utllowwater
Show utlwindow
Show utlhighwater
Intel 7115 show ovlwindow
CommandDescription Show ovlwindow
Command Description Show config
Configuration Commands
Display current volatile configuration settings
Intel 7115 show config default Default configuration
Config save
Command Description Config compare
Config reset
Config default
Import a configuration file paste, xmodem, uudecode
Command Description Export config
Configuration specifics are displayed
Import config
Import patch
Command Description Import upgrade
List system
Returns to factory configuration settings
Command Description Factorydefault
Set date
Administration Commands
Command Description Password
Show info
Set idleto
Command Description Set egressmac
Set ether
Show ether
Set serial
Command Description Set more
Nic
Set prompt
Exit
Logging Commands
Command Description Show serial
Command Description
List logs
Command Description Delete log
Delete saved log/trace files from /flash/logs
All deletes all logs
Overview
Remote Management
Limitations
Remote Management CLI Commands
A P T E R Overview
Local Serial Console
Remote Telnet Sessions
Unix-prompttelnet
Remote Console, Telnet
Changing the Telnet Port
To display the Telnet port
Disabling Telnet
To verify Telnet disable
Enable remote SSh sessions
Remote SSh Sessions
Changing the SSh Port
Unix-promptssh -1 admin
Passwordpassword
Remote Console, SSh
To display the SSh port
To verify SSh disable
Intel 7115 set ssh disable
Disabling SSh
Intel MIB Tree
Standards Compliance
Ceo-header.my
Where to find MIB Files
Supported MIBs
Management Information Base-II MIB-II Intel Enterprise MIBs
Following is a summary of the 7110/7115 private MIB
Enterprise Private MIB Summary
Page
Snmp
ThrottlesPerSec Number of throttles per second
Snmp
Standard Snmp Traps
Trap Summary
Private Traps in ssl-appliance-mib.my
Intel 7115 setsnmp snmp disable Intel 7115 showsnmp snmp
Intel 7115 setsnmp snmp enable Intel 7115 showsnmp snmp
Enabling Snmp
Intel 7115 showsnmp snmpinfo
Specifying Snmp Information
Intel 7115 delete snmpcommunity
Community String
Trap Community String
Use CLI commands, setsnmp trapcommunity, list
Access Control
Page
Alarms Monitoring
Set alarms All, esc, rsc, utl, ovl, nls None Show alarms
CLI commands for alarm configuration are
For example
Alarm Types
ESC Encryption Status Change Alarm
Alarm Modifiers and Messages
Extended Data
RSC Alarm CLI Commands
To set Overload Alarm time window
RSC Refused SSL Connections
Intel 7115 set rscwindow Intel 7115 show rscwindow
UTL Utilization Threshold Alarm
To display Overload Alarm time window
This alarm monitors three utilization threshold values
To set Utilization Threshold Alarm low-water value
UTL Alarm CLI commands
To set Utilization Threshold Alarm time window
To set Utilization Threshold Alarm high-water value
Intel 7115 set ovlwindow Intel 7115 show ovlwindow
OVL Overload Alarm
OVL Alarm CLI Commands
Intel 7115 set ovlwindow seconds Range
NLS Network Link Status Alarm
Alarm Logging
Intel 7115 status
Respend Inline
Ip 10.1.11.34 netmask
Intel 7115 status alarms
Example, status alarms command
Monitor report format
Report Configuration
Monitoring
Monitoring Reports
Intel 7115 set monitoringfields
Monitoring Reports CLI Commands
Intel 7115 show monitoringfields
Intel 7115 set monitoring enable Intel 7115 show monitoring
Page
Software Updates
Press y for yes at the Continue with upgrade? prompt
Using Windows§ HyperTerminal§
Intel 7115 import upgrade
Connect the serial cable to the 7110/7115 auxiliary console
Command import patch
Intel 7115import upgrade
To send the uuencoded file use the ~ command
Intel 7115import patch
Page
Troubleshooting
Intel 7115 set clienttmo
See Global Site Certificates
Error message Intermediate
Different media
Error message Server
Settings
Then use the nic command to force
LEDs
Front Panel
Processing
Buttons and Switches
Press to physically force bypass mode bypass 7110/7115
Front Panel LEDs
Overload
See Appendix B, Failure
Connectors
Failure/Bypass Modes
Enable 7110/7115 processing
Bypass Button
Fail-through Switch Security Level
P E N D I X B Fail-through Switch Security Level
Page
Cipher Strength
Supported Ciphers
SSL Version Level
RC464
RC2 SSLv2
RC2128
RC4-64 SSLv2
Page
Taiwan Class a EMI Statement
Regulatory Information
FCC Part 15 Compliance Statement
Vcci Statement
CE Compliance Statement
Canada Compliance Statement Industry Canada
Vcci Class a Japan Australia
Cispr 22 Statement
Avertissement
Warnung
Advertencias
Wichtige Sicherheitshinweise
Wichtige Sicherheitshinweise
Page
END User Terms and Conditions of Sale and Software License
Terms and Conditions and Software License
Page
P E N D I X E
Page
Year warranty
Process of being installed
Export Law Regulations
Page
Glossary
Glossary-2
Glossary-3
Glossary-4
Japan only
Support Services
Worldwide Access to Technical Support
North America only
Support-2
Intel NetStructure 7110/7115 e-Commerce Accelerator User
Support-4
Index
D E
Index-3
Index-4