GZ-E300 GZ-EX310 GZ-EX355
LYT2536-002A
Table of Contents
Setting the UPnP of this Camera Outdoor Monitoring
Setting the Sender’s E-mail Address of the Camera
Registering the Access Points of the Camera to Connect
Protecting the Network Settings with a Password
Extending Your Hands to Shoot ~ High-Angle Shooting ~
Panning
Getting Ready
Open your feet to the width of your shoulders
Holiday Season/Christmas
Wedding
Discussing and Planning Before the Event
Finding out the route of entrance
Number of times and timing of clothes-changing
Travel
Battery Charger
Using Pan at the Places of Interest
Tripod
Recording the Excitement Before Departure
Amusement Park
Without backlight compensation With backlight compensation
Verifying the Accessories
Memo
Illustration
AC-V11U
Charging the Battery Pack
Detaching the Battery Pack
Approximate Battery Charging Time Using AC Adapter
Battery Pack Charging time
Grip Adjustment
Using as a Hand Strap
Adjust the length of the belt and loop it around your wrist
Inserting an SD Card
When your computer cannot recognize the Sdxc card
Removing the Card
Types of Usable SD Card
SD Card
Adjusting the Touch Panel
Using the Touch Screen
Following is a screen of the model with Wi-Fi functions
Names of Buttons and Functions on the LCD Monitor
Setting ends and returns to the menu screen
Recording Screen Video/Still Image
Playback Screen Video Index Screen Thumbnail Display Display
Playback Screen Still Image
Menu screen recording mode
Clock Setting
Menu screen playback mode
Resetting the Clock
Changing the Display Language
Holding this Unit
Charging the Battery Pack Overseas
Using this Unit Overseas
Tripod Mounting
Setting the Clock to Local Time when Traveling
Setting Daylight Saving Time
Approximate Recording Time Using Battery GZ-EX355/GZ-EX310
Optional Accessories
GZ-E300
Indications During Video Recording
Taking Videos in Auto Mode
Display Icon Description
Scenes of Intelligent Auto
Operation Buttons for Video Recording
Operation Description Buttons
Menu
Useful Settings for Recording
Using the Silent Mode
Capturing Still Images During Video Recording
Taking Still Images in Auto Mode
Indications During Still Image Recording
Halfway
Operation Buttons for Still Image Recording
Displays the various menus of still image
Zooming
Manual Recording
Manual Recording Menu
Name Description
Shooting According to Scene Subject
Tap the appropriate scene
Adjusting Focus Manually
Setting Effect
Image is only an impression
Bright under light
Adjusting Brightness
Setting Backlight Compensation
Setting White Balance
Setting Details
OFF
Advance
Using MWB
Taking Close-up Shots
Recording with Effects
Type of Effect Description of Effect
Recording with Animation Effects Animation Effect
Recording
Recording with Face Decorations Decorate Face Effect
Recording with Decorative Stamps Stamp
Recording with Personal Handwriting Handwriting Effect
Capturing Subjects Clearly Touch Priority AE/AF
Capturing Smiles Automatically Smile Shot
Capturing Pets Automatically PET Shot
Recording
Registering Human Face Personal Authentication Information
Recording
Displays only the frames when faces are detected
Setting SMILE%/NAME Display
Are detected
Canceling Deleting the Registered Face Information
Editing the Registered Face Information
Reducing Camera Shake
Marking the Video While Recording
Slow-motion High-speed Recording
Recording at Intervals TIME-LAPSE Recording
Tap High Speed Recording
Indications During Time-Lapse Recording
Time-Lapse Setting
Display Description
Recording Stop-Motion Videos Stop
Motion REC
Recording Automatically by Sensing Movements Auto REC
Taking Group Shots Self-timer
Using the 2-/10-second Self-timer
Using the Face Detection Self-timer
Recording Videos with Date and Time
Checking the Remaining Recording Time
Approximate Video Recording Time
Approximate Number of Still Images Unit Number of Shots
Picture quality Built-in memory GZ-EX355 only
Picture quality SDHC/SDXC card
5 m 55 m Supplied
40 m 5 m
40 m 5 m Supplied
15 m 10 m
Switching to the video playback screen
Playing Back Videos
During Video Playback
Adjusting the Volume of Videos
Checking the Recording Date and Other Information
Normal Playback
Marking Playback
During the DIGEST/Mark Playback
If the score is registered
Game Playback GZ-EX355/EX310
During the DIGEST/Game Playback
Adjusting the Marked Playback Position
Digest Playback
Types of Digest Playback
Playback Playlist
Creating Playlists from the Recorded Videos a p
Playback Other File
Playing Back Still Images
During Still Image Playback
Slideshow Playback
Searching for a Specific Video/Still Image by Date
Deleting Files of a Selected Date:
Connecting to and Viewing on TV
Connecting via the Hdmi Mini Connector
Unnatural Displays on TV
Trouble Action
Operating in Conjunction with TV via Hdmi
Preparations
Operation Method
Turn off the TV This unit turns off automatically
Playing Back a DVD or Blu-ray Disc Created on this Unit
Connecting via the AV Connector
Digest Playback on a Blu-ray or DVD Player
Deleting the Currently Displayed File
Deleting Unwanted Files
Deleting Selected Files
Protecting Files
Protecting/Releasing Protection of Selected Files
Capturing a Still Image in the Video During Playback
Combining Videos Recorded by Seamless Recording
How to Enable Seamless Video Recording Again
Capturing a Required Part in the Video Trimming
Creating Playlists with Selected Files
Creating Playlists from the Recorded Videos
Division point may deviate slightly from the selected scene
Tap L on each screen to exit the menu
Creating Playlists by Date
Editing Playlists
Deleting Playlists
After arranging, tap Save Tap YES
Creating Discs with a BD Writer External Blu-ray Drive
Compatible BD Writers External Blu-ray Drives
Copying to Discs
Other Operations
Preparing a BD Writer External Blu-ray Drive Memo
Copying All Files
Creating a Disc
Preparing a BD Writer External Blu-ray Drive
Copying Files by Date
Copying
Copying Selected Playlists
Copying Selected Files
Copying
Playing Back with a BD Writer External Blu-ray Drive
Creating Discs with a DVD Writer
Creating Discs with a DVD Writer Preparing a DVD Writer
Preparing a DVD Writer CU-VD3 Preparing a DVD Writer CU-VD50
ALL Scenes video/ALL Images still image
100
All videos or still images in this unit are copied
101
102
After checking, tap J
103
104
105
Creating a Disc Using a Connected Blu-ray Recorder
Playing Back with a DVD Writer
Dubbing Files to a Disc by Connecting to a DVD Recorder
106
Dubbing Files to a VHS Tape by Connecting to a VCR
107
Using a USB External Hard Disk Drive
108
Compatible External Hard Disk Drives
Copying and Playback with a USB External Hard Disk Drive
109
Preparing a USB External Hard Disk Drive Memo
110
Playing Back Files in the USB External Hard Disk Drive
Back on this unit
Tap Playback
Deleting Folders in the USB External Hard Disk Drive
111
Formatting the USB External Hard Disk Drive
Copying Files to an SD Card GZ-EX355
112
Moving Files to an SD Card GZ-EX355
113
Copying to Windows PC GZ-EX355/GZ-EX310
114
Installing the Provided Software
115
Backing Up Files
116
Select the files to back up
117
Disconnecting this Unit from Computer
Recording Videos to Discs
Sort the files in your desired order Click Create Disk
118
DVD-R DVD-R DL DVD-RW
119
Backing Up Files Without Using Provided Software
Copy the files to any folder in the computer desktop, etc
120
List of Files and Folders
Copying to Windows PC GZ-E300
121
Telephone
Homepage
Installation Procedure Windows Vista/Windows
Installing the Provided Software Built-in
122
123
Backing Up All Files
English/German/French/Spanish +800-1532-4865 toll
Free
124
Organizing Files
125
Click on the recording day
126
DVD-R DVD-R DL DVD-RW DVD+R DVD+R DL DVD+RW
Avchd
For details, refer to the Pixela homepage
127
128
129
Copying to Mac Computer
IMovie and iPhoto
130
Wi-Fi Capabilities
Name of Function Capability
Operating Environment
Precautions on Using Wi-Fi
131
Settings Required in Advance
Image Monitoring via Direct Connection
132
Exporting/Bringing the Unit Overseas
Connecting the Smartphone to the Camera Wirelessly
Connection by entering the Wi-Fi password
Connection by Wi-Fi Protected Setup WPS
133
134
135
Computer Windows
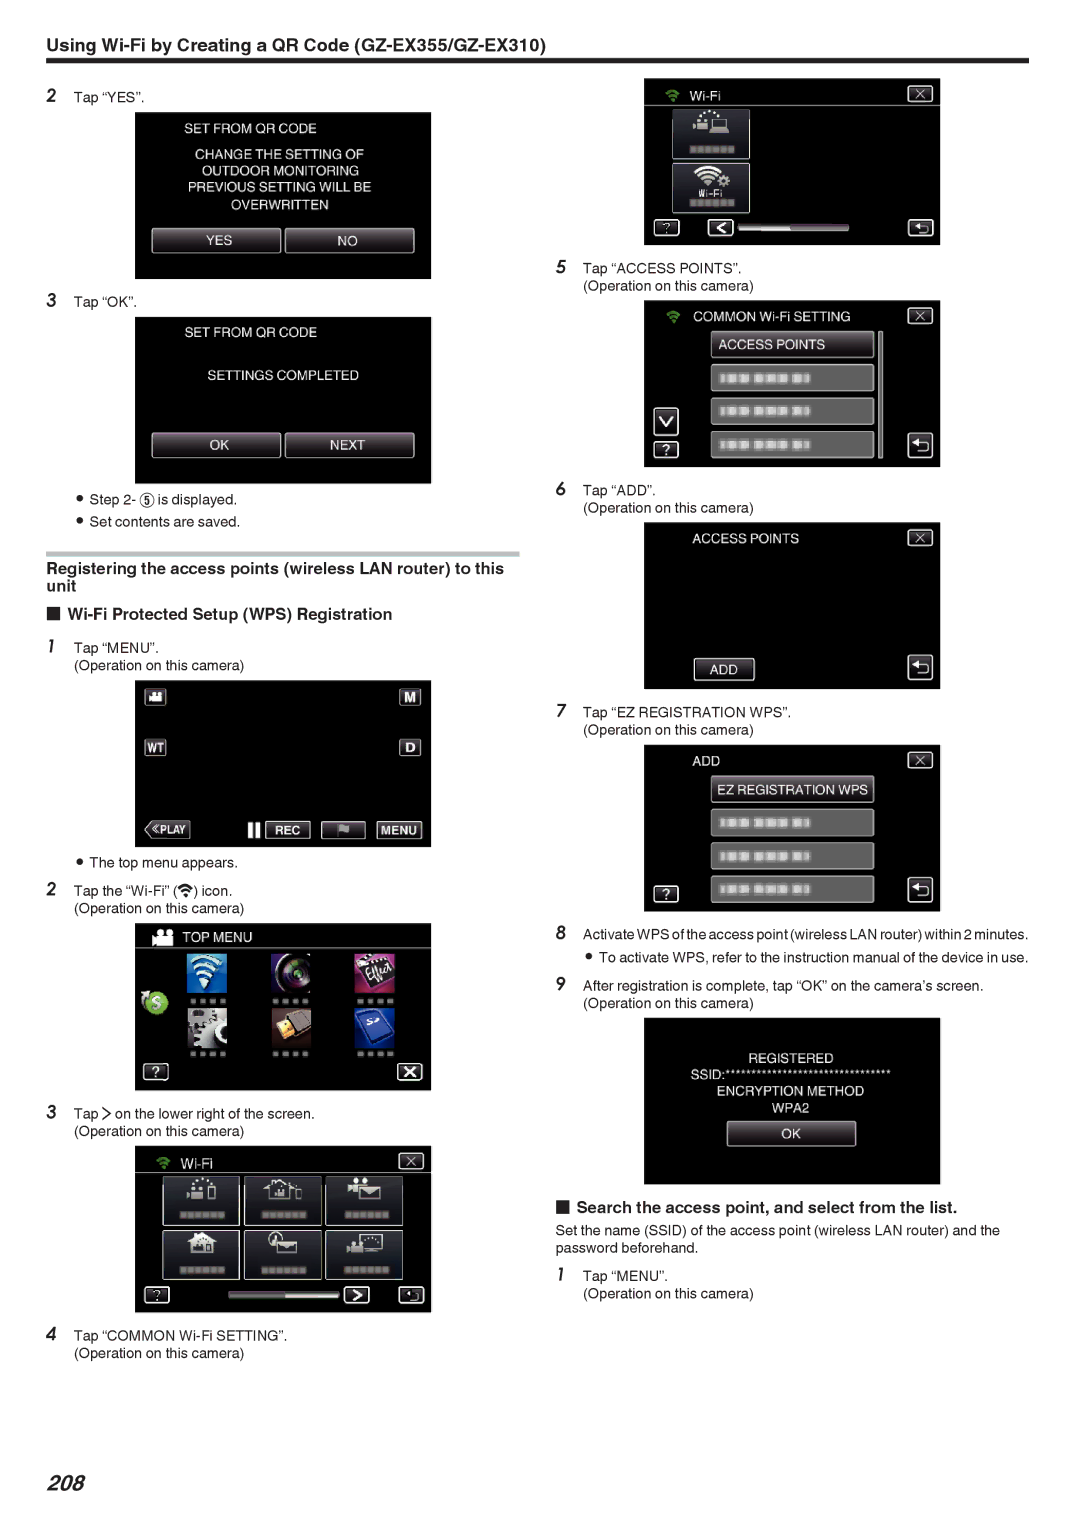
Search the access point, and select from the list
Wi-Fi Protected Setup WPS Registration
136
137
Operation on this camera
138
Operation on the smartphone
139
Monitoring from the computer Windows7
140
Image Monitoring via the Internet
Operation Method Operation on this camera Memo
141
Setting detection interval a p
142
143
Record and Send Videos via E-mail Video Mail
144
Image Monitoring on TV TV Monitoring
145
Easy Storage
146
Connection is established backup starts
Recording the Location Information
147
Smartphone
148
149
Using the Pan Cradle Sold Separately
Changing the setting of the AV terminal
Change the setting from the menu screen of the camera
150
Setting the camera to the pan cradle
151
Operations from the smartphone application
Indoor MONITORING/OUTDOOR Monitoring
Changing the Settings
152
Menu Settings
153
154
Changing the Http Port
155
Direct MONITORING/INDOOR MONITORING/OUTDOOR Monitoring
Setting the Enforced Group Owner Direct Monitoring
156
157
Setting the UPnP of this Camera Outdoor Monitoring
Obtaining a Dynamic DNS Ddns Account
Only the JVC dynamic DNS service can be set on this camera
Setting Dynamic DNS on this Camera Outdoor Monitoring
158
Setting the Sender’s E-mail Address of the Camera
159
160
Senders Email
Smtp Server
Smtp Port
Authenticate
161
Registering the Recipient’s E-mail Address of the Camera
Method
162
163
Setting Self Recording on this Camera DETECT/MAIL Setting
Registering the Access Points of the Camera to Connect
Access Points
164
165
Search and Register
166
Manual Registration
167
168
WPS PIN Registration
Editing LAN Settings of Access Points Wireless LAN Router
169
170
Setting the Password Direct Monitoring
Enabling the MAC Address Filter TV Monitoring
After setting, tap SET After checking, tap SET
171
Registering the MAC Address TV Monitoring
Checking the MAC Address of this Camera
Protecting the Network Settings with a Password
172
Initializing the Wi-Fi Settings
Change the setting via smartphone
173
Changing the Panning Speed
174
Tap High Speed or LOW Speed
Using Smartphone Applications
Installing Smartphone Applications Android Smartphone
175
Deleting the Application
176
177
Tap the scorecard
Team
Select the team, then tap OK
178
179
Screen display of the camera while recording the game score
Transferring Videos Avchd format
MP4
180
181
Transferring manually
182
Transferring Videos iFrame format
183
184
Transferring Still Images
185
Game Score Settings
Smartphone Application Settings
186
187
188
Using the Wi-Fi Function from a Web Browser
Indications on the Screen Recording Screen Memo
189
DETECT/MAIL Setting Screen
Video index Avchd Video index iFrame
190
Troubleshooting
Access Point Wireless LAN Router
191
Direct Monitoring
192
Indoor Monitoring connection at home
Outdoor Monitoring connection from the Internet
193
Confirming global IP address a p
194
Mail Notification Mail, Video Mail
195
Vide/Still Image Transmission
Wi-Fi Specifications
196
Direct Monitoring / Indoor Monitoring / Outdoor Monitoring
Video Mail
197
DETECT/MAIL
Audio Time AAC 48kHz 16 bits 2ch Max seconds
Still Image Transmission Jpeg
Indoor Monitoring
198
199
Display the screen for reading the QR code
Read a QR code
Tap Menu Operation on this camera
200
201
Operate from a smartphone
202
Tap Execute Top menu appears Tap the Wi-Fi Q icon
203
204
205
Operation on the smartphone Memo
206
Display the screen for reading the QR code Read a QR code
207
Tap Menu Read a QR code Operation on this camera
Tap YES Tap OK Is displayed Set contents are saved
208
209
210
211
212
Mail address set the sender’s e-mail address
Tap OK Is displayed Set contents are saved
213
214
Regular Operation Sending a Notification Mail
215
Check the incoming e-mail
216
Is displayed Set contents are saved
217
218
Regular Operation Record videos to send a video mail
219
Registering the access points wireless LAN router to this
Unit Wi-Fi Protected Setup WPS Registration
220
Tap SET from QR Code Tap Menu Operation on this camera
221
Connecting This Camera to the TV
Regular Operation Connect the TV to the access point
222
223
224
Operating the Menu
Operating the Top Menu
Shortcut Menu During Video Recording Mode
Shortcut Menu During Still Image Recording Mode
225
Operating the Shortcut Menu
Record Setting Menu video
226
227
228
Video Quality
Zoom
Zoom MIC
229
MIC Level Setting
K2 Technology
Special Recording Menu video
230
SELF-TIMER
Record Setting Menu still image
231
Image Size
232
Sets the image size number of pixels for still images
Special Recording Menu still image
233
Playback Setting Menu video
234
Search Date
Display DATE/TIME
Edit Menu video
235
236
Playback Setting Menu still image
Slide Show Effects
Edit Menu still image
237
Copy GZ-EX355
Move GZ-EX355
Setup video/still image
238
239
240
Open Source Licenses recording only
Connection Settings video/still image
241
Media Settings video/still image
242
243
Front Rear
244
Interior
Bottom
245
246
LCD Monitor
LCD Monitor
Common Recording Indications Video Recording
247
Still Image Recording Video Playback
248
Still Image Mode
Still Image Playback
249
Folder Number File Number Date/Time
Turning Off the Power
When the unit is not working properly
250
Recording
Battery Pack
251
Playback
Card
252
Editing/Copying
253
Screen/Image
Computer
254
Other Problems
255
Error Message?
256
257
Camcorder
Lens/LCD Monitor
258
Wipe this unit with a dry, soft cloth to remove any dirt
Connectors
Camera
Video Avchd
Videos iFrame GZ-EX355/GZ-EX310
Battery Pack BN-VG107U GZ-E300
Battery Pack BN-VG114U GZ-EX355/GZ- EX310
Still Image
AC Adapter AC-V11U