|
|
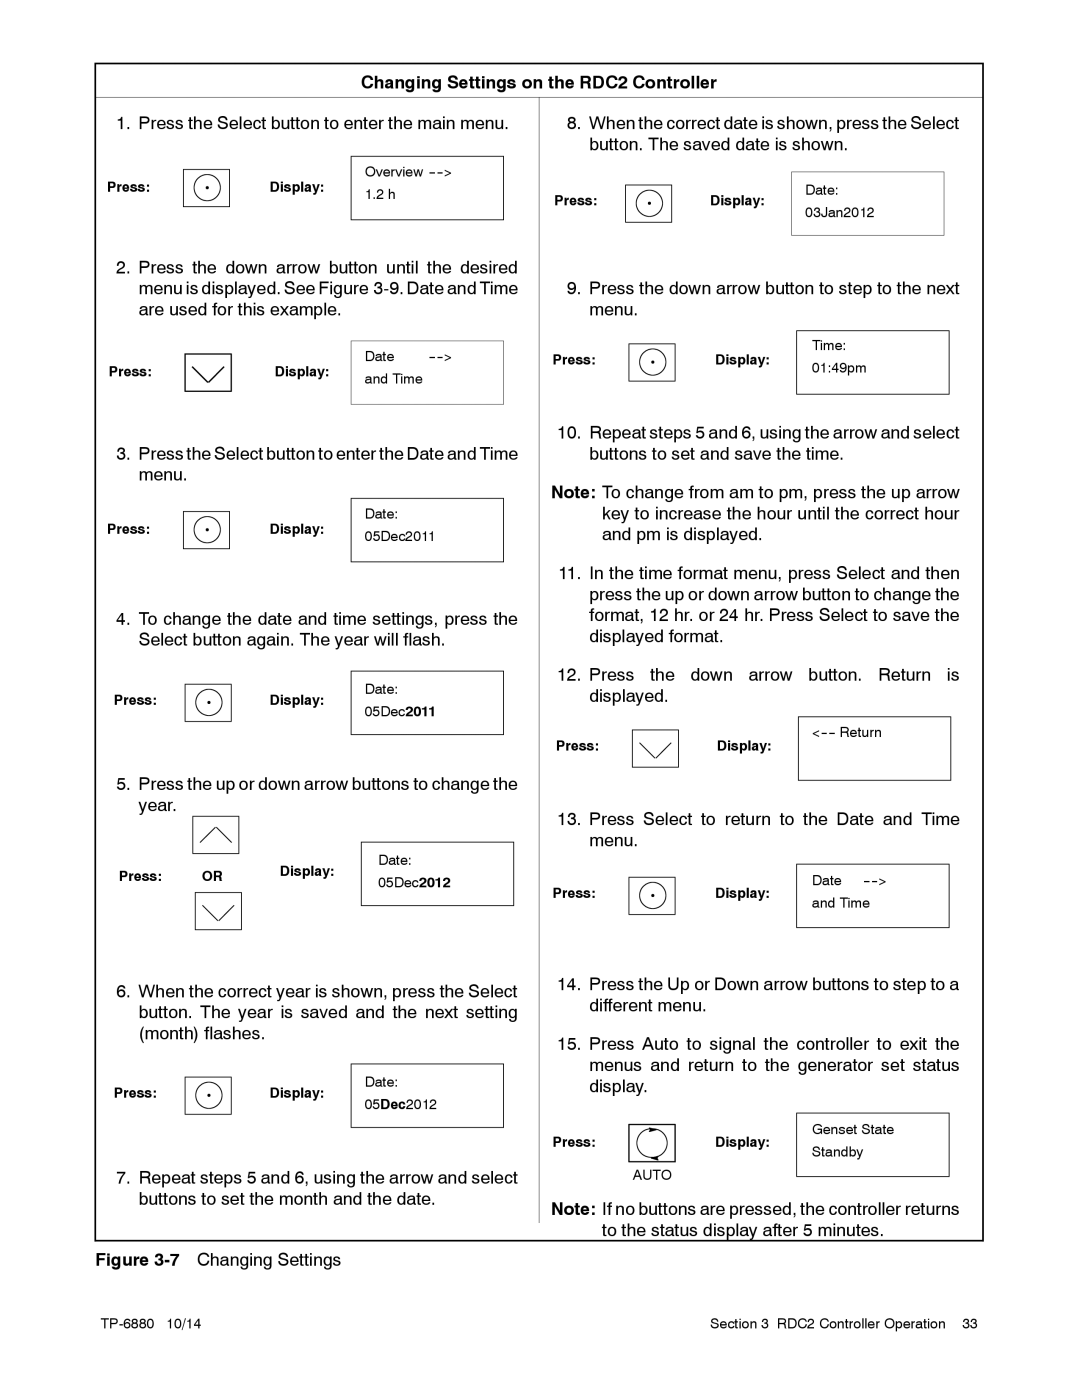
| Changing Settings on the RDC2 Controller |
|
| |||
1. Press the Select button to enter the main menu. | 8. When the correct date is shown, press the Select | |||||||
|
|
|
|
| button. The saved date is shown. |
| ||
Press: |
| Display: | Overview |
|
|
|
| |
| 1.2 h |
| Press: | Display: | Date: |
| ||
|
|
|
|
|
| |||
|
|
|
|
| 03Jan2012 | |||
|
|
|
|
|
|
| ||
2. Press the down arrow button until the desired |
|
|
|
| ||||
menu is displayed. See Figure | 9. Press the down arrow button to step to the next | |||||||
are used for this example. |
|
| menu. |
|
|
| ||
|
|
| Date | Press: | Display: | Time: |
| |
Press: |
| Display: | 01:49pm | |||||
| and Time |
|
|
| ||||
|
|
|
|
|
|
|
| |
|
|
|
|
| 10. Repeat steps 5 and 6, using the arrow and select | |||
3. Press the Select button to enter the Date and Time | buttons to set and save the time. |
| ||||||
menu. |
|
|
|
| Note: To change from am to pm, press the up arrow | |||
|
|
|
|
| ||||
Press: |
| Display: | Date: |
| key to increase the hour until the correct hour | |||
| 05Dec2011 | and pm is displayed. |
|
| ||||
|
|
|
|
| 11. In the time format menu, press Select and then | |||
|
|
|
|
| press the up or down arrow button to change the | |||
4. To change the date and time settings, press the | format, 12 hr. or 24 hr. Press Select to save the | |||||||
Select button again. The year will flash. | displayed format. |
|
| |||||
|
|
| Date: |
| 12. Press the | down arrow button. | Return is | |
Press: |
| Display: |
| displayed. |
|
|
| |
| 05Dec2011 |
|
|
| ||||
|
|
|
|
|
|
| ||
|
|
|
|
| Press: | Display: | ||
|
|
|
|
|
|
| ||
5. Press the up or down arrow buttons to change the |
|
|
|
| ||||
year. |
|
|
|
| 13. Press Select to return to the Date and Time | |||
|
|
|
|
| ||||
|
|
|
|
| menu. |
|
|
|
Press: | OR | Display: | Date: |
|
|
|
|
|
05Dec2012 |
|
| Date | |||||
| Press: | Display: | ||||||
|
|
| ||||||
|
|
|
|
| and Time | |||
|
|
|
|
|
|
| ||
6. When the correct year is shown, press the Select | 14. Press the Up or Down arrow buttons to step to a | |||||||
different menu. |
|
| ||||||
button. The year is saved and the next setting |
|
| ||||||
|
|
|
| |||||
(month) flashes. |
|
|
| 15. Press Auto to signal the controller to exit the | ||||
|
|
|
|
| ||||
|
|
| Date: |
| menus and return to the generator set status | |||
Press: |
| Display: |
| display. |
|
|
| |
| 05Dec2012 |
|
|
|
| |||
|
|
|
|
|
|
| ||
|
|
|
|
| Press: | Display: | Genset State | |
|
|
|
|
| Standby | |||
|
|
|
|
|
|
| ||
7. Repeat steps 5 and 6, using the arrow and select | AUTO |
|
|
| ||||
buttons to set the month and the date. | Note: If no buttons are pressed, the controller returns | |||||||
|
|
|
|
| ||||
|
|
|
|
| to the status display after 5 minutes. | |||
Figure |
|
|
|
|
|
| ||
Section 3 RDC2 Controller Operation 33 |