LD060/LD075
Operators Guide
Copy Reference Guide
your document management partner
a means POWER ON. c means STAND BY
Power Source
Introduction
What You Can Do With This Machine
Types of Duplex Copies
Open to Left
Copying Book Originals
Open to Right
Combining Multiple Pages onto a Single Page p.45 1 Sided Combine
Copying Originals Such as Books
p.48 Series Copies
1 Sided
TABLE OF CONTENTS
How to Read this Manual
Basic Procedure
1. Placing Originals
4. Troubleshooting
3. Program
Storing Originals in the Document Server
Programs
5. User Tools Copy/Document Server Features
6. Specifications
User Tools Menu Copier/Document Server Features
Accessing User Tools Copy/Document Server Features
How to Read this Manual
Symbols
Preparation
Limitation
Machine Types
Functions that Require Options
Required options
2. Indicators
10. Main power indicator, On indi- cator
Control Panel
1. Screen Contrast knob
11. Operation switch
19. Function Status indicator
Common Key Operations
12. Clip Tray
Page
Sizes and Weights of Recommended Originals
1. Placing Originals
Originals
Metric version
Sizes Detectable by Auto Paper Select
Document feeder Sizes difficult to detect
Exposure glass
Originals
Missing Image Area
0.5 mm, 0.02”
0.5 mm - 3.5 mm, 0.02” - 0.14”
1 mm or more, 0.04” or more
Direction-fixed paper or 2-sided paper
Placing Originals
Original Orientation
1. Document feeder 2. Exposure glass
A Press the Special Original key
When copying originals of various sizes
When placing originals one by one
When placing originals consisting of more than 100 pages
When placing custom size originals
Batch mode
A Set the document guide to the original size
B Align the edges of the original
1. Limit mark 2. Document guide
SADF mode
Mixed Size mode
B Press the SADF key, and then press the OK key
C Place one page of an original, and then press the Start key
D Adjust the guide to the widest original size
Placing Custom Size Originals
1. Place into the document feeder 2. Vertical size
E Place aligned originals face up into the document feeder
Basic Procedure
How to Operate
When clearing entered values
To confirm settings
When the machine keeps copying
When the originals stop scanning
A Set the copy contents while “Se- lect copy mode and press Start”
C When the copy job is finished, remove originals and copies
Job Preset
Editing Job Preset
A Press the New Job key when Copying is shown
B Set up the next copy job
To check job contents
To change job contents after checking
To delete a job after checking its contents
Deleting a Preset Job
1. Originals 2. Tab stock 3. Copies
A Select the paper tray where the tab sock is set
B Place originals, and then press the
Copying from the Bypass Tray
When copying onto standard size paper
When copying onto custom size paper
A Open the bypass tray
1. Extender
When copying onto special paper
A Press the # key B Select paper type in Special paper
C Press the OK key
2 D Place your originals, and then press the Start key
Adjusting Copy Image Density
adjust image density
B Press the Lighter or Darker key to adjust the density
A Press the Auto Image Density key to cancel it
Selecting Original Type Setting
When the original type keys are not displayed
Select this mode when your origi
Text
Auto Paper Select
Selecting Copy Paper
Manual Paper Select
When the paper type keys are not displayed
Auto Paper Select
Manual Paper Select
A Make sure that the Auto Paper Select key is selected
Rotated copy
Preset Reduce/Enlarge
1. Base point when setting on the ex- posure glass
2. Base point when setting on the document feeder
Base Point
B Adjust the ratios with the n or o keys
Zoom
Create Margin Mode
To select a ratio with the n and o keys
Auto Reduce/Enlarge
To enter a ratio with the number keys
A Press the Mag. Ratio key
B Enter the desired ratio with the number keys C Press the # key
Size Magnification
Directional Magnification %
A Press the Reduce/Enlarge key B Press the Specifd. Ratio key
C Make sure the Size Magnification key is highlighted
C Adjust the ratio using the n or o keys
D Press the Vertical key E Adjust the ratio with the n or o keys
Directional Size Magnification mm
To specify a ratio with the n and o keys
Sort
Sort
Rotate Sort
C Press the Dir. Size Mag mm key
When a finisher is not installed
When the Booklet Finisher is installed
Shift Sort
A Press the Sort or Rotate Sort key
Stack
Staple
An optional finisher is required to use this function
A Press the Stack key
Finisher 3000M50-sheet staples
Stapling position and original setting
Finisher 3000B100-sheet staples
Finisher 3000B100-sheet staples, Finisher 3000M50-sheet staples
Booklet Finisher
A Select one of the stapling posi- tions
Sample Copy
Changing the Number of Sets
B Press the Sample Copy key
C If the sample is acceptable, press the Print key
2 holes
Punch
3 holes 4 holes
Punch hole positions
42 dicate direction of delivery
Direction in which Original is Set
Exposure glass
Duplex
1 Sided → 2 Sided
2 Sided → 2 Sided
Originals and Copy Direction
A Press the Dup./Combine/Series
Original Direction and Completed Copies
1 Sided Combine
2 Sided, 1 Page → Combine 1 Side
2 Sided, 2 Pages → Combine 1 Side
2 Sided, 4 Pages → Combine 1 Side
Orientation of the Original and Image Position of Combine
Placing Originals Originals Placed in the Document Feeder
A Press the Dup./Combine/Series key
C Select the number of originals to combine D Select the paper
2 Sided Combine
1 Sided, 16 Pages → Combine 2 Side
2 Sided, 4 Pages → Combine 2 Side
2 Sided, 8 Pages → Combine 2 Side
Book → 1 Sided
Series Copies
2 Sided, 16 Pages → Combine 2 Side
Book → 2 Sided
Front & Back → 2 Sided
B Press the Series/Book key
→ 2 Sided, then press the OK key D Press the OK key
2 Sided→1 Sided
Copying Book Originals
1 Sided → Booklet
E Make sure that the Auto Paper Se- lect key is selected
Open to Right
2 Sided → Magazine
How to fold and stack copies to make a magazine
How to fold copies to make a booklet
Open to Left
Open to Right
Image Repeat
Original A5K/Copy paper A4K
Original A5K/Copy paper A4L or Original A5L/Copy paper A4K
H Place your originals, and then press the Start key
Double Copies
A Press the Edit/Stamp key B Press the Edit Image key
C Press the Double Copies key. D Press the OK key
E Press the OK key F Select the paper
1. Point where the machine starts scanning
Centering
Scanning Position
A Select the paper B Press the Edit/Stamp key
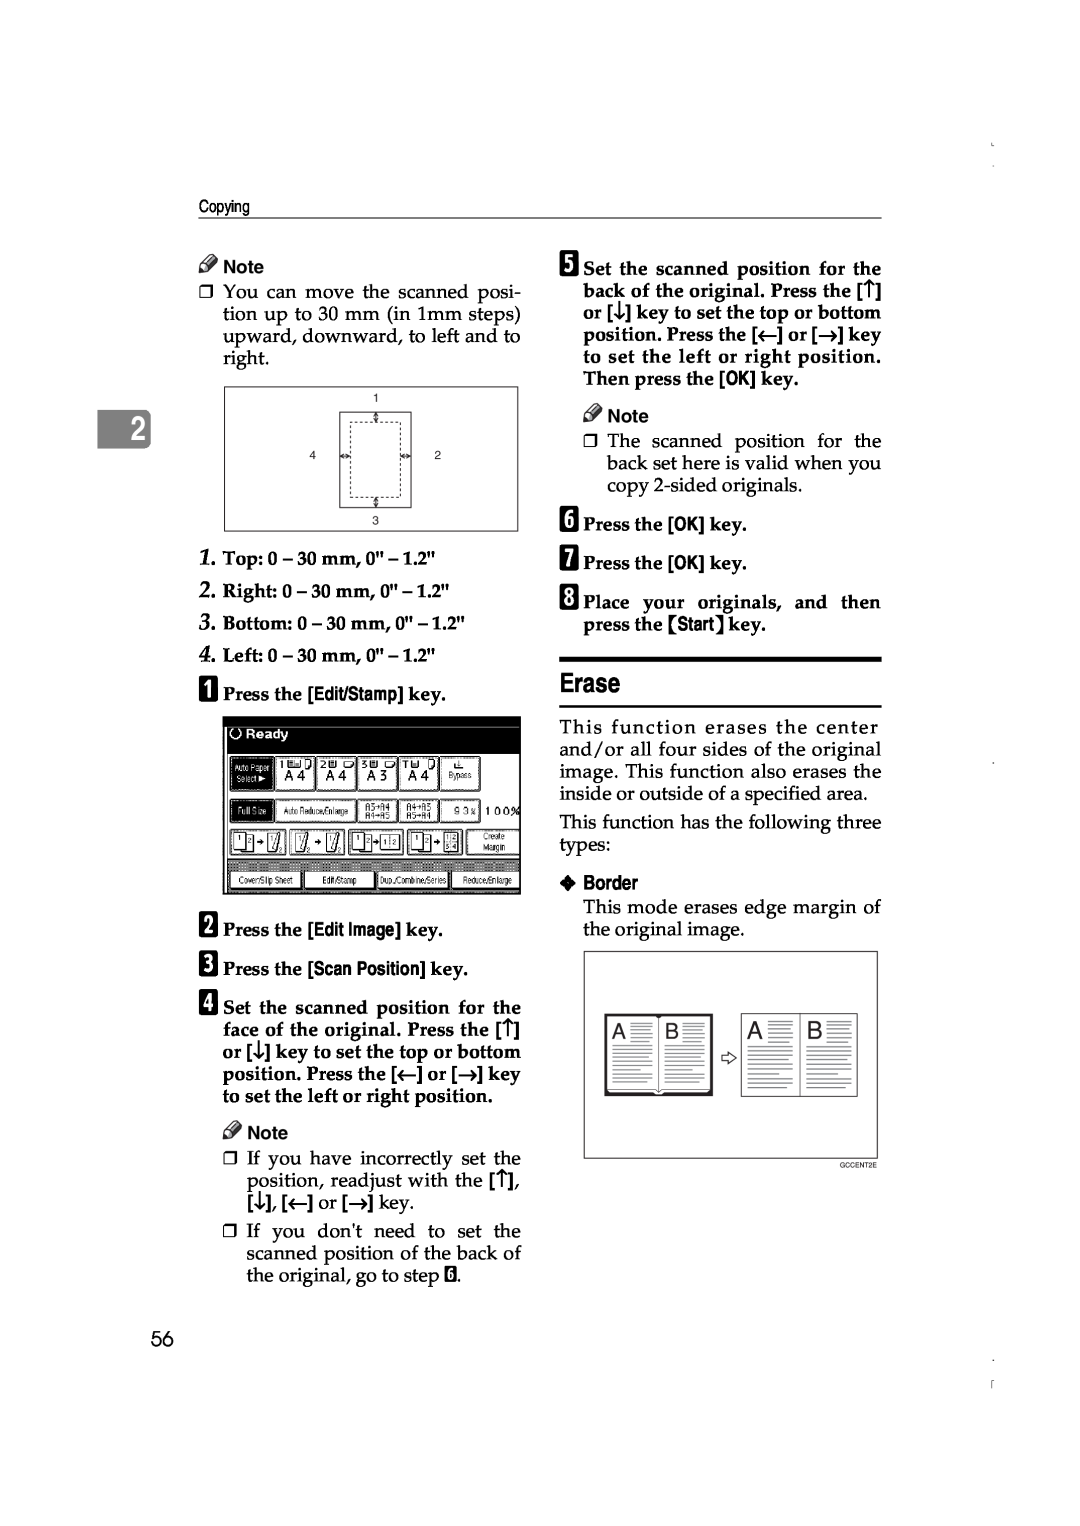
Erase
Border
1. Top 0 - 30 mm, 0 2. Right 0 - 30 mm, 0 3. Bottom 0 - 30 mm
4. Left 0 - 30 mm, 0 A Press the Edit/Stamp key
Center
Center/Border
Outside
Border Erase
E Press the 2-sided Setting key and the Back Side key
F Press the 2-sided Setting key and the Back Side key
Selecting Same Width
Selecting Diff. Width
Center/Border Erase
H Press the OK key
I Place your originals, and then press the Start key
A Press the Edit/Stamp key
I Press the 2-sided Setting key and the Back Side key
Inside Erase
Outside Erase
B Press the Edit/Stamp key C Press the Erase key
A Press the 3 Edges Full Bleed key
3 Edges Full Bleed
B Place your originals, and then press the Start key
Margin Adjustment
Preset Stamp
Background Numbering
G Press the OK key H Set your originals, then press the Start key
A Press the Edit/Stamp key B Press the Stamp key
F After you specify all the desired settings, press the OK key
Changing stamp position, size and density
Stamp Position and Original Direction
E Press the All Pages or 1st Page on- ly key to select the print page
F After making all settings, press the OK key G Press the OK key
User Stamp
Stamp position and original orientation
C Press the User Stamp key. D Select the stamp you require
er/Document Server features ap
have settings in them
the General Settings Guide
Features key
C Press the Copier/Document Server Features key
Date Stamp
To delete the user stamp
L Press the Exit key M Press the Exit key
E After all settings are complete, press the OK key
To change the date format
B Press the Stamp key C Press the Date Stamp key
D Press the All Pages or 1st Page on- ly key to select the print page
Page Numbering
Stamp position and orientation of originals
A Press the left bottom Change key
B Select the desired Date Stamp po- sition, and then press the OK key
E After you have made all desired settings, press the OK key
Changing the stamp position
Specify the first printing page and start number
If you selected P1,P2…, -1-,-2-…, P.1, P.2…, 1, 2…
If you selected 1/5, 2/5…
F When page designation is com- plete, press the OK key
C Press the # key
To change settings after press
Covers
If you selected 1-1, 1-2,…
Front Cover
Designate
Front/Back Covers
Copy
A Press the Cover/Slip Sheet key
I When you wish to finish specify- ing pages, press the OK key
Chapter
J Press the OK key
L Set originals, then press the
H When you finish specifying the pages, press the OK key
Blank Slip Sheets
A Press the Cover/Slip Sheet key B Press the Desig./Chapter key
C Press the key to select a chapter number D Press the Chapter key
J When you have finished specify- ing all settings, press the OK key
When using OHP transparencies set on the bypass tray
Slip Sheets
D Press the Insert Sheet key
B Press the Slip Sheet key
C Select Copy or Blank, and then press the OK key
D Select the paper tray that contains paper for copying originals
E Place originals, and then press the
B Enter a file name, user name, or password if neccessary
E Make scanning settings for the original F Press the Start key
Storing Originals in the Document Server
A Press the Stored File key
3. Program
Programs
Storing a Program
B Press the Program key
A Check the program settings
Deleting a Program
Recalling a Program
Changing a stored program
C Press the program number you want to recall
Stored settings are displayed
Only programs with m against them contain a program
Programs
Program
4. Troubleshooting
When a Message is Displayed
If Your Machine Does Not Operate as You Want
Messege
If You Cannot Make Clear Copies
Problem
If You Cannot Make Copies As You Want
Troubleshooting
When Memory Is Full
Solution & Reference
Message
Print Inquiry List key to clear
Troubleshooting
5. User Tools Copy/Document Server Features
User Tools Menu Copier/Document Server Features
Default Settings
User Tools Item Names
User Tools Copy/Document Server Features
User Tools Menu Copier/Document Server Features
Default Settings
User Tools Copy/Document Server Features
User Tools Item Names
Default Settings
User Tools Menu Copier/Document Server Features
User Tools Item Names
Default Settings
User Tools Menu Copier/Document Server Features
Accessing User Tools Copy/Document Server Features
switch is turned off, or the Clear
B Press the Copier/Document Server Features key
Exiting From User Tools
General Features 1/5
Auto Tray Switching
Auto Paper Select Priority
1. Original 2. Paper Tray 3. Paper Tray 4. Paper Tray
Paper Display
Original Type Priority
Original Type Display
Auto Image Density Priority
General Features 2/5
General Features 3/5
General Features 4/5
Duplex Mode Priority
General Features 5/5
Priority Setting Reduce
Priority Setting Enlarge
Reproduction Ratio 2/2
Edit 1/2
Front Margin Left/Right
Back Margins Left/Right
Front Margin Top/Bottom
Image Repeat Separation Line
Edit 2/2
Double Copies Separation Line
Separation Line in Combine
Copy Back Cover
Front Cover Copy in Combine
Copy on Designating Page in Com- bine
Preset Stamp 1/4-4/4 Stamp Priority
Stamp
Background Numbering Size
Density
Stamp Setting
Date Stamp Format
Font
Size
Switch to Batch SADF
SADF Auto Reset
Input/Output 1/2
Rotate Sort Auto Paper Continue
Input/Output2/2
Select Stapling Position Bottom Right
Select Stack Function
Select Punch Type
Eject Copy Face Up/Down in Bypass Mode
Letterhead Setting
Eject Copy Face Up/Down in Glass
6. Specifications
Combination Chart
Specifications
Function
first
ZGVX110E
Supplementary Specifications
Preset Enlarge/Reduce
Batch Mode
Bypass Tray Copy
Zoom
Ratio %
Original → Copy paper size
Original → Copy paper size
Auto Reduce/Enlarge
Size Magnification
Directional Size Magnification
Copy tray
Copies
Number of
3000M50
are as follows
Stack
A3L and A4 K B4 L and B5 K 11” ⋅ 17”L and Letter 8”1/2 ⋅ 11”K
Paper Sizes and
Number of the Stapled
Orientation
Number of the Sheets
Punch
Booklet Finisher, Finisher 3000M50-sheet staples
Duplex
Combine
Copying Book Originals
Repeat
1. Base point
3. Vertical length
Margin Adjustment
Preset Stamp
Centering
Erase
Date Stamp
Page Numbering
Designate
Front Cover, Front/Back Cover
Slip Sheets
INDEX
Page
priority setting − enlarge
duplex back page stamping position
page numbering in combine
position and original orientation
Page
MEMO
EE GB B064