Manuals
/
Nikon
/
Computer Equipment
/
Scanner
Nikon
LS8000
user manual
Parts of the Scan Window, 118
Models:
LS8000
1
128
148
148
Download
148 pages
634 b
125
126
127
128
129
130
131
132
Troubleshooting
Specifications
Install
Connecting the Scanner
Maintenance
Accessories
Setup
Adjust scan settings
Settings Menu Color Model Menu
Cleaning the Scanner
Page 128
Image 128
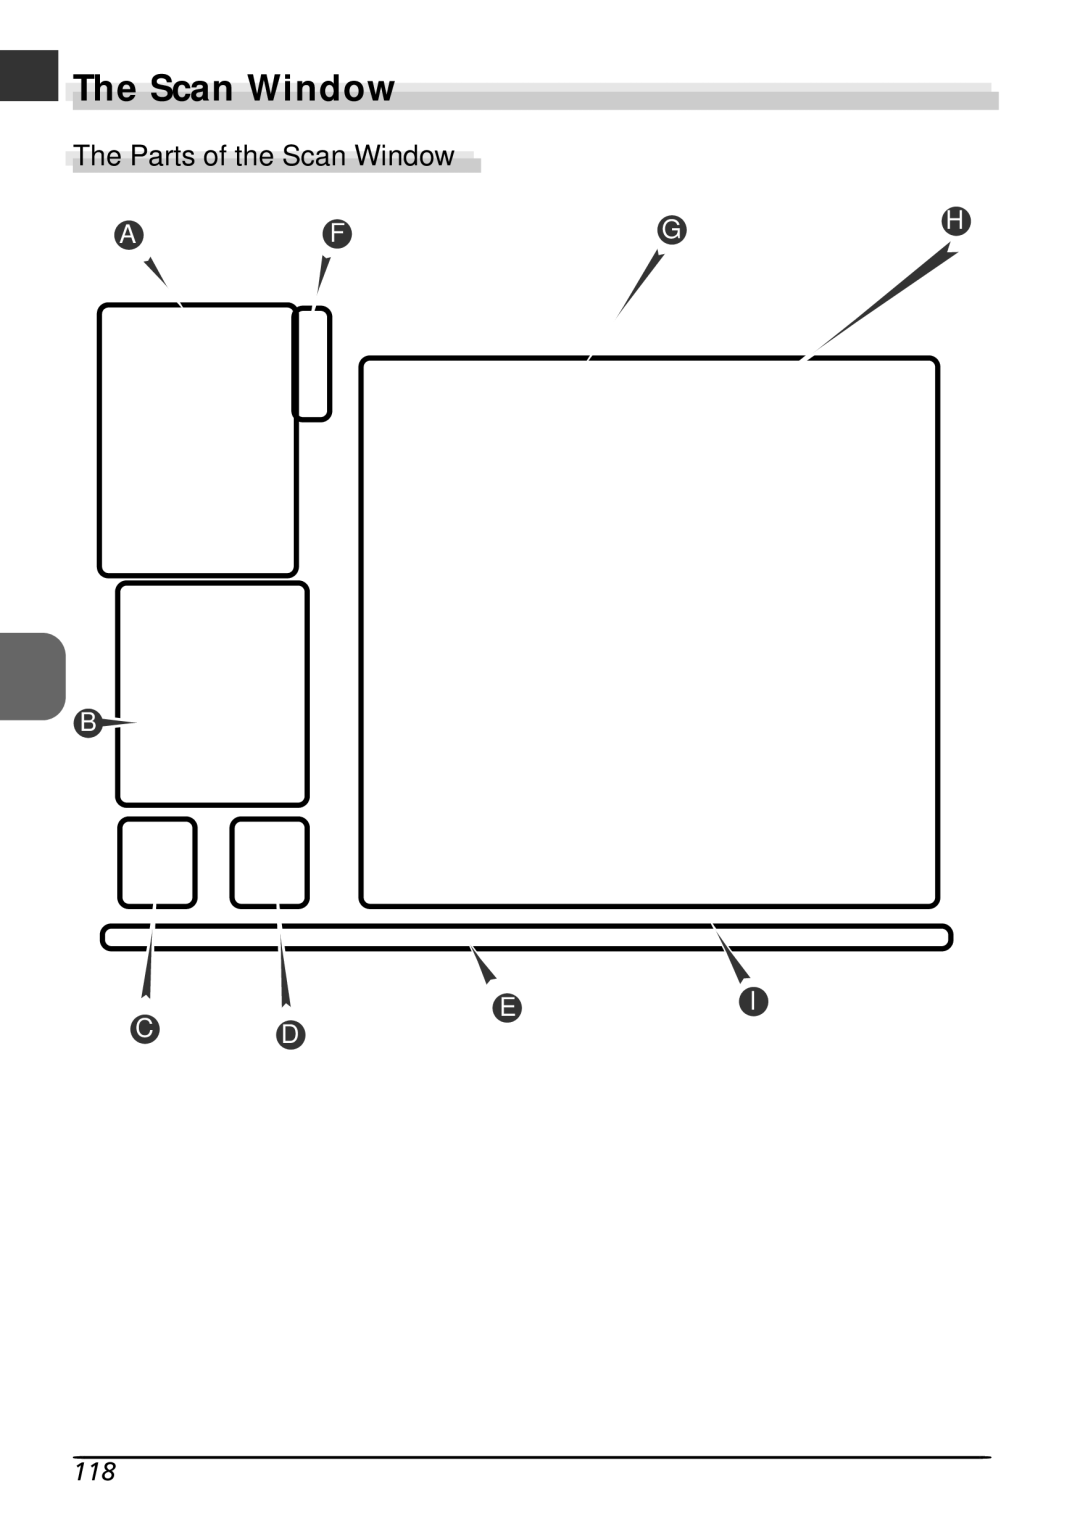
The Scan Window
The Parts of the Scan Window
A
F
G
H
B
E
I
C
D
118
Page 127
Page 129
Page 128
Image 128
Page 127
Page 129
Contents
Windows Only
Scanning Guide
Product Documentation
User’s Manual this manual
For Your Safety
Do not disassemble or modify
Use an appropriate power supply
Iii
Page
Trademark Information
Table of Contents
Vii
Film Holders for the 8000 ED
Nikon Scan
Reference
Introduction
Viii
Illustrations
Life-Long Learning
Setup
Before Using Your Scanner
Using the Scanner with a Windows Computer
Before Using Your Scanner
Connecting the Scanner
Status LED
Get to Know Your Scanner
Your Scanner
Accessories
SUPERCOOLSCAN8000ED
Keep the Holder Slot Closed
Choose a Location
Protect Your Film
Connecting Ieee 1394/Firewire Devices
Installing the Ieee 1394/Firewire Interface Board
Installing the Interface Board
Page
Select Control Panel from the Start
Device Manager…
Windows 2000 Professional
Windows Millennium Edition Me
Windows 98 Second Edition SE
Page
Nikon Scan 3 Version
Installing Nikon Scan
Installing Nikon Scan under Windows
Welcome Window
Installation
ROM drive. When the Welcome dia
What to do when the CD-ROM does not start automatically
Log is displayed, click Nikon Scan
Click Next to install Nikon Scan 3 to
Folder for Nikon Scan 3 shown
Wizard dialog displays the dialog
Shown at right. Click Windows
Page
Installing Nikon Scan on a Macintosh
Memory Requirements under Mac OS
Install Location menu and click
Install
Once the Nikon Scan program files
Have been copied to disk, a color-space
Selection wizard will be displayed
Click Use Wizard to have the wizard
Quire plug-ins. The installer will dis
Applications currently installed on
Click Cancel to complete installation
Installation is complete. Click Restart
Connecting the Interface Cable
Connecting the Scanner
Connect the Power Cable
Turn the Scanner On
For more information on
Device Registration
Windows XP Home Edition/Windows XP Professional
Registering the Scanner with Windows XP
Insert the Nikon Scan 3 CD
Logging On
Select ls8000xp.inf
Select ls8000xp.inf in the list of drivers and click Next
Confirming Device Registration Windows XP
Click System
Display the Device Manager
System Properties dialog will be dis
Confirm that the scanner is working properly
Double-click the listing for your scanner
Driver…
Click Reinstall Driver…
Updating the Device Driver Windows XP
Select ls8000xp.inf
Windows 2000 Professional
Registering the Scanner with Windows 2000 Professional
Select Specify a location and click Next
Select Specify a location
Click Browse…
Click Next
Begin installation of the device drivers
Confirm the file path
Page
Confirming Device Registration Windows 2000 Professional
Icon
Confirm that the scanner is working properly
Click Update Driver…
Open the Driver tab and click Update
Updating the Device Driver Windows 2000 Professional
Scanner Properties dialog
Page
Windows Millennium Edition Me
Registering the Scanner with Windows Me
Next
Select LS8000ME.INF
Page
Confirming Device Registration Windows Me
Confirm that the scanner is working properly
Updating the Device Driver Windows Me
Select the search option
Select LS8000ME.INF in the list of driv- ers and click OK
Windows 98 Second Edition SE
Registering the Scanner with Windows 98 SE
Turn the computer on
Computer via the Ieee 1394 cable
Browse
3b Insert the Nikon Scan 3 CD
Select Specify a location and click
Click Finish Click Finish to complete installation
Select the Win98SE folder
Confirming Device Registration Windows 98 SE
Confirm that the scanner is working properly
Open the Driver tab and click Reinstall
When the Update Device Driver wizard is
Updating the Device Driver Windows 98 SE
Erties dialog
Select the Win98SE folder
Scanning
Ready the Film
Insertion guide Upper cover Hooks ⋅
Place the Film in the Holder
Scanning Single Strips
Perforations Openings Direction of insertion
Insert the Holder
Inserting Holders
Scan the Slide
Making a Scan
Windows
Mac OS 9 or Earlier
Using Nikon Scan
Using Nikon scan for the First Time
Choose the type of film to be scanned
From the Nikon Scan media-type
Choose the frames to be scanned
Scroll bar Drag to enlarge thumbnail area
Preview button
Click the Preview button
Preview will be displayed in the preview area
Adjust scan settings
Tools button
Rotate or flip the image
Click
Page
Choose an output size and resolution
Resolution
Page
Adjust color, contrast, and sharpness
Page
Click the Scan button to begin scanning
Image Windows
Page
Sliding cover
Turn the scanner off
Windows Me
Film Holders for the 8000 ED
Holders Provided with Your Scanner
Frames in length
FH-835S holder for 35-mm film strips
Mounted 35-mm slides
Using the FH-835S Holder for 35-mm Film Strips
Page
Perforations Openings
Masking Sheets
Inserting Film and Masking Sheets
Removing Film from the Holder
Using the FH-835M Holder for Mounted 35-mm Slides
Page
Removing Slides from the Holder
Using the FH-869S Holder for Brownie Film
Film stop
Curled Film
Removing Film from the Holder
Optional Holders
Mounted medium-format Film
FH-869M holder for mounted Brownie film
FH-869GR glass-covered rotating holder for Brownie film
FH-816 16-mm film holder
FH-8G1 medical holder
Using the FH-869M Holder for Mounted Brownie Film
Direction Insertion
Removing Slides from the Holder
Using the FH-869G Glass-Covered Holder for Brownie Film
100
Placing Seals Between Frames
101
102
103
104
105
106
Using the FH-816 Holder for 16-mm Film Strips
107
108
109
110
111
Using the FH-8G1 Medical Holder
112
113
114
115
Scan Window 118
Double-click the Setup Windows or installer Macintosh icon
116
To Step
CD-ROM drive labeled Nikon
Follow the on-screen instructions to complete installation
117
118
Scan Window
Parts of the Scan Window
119
Settings Menu Color Model Menu
Control Area
120
Eject Button Autofocus Button
Window Buttons
121
Media Type Menu
Orientation Dimensions/File Size
Information Panel
122
Image Enhancement
Preview Button
Thumbnail Drawer Tab
Processed/Natural Tabs
123
Tool Chest
124
Layout Tools Information
Crop
Analog Gain
125
Unsharp Mask Digital ICE Cubed
Scan Progress Window
126
Reference
127
Maintenance
Caring for Your Scanner
128
Storing the Scanner
Cleaning the Scanner
Disconnect the power and interface cables
129
Transporting the Scanner
Cleaning
Caring for Holders
130
Storage
Or removed Status LED flashes
Troubleshooting
131
132
To computer Quality of scanned Images is poor
133
134
Specifications
Scanner Specifications
135
Holder Specifications
136
FH-835S Holder for 35-mm Strip Film
FH-835M Holder for 35-mm Slide Mounts
Specifications for Optional Holders
137
Index
138
Top
Page
Image
Contents

 The Scan Window