Manuals
/
Nikon
/
Computer Equipment
/
Network Hardware
Nikon
UT-1 Display ftp site properties, Right-clickDefault FTP Site and select Properties
Models:
UT-1
1
119
140
140
Download
140 pages
61.83 Kb
116
117
118
119
120
121
122
123
Troubleshooting
Specifications
Install
Loss of Signal
Password
Interval Timer Photography
Login
Open Administrative Tools
Wireless Networks
Supplied Accessories
Page 119
Image 119
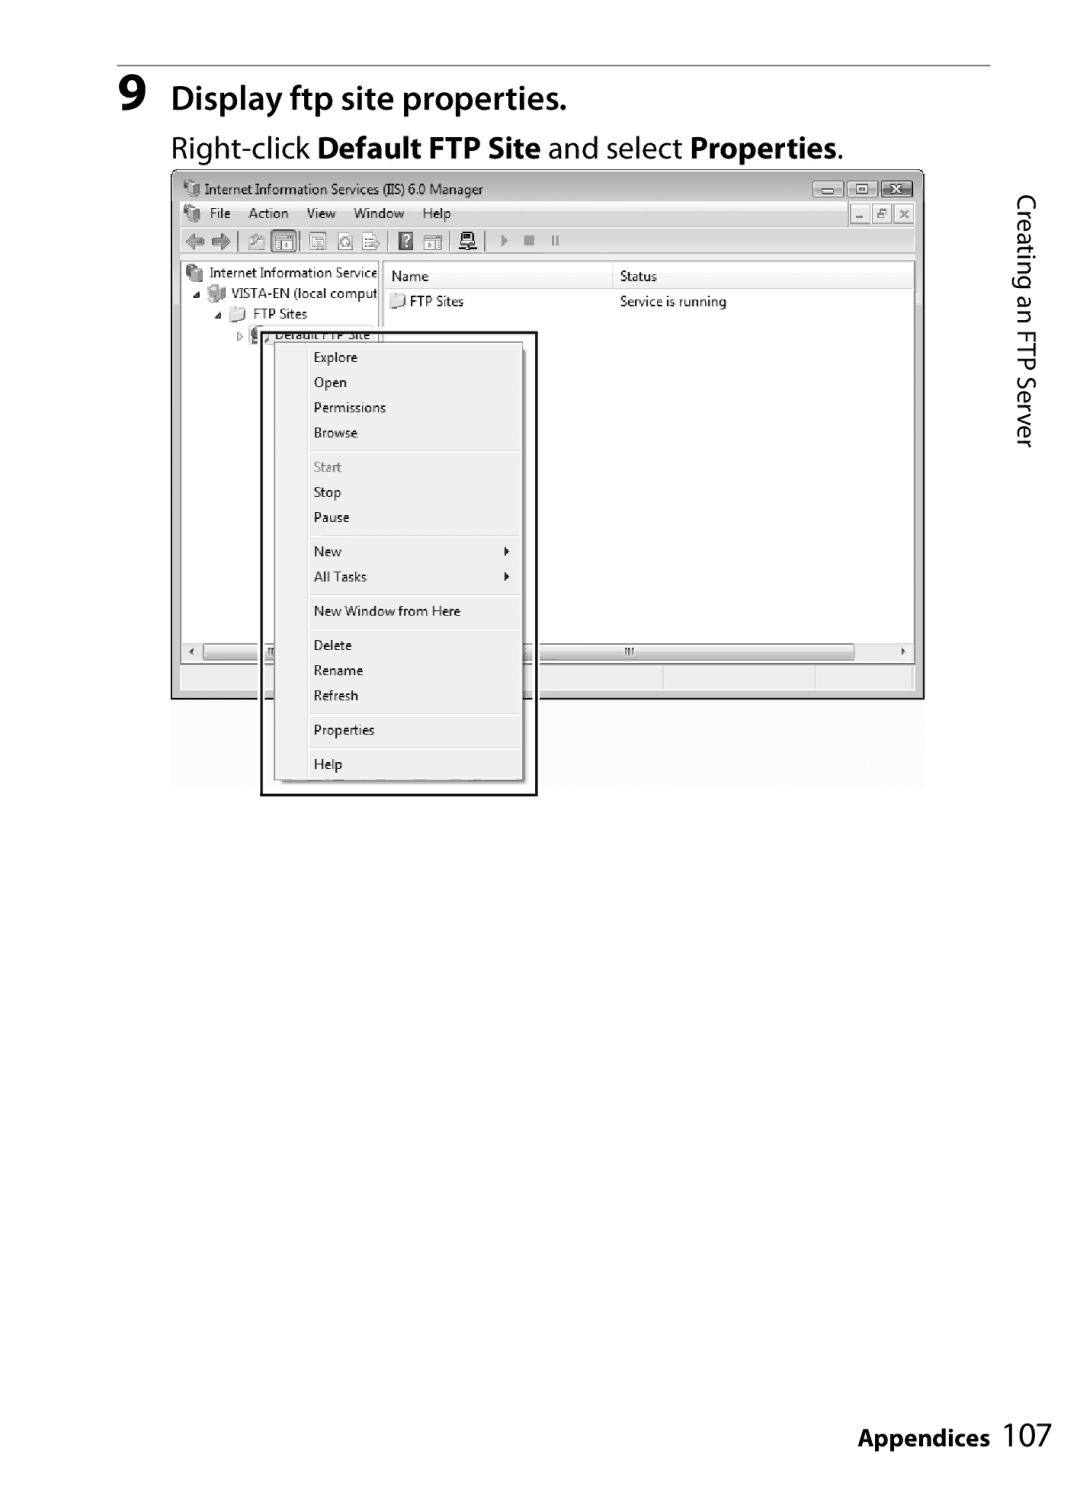
9
Display ftp site properties.
Right-click
Default FTP Site
and select
Properties
.
Creating an FTP Server
Appendices
107
Page 118
Page 120
Page 119
Image 119
Page 118
Page 120
Contents
Communication Unit
Ethernet Networks
Wireless Networks
What the UT-1 Can Do for You
Upload pictures to an ftp server
Control the camera remotely using Camera Control Pro 2
Upload existing pictures
Trademark Information
For Your Safety
Avoid extended contact
Vii
Viii
Symbol for Separate Collection in European Countries
Table of Contents
Appendices
Menu Guide
Life-Long Learning
Background Knowledge
Illustrations
Introduction
Feet Eyelet for strap Tripod socket
Parts of the UT-1
Supplied Accessories
Power LED
Attaching the UT-1
UT-1
USB Cable Gaskets and Connector Covers
Camera
Supported Modes
Mode Host Description See
Routers
Firewall Settings
FTP Servers
Ethernet Connection
D4 Cameras
Connecting the WT-5
Uploading Pictures to an ftp Server
Set up the UT-1 and install software
Workflow
Upload pictures Uploading Pictures to a Host Computer
Preparing the UT-1
Inserting the Battery
Using an AC Adapter
Removing the Battery
Stand-By Mode
Battery Level
Connect the AC adapter
Connecting the Adapter
Insert the power connector
Disconnecting the Adapter
System Requirements
Installing the Wireless Transmitter Utility
Pack 3, and Mac OS X version
Installing Software
Windows Mac OS
WT-4 Setup Utility
Introduction
Before Connecting
PC Mode
Turn the camera on
Copying Network Profiles to the Camera
Copying Network Profiles to the Camera
Select Add/Edit profiles and click Next
Select Action Dialog
Select Add new profile and click Next
Connection type Choose Computer
Select Manual setup and click Next
Copying Network Profiles to the Camera
WPA2-PSK AES
Communication mode Select Infrastructure or Ad-hoc
Using the UT-1 with a Computer
Using the UT-1 with a Computer
Using the UT-1 with a Computer
Using the UT-1 with a Computer
Uploading Pictures to a Host Computer
Connecting the UT-1
Wireless transmitter Mode option in the camera setup menu
Power switch
Uploading Images
Voice Memos
Interval Timer Photography
During Upload
Turning the Camera Off
Loss of Signal
Removing the Send, Sending, and Sent Icons
Transfer Status
Status
Status LEDs
Status Display
Battery level a five
Connecting to the Computer
PC Mode
Select PC mode for
Using the UT-1 with a Computer
Controlling the Camera
Wireless Networks
Wireless Networks Loss of Signal During Transfer
Network Status
Status Display
PC Mode
UploadingPicturesto an ftp Server
Uploading Pictures to an ftp Server
Copying Network Profiles to the Camera
Select Add/Edit profiles and click Next
Connection type Choose FTP Server
Select Manual setup and click Next
Automatic Setup
WPA2-PSK AES
Copying Network Profiles to the Camera
Uploading Pictures to an ftp Server
Copying Network Profiles to the Camera
Confirm that settings are correct and click Next
Copying Network Profiles to the Camera
Connecting to the ftp Server
Turn the camera on
Press the power switch for about a
Uploading Images
File Names
Transfer Status
Power LED lights when the UT-1 is on
Status Display
Uploading Pictures to an ftp Server
Print Device Info
Menu item Mode
Transfer Settings
Device Settings
Choose Profile
Mode
Text Entry
Editing ftp Profiles for Connection to ftp Servers Only
Ethernet Networks
Option Description
Channel
Choose a channel Return to the wireless menu 1/2
Shared WEP
Encryption
Encryption
Choose an index Return to the wireless menu 2/2
TCP/IP
Menu Guide
TCP/IP Menu, Page 2/2
Menu Guide
Server
FTP
Menu Guide
Enter edit mode
FTP Menu, Page 2/3
Highlight Password
FTP Menu, Page 3/3
Highlight Port
Delete After Send?
Transfer SettingsTransfer Mode Only
Auto Send
Files
Send File As
Send Folder
Deselect All?
Print Print Mode Only
Firmware Version
Battery Info
Device Info
MAC Address
Format Transmitter’s Memory
Device Settings
Auto Power Off
Device Settings
Ftp server port
Creating an FTP Server
Display the network adapter list
Click Change adapter settings
Windows
Go to Network and Sharing Center
Enter an IP address and subnet mask
Display TCP/IP settings
Close the network properties dialog
Open Administrative Tools
Select Add FTP Site…
Double-clickInternet Information Services IIS Manager
Open the IIS manager
Enter site information
Anonymous Login
Choose binding and SSL options
Authentication Basic Allow access to All users
Choose authentication options
Click Allow
Windows Vista
Display network connections
Display TCP/IP settings
Enter an IP address and subnet mask for the ftp server
Double-clickInternet Information Services IIS 6.0 Manager
Display ftp site properties
Right-clickDefault FTP Site and select Properties
Select the address and port number
Choose a home directory
Select Internet Protocol TCP/IP and click Properties
Windows XP
Open Internet Information Services
Display ftp site properties
Choose a home directory
Click Sharing
Display network settings
Adjust network settings
Mac OS X
Select File Sharing and click Options
Select Share files and folders using ftp
Display file sharing options
Turn ftp file sharing on
Editing Existing ftp Profiles
Creating ftp Profiles Using Camera Menus
Firewalls
Select Transfer mode for Wireless transmitter Mode
Or Ethernet
Troubleshooting
Transfer interrupted Transfer will resume if UT-1 is
Specifications
Data rates †
Wireless WT-5
Power source
Weight
Battery Life
Index
Wireless LAN
126
Page
6MWD0611-02
Top
Page
Image
Contents