CrossFireTM 8600/8605 Token-Ring Switches
Page
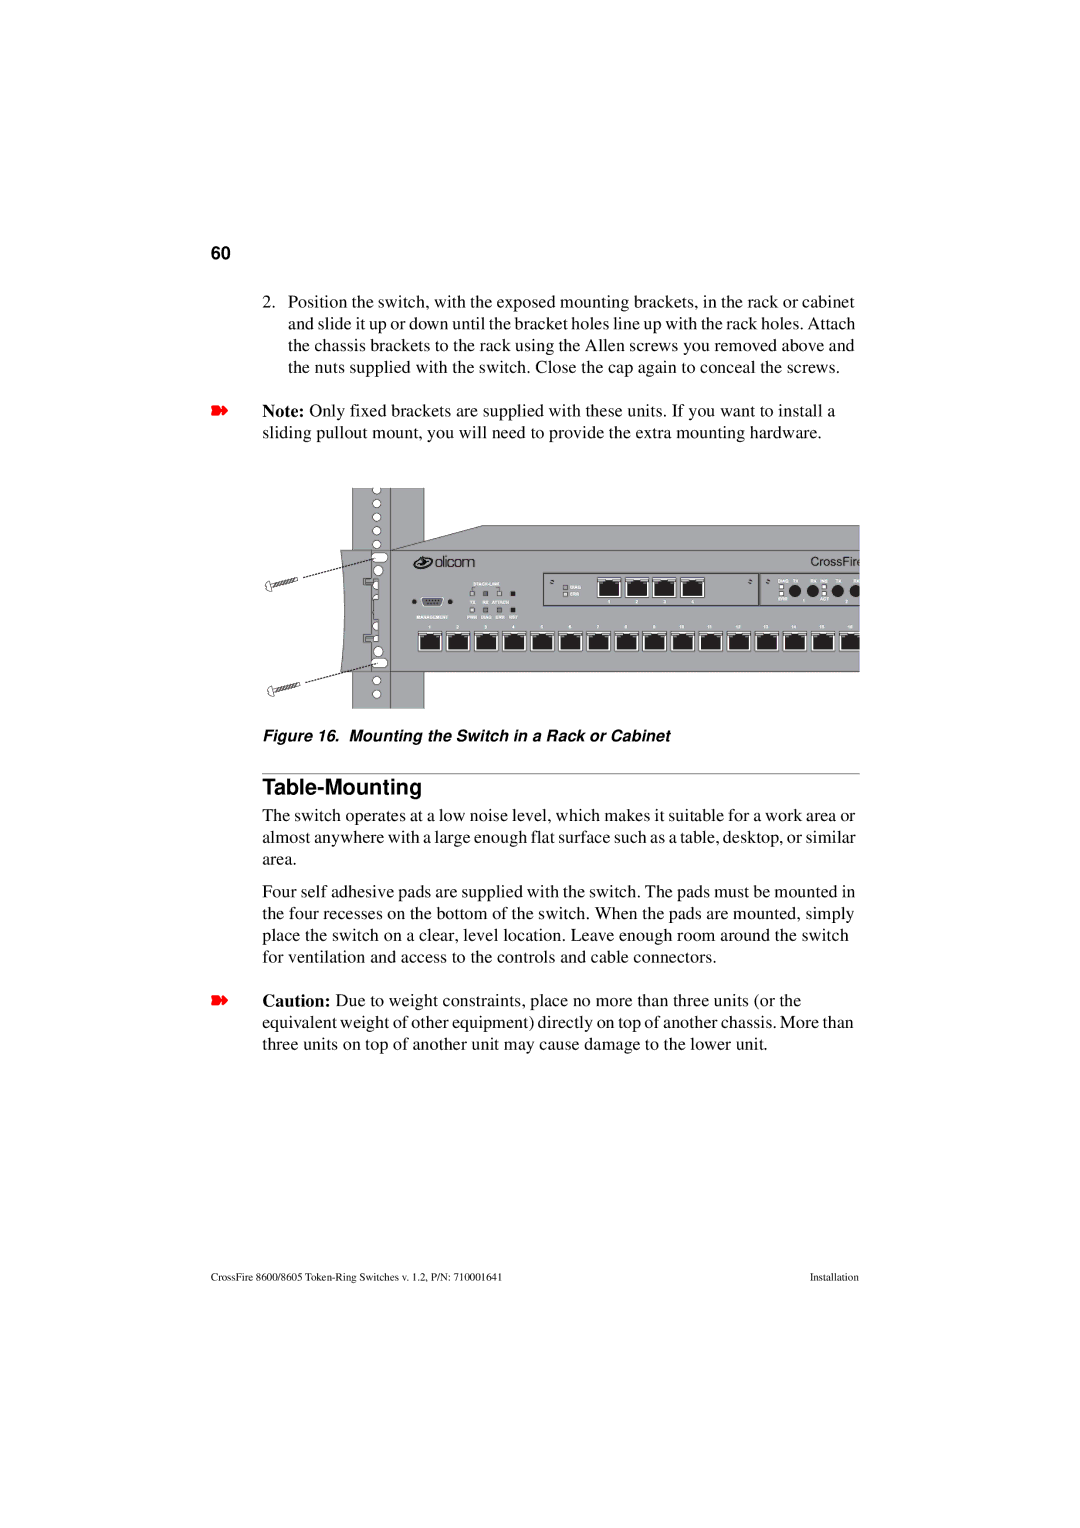
CrossFireTM 8600/8605 Token-Ring Switches
Trademarks
Modifications
Iii
CrossFire 8600/8605 Token-Ring Switches v .2, P/N
Table of Contents
Installation
Preparing for Installation
Connecting a Network Management Console
Switch Configuration
Vii
Monitoring the Network with the Console 145
Viii
Monitoring the Network with Snmp 183
Monitoring Port Traffic 193 Troubleshooting 195
Getting in Touch with Technical Support 201
CrossFire 8600/8605 Token-Ring Switches v .2, P/N
Connecting using Building Wiring
List of Figures
List of Tables
Xii
About this Manual
Xiii
Xiv
Overview and Specifications
Switching Technology
Switch of Switches
Switch of Hubs
Switch of Servers
Switch of Desktops
Switch of Floors and Buildings
Switch of Routers
Physical Characteristics
Out-of-Band Management OBM
Switched Port Analyzer
Token-Ring Ports
Reset Button
Universal Expansion Slots and Modules
System Request Button
Labels
Status and Activity LEDs
State Meaning
On or
Features
Features and Specifications
Performance and Advanced Features
Management
Installation
Scalability and High Availability
Specifications
Capacity
Physical Characteristics
Performance
Specification Value Operating Temperature
Non-operating Temperature
Safety
Software updates
Specification Value Network management
Tivoli TME 10 NetView for AIX
CrossFire 8600/8605 Token-Ring Switches v .2, P/N
Switch Theory of Operation
How the CrossFire 8600 and the CrossFire 8605 Works
Multiple Simultaneous Conversations
Low Latency
Address Management
Multiple Bridging Modes
Source Route Bridging SRB
Source Route Switching SRS
Source Route Transparent SRT
Filtering
SRT/SRB
Three Switching Modes
Congestion Control
Cut-Through
Store and Forward
Token-Ring Port Operation Modes
RI/RO-Like Connection
CrossLink Connections
Transmission Priority Queues
Spanning Tree Protocol Support
Switch Configured with Two VLANs
Vlan Support
Specification
Management
Switch Manager for HP OpenView for Windows
Rmon Support
Telnet Management and VT100 Management Console
IBM LAN Network Manager
Built-in Port Counters
Optional Redundant Power Supply
Stackable Architecture
Back-to-Back
Internal Stacker
CrossFire 8600/8605 Token-Ring Switches v .2, P/N
Benefits of the CrossFire 8600 and the CrossFire
Token-Ring Port Operation Modes
Feature Function Benefit Automatic port
Sensing of operating
Mode
Automatic media
Three Switching Modes
Feature Function Benefit Cut-Through
Store and Forward
Auto
Expansion Module Slots
Multiple Bridging Modes
Feature Function Benefit Ieee 802.1D
Spanning Tree Protocol
Feature Function Benefit
Vlan support
HP OpenView for
Windows
Network Monitoring
Feature Function Benefit MAC address
Filtering
Logical Link
Control LLC
Connectivity Options
CrossFire 8600/8605 Token-Ring Switches v .2, P/N
Safety Recommendations
Safety with Electricity
CrossFire 8600/8605 Token-Ring Switches v .2, P/N
Preventing Electrostatic Discharge Damage
Chassis Accessibility
Power
Site Requirements
Environment
CrossFire 8600/8605 Token-Ring Switches v .2, P/N
Unpacking and Inspecting
Frame Length Limit
Rules to Remember
Cables and Distances between Devices
Sample Applications for the CrossFire 8600 and the CrossFire
Simple Application of the Switch
Typical Network without the CrossFire Switches
Next Step
Replacing SRBs with CrossFire 8600 or CrossFire
Star-Wired Topology of Interconnected Switches
Important Management Considerations
Installation
Required Network Preparation Frame Length Limit
Installation Summary
Materials Needed for Installation
Unpacking Instructions
Installing a Universal Expansion Module
Removing the Universal Expansion Slot Cover
Mounting the Chassis
Rack or Cabinet Mounting
Mounting the Switch in a Rack or Cabinet
Table-Mounting
Connecting Devices to the Token-Ring Ports
Cabling
Connecting Devices to Token-Ring Ports
Checking the Installation
Connecting using Building Wiring
Applying Power
Back Panel of the Switch
Page
Connectors and Push-Buttons
Control Panels
Front Panel
Name Description
Status LEDs
Back Panel
Connecting a Network Management Console
Connecting the Console
Specification Value
XON/XOFF
Disable the Use Function, Arrow,
Communication Problems
Ctrl Keys for Windows option located
Diagnostic Screen
Press Return key to activate console
CrossFire 8600/8605 Token-Ring Switches v .2, P/N
Switch Configuration
General Guidelines
Navigating within the Menus
Main Menu
Configuration Menu
Port Configuration
Switched Port Analyzer
Password
Console Configuration
Switch Configuration Screen
Configured MAC Address
System Description
Burned-in MAC Address
Switch reserves 31 addresses for ports
Dram Installed
Flash Memory Installed
Address Format
System Name
Stack Configuration Screen
Time of Day
Number of Boxes
Local Box Number
Module Information Screen
Status
Model
Board ID
HW Rev
Vlan Configuration
Switch with four VLANs
Vlan Configuration Menu
Local Vlan Port Configuration
Vlan Configuration Screen
Vlan Parameter Configuration for TrCRF Screen
Add
Change
Delete
Bridging Mode
Vlan Name
Parent Vlan
State
Vlan Parameter Configuration for TrBRF Screen
MTU
Local Vlan Port Configuration Screen
IP Configuration Screen
Default Gateway
Interface MAC Address
IP Address
IP State
Send Ping
BootP Requests and Parameters
Snmp Configuration Menu
Spanning Tree Protocol
Ieee 802.1D Spanning Tree Protocol STP
Spanning Tree for TrBRF Screen
STP Participation
Bridge Forward Delay in Seconds
100 Ieee STP Uses Bridge Functional Address
Bridge Priority
Bridge Hello Time in Seconds
STP Mode TrBRF to TrCRF
Spanning Tree for TrCRF Screen
101
STP Priority
Switch Priority
Switch Hello Time in Seconds
Switch Maximum Message Age in Seconds
Switch Forward Delay in Seconds
Port Spanning Tree Parameters Screen
103
Port Spanning Tree Parameters
Priority
104 STP Mode
Current Spanning Tree Information Screen
Port Configuration Screen
Enabled
105
Name
106 Status
Media Type
Media Speed
Max Explorer Rate on Input
Forwarding Mode
107 Operation Mode
Priority Threshold
Error High Threshold
Error Low Threshold
Error Sampling Interval
108 Min Transmit Priority
CrossLink
Switched Port Analyzer Menu
109
110
CrossLink Menu
111
CrossLink Configuration Screen
Setting up a CrossLink
113
Current CrossLink Information Screen
114
Address Filtering
115
Filters and Port Security Menu
Configure Filters Screen
117
Index
MAC Address
Applied Ports
118
Exit Ports
Configure Port Security Mode Screen
119
120
View Port Filters Screen
Description
Port number Security Mode
Protocol Filters Menu
121 More
Protocol Class Assignment
Protocol Class Assignment Screen
122
Class
Ethertype
123
Port Filtering Attributes Screen
Block
124 Ethertype
Address Aging
125
Set at the Port Address Table Aging menu
Set at the Master Address Table Aging menu
Configuration menu
Address Aging Menu
126
Port Address Table Aging
Port Address Table Aging Screen
127
Aging Time min
Demand Aging Level
128
Master Address Table Aging Screen
Aging Time
Password Menu
Set Password
Delete Password
129
Console Configuration Menu
Console/Telnet Sessions
Serial Link Configuration Screen
Stopping the Console Session
Creating a Console Session Using a Modem
132
Telnet Configuration Screen
Telnet Sessions Screen
134 Telnet Sessions
Box
Remote
Starting the Telnet Session
Stopping the Telnet Session
Involuntary Termination of the Telnet Session
135
136
Download/Upload Menu
137
Serial Link Download
Tftp Download/Upload
138
Serial Link Download Screen
Select Serial Link Download Select Main Image Download
Tftp Download/Upload Screen
139
Tftp Server Address
Download Vlan
Execute name Download/Upload
141
Reset Screen
Number of Resets Since Diagnostics
Reset Switch With Diagnostics
Reset Switch Without Diagnostics
Power-On Diagnostics
143 Reset Port Address Table
Clear Non-Volatile RAM
144
Monitoring the Network with the Console
145
Navigating Within the Menus
146
Statistics Menu
Switch Statistics Screen
148 Diagnostic Test Results
Message Log Information
Display Summary
149 Board Temperature
Frame Transmit Errors
Error Frames Received
Reset
Port Status Screen
150
Ins
Spd
151 Oper Mode
Fwd Mode
Port Statistics Menu
General Statistics Screen
Frame Errors
154 Frames Processed
Frames Unknown
Broadcast Frames Received
Config Loss
Config Loss Reason
155 Receive Buffer Overflows
Transmit Buffer Overflows
Last Reset
Line Errors
Burst Errors
Statistics Screen
157 AC Errors
Abort Transmit Errors
Internal Errors
Lost Frame Errors
158 Hard Errors
Signal Loss
Recoveries
Lobe Wires
State Information Screen
159
Ring Status
Ring State
DTR MAC Information Menu
Error Report Timer
TXI Information Screen
161 Station-CPort Information
Authorized Function Classes
162 Join State
Monitor State
Beacon Source Address
Beacon UNA
Station-CPort Information Screen
164 CPort Phantom Drive Mask
Common Access Protocol Mask
Common Policy Flags
Address Tables Menu
166
Master Address Table Screen
Address
167
Unknown
Master Route Descriptor Table Screen
168 Ports
Search
Route hex
169 Type
Vlan Address Table screen
170
Vlan Route Descriptor Table Screen
171
172
Bridge ID
Root ID
Root CRF
Forward Delay
173 Max Message Age
PId
PCst
174 DCst
Dsg SwId/BrId
Dsg PId
# Chgs
175
Current Spanning Tree Information for a TrCRF Screen
Root Port
176 Max Message Age
177
Vlan Statistics Screen for TrCRF
Vlan Statistics
178
179
Vlan Statistics Screen for TrBRF
Display Members
Diagnostic Test Results Screen
180
Message Log Information Screen
Display Summary Screen
182 Clear
183
Snmp Setup
Community String screen Trap Receiver screen
Snmp Configuration
Snmp Configuration Screen
Send Authentication Traps
Enable Rmon Statistics
185 Community Strings
Community Strings Screen
Trap Receivers
186 Community Name
Trap Receivers Screen
187
List of Supported Traps from a Switch
188 Add Entry
Zoom
General traps
Enterprise specific traps from OC8600.MIB
189
Per Port Traps
190
Traps for the Spanning Tree Protocol
191 Traps for CrossLinks
Oc8600TsCrossLinkFailed
192
Active Monitoring
193
Passive Monitoring
194
Port Number
Port To Monitor
Select Then
Troubleshooting in a Network
Obtaining Service
Start of Troubleshooting Process
Choosing a Troubleshooting Procedure
Symptom and LED State Go To
Procedure a
196
197 Procedure B
Procedure C
198 Procedure D
199
200
Hotline Support
Before You Contact Olicom Technical Support
201
Bulletin Board Service
Fax Support
Standard Modem Requirements
Isdn Modem
Internet E-Mail
Anonymous Internet FTP Server
Internet World Wide Web Server WWW
Olicom Support WEB
Problem Report Form
Switch Information
Switch Configuration
204
Problem Description Network Installation Sketch
205
206
Appendix A. Abbreviations
207
208
Mbps
TrBRF
209
TrCRF
210
Cable Function Cable Type or Cable Solution
Connecting to the Out-of-Band Management Port
211
Pin Signal Name
Out-of-Band Management Port and Cable Pin-Outs
212
Management Port Pin-Out
TIA/EIA 232 Null-Modem Cable for the 25-pin Connector
213 TIA/EIA 232 Null-Modem Connections
Ohm IBM STP Data Connector-to-RJ-45 Straight-Through Cable
Twisted-Pair Cable Pin Outs
214
Straight-Through 100-Ohm/120-Ohm Cable
Cabling Recommendations
215
Cable Type Impedance
Cable Type
216
Number Of Attaching Devices
CrossFire 8600 Token-Ring Switch
217
Ring Types Speed
Ring Speed Ohm Type Ohm Category
CrossFire 8605 Token-Ring Fiber Switch
218
Ring Speed 100 or 120 Ohm Category
Ring Speed 62.5/125 µm
219
220
Index
Numerics
Index-2
119
Index-3
116
Index-4
207 203
Index-5
MMF
Index-6
131 162
Index-7
Index-8
Index-9
170
Index-10
Index-11
Index-12
Page
Olicom Australia