REC
Printing Conventions in This Manual
Do not open or modify in any way the unit or its AC adaptor
Page
Additional Precautions
Power Supply Use of Batteries
Placement
Maintenance
Driver
Before Using Memory Cards CompactFlash
Copyright
Compatible OS
Contents
Recording
Contents
Canceling an Operation Undo/Redo
Using the insert effects
Search for the music’s start and end Scrub/Preview
Mastering
Displaying the song information
Registering time Locator Function
Creating original arrangements
Contents Organizing the songs you’ve recorded
Creating a master tape
About the Rhythm Guide
Insert Effect Parameter Functions 110
About the drum kits 104
Algorithm
Mastering Tool Kit Parameter Functions 127
Loop Effect Parameter Functions 131
Track EQ Parameter Functions 133
Copying difficult songs Phrase Trainer 139
Using a foot switch or expression pedal 136
Tuning an instrument Tuner 137
Conserving battery power Power Save 150
Importing SMFs and creating patterns 167
Before Using USB Overview 156
Backing up the BR-864’s data 158
Loading WAV/AIFF files in BR-864 tracks WAV/AIFF Import 164
Digital audio workstation
Features
Introduction to the BR-864
Simple operation
Two-way power supply allows you to record anywhere
Full complement of input connectors jacks
Phrase Trainer Function
Recommended Products
How to remove the card protector
Memory cards supported by your BR-864
Formatting the memory card CompactFlash
Front Panel
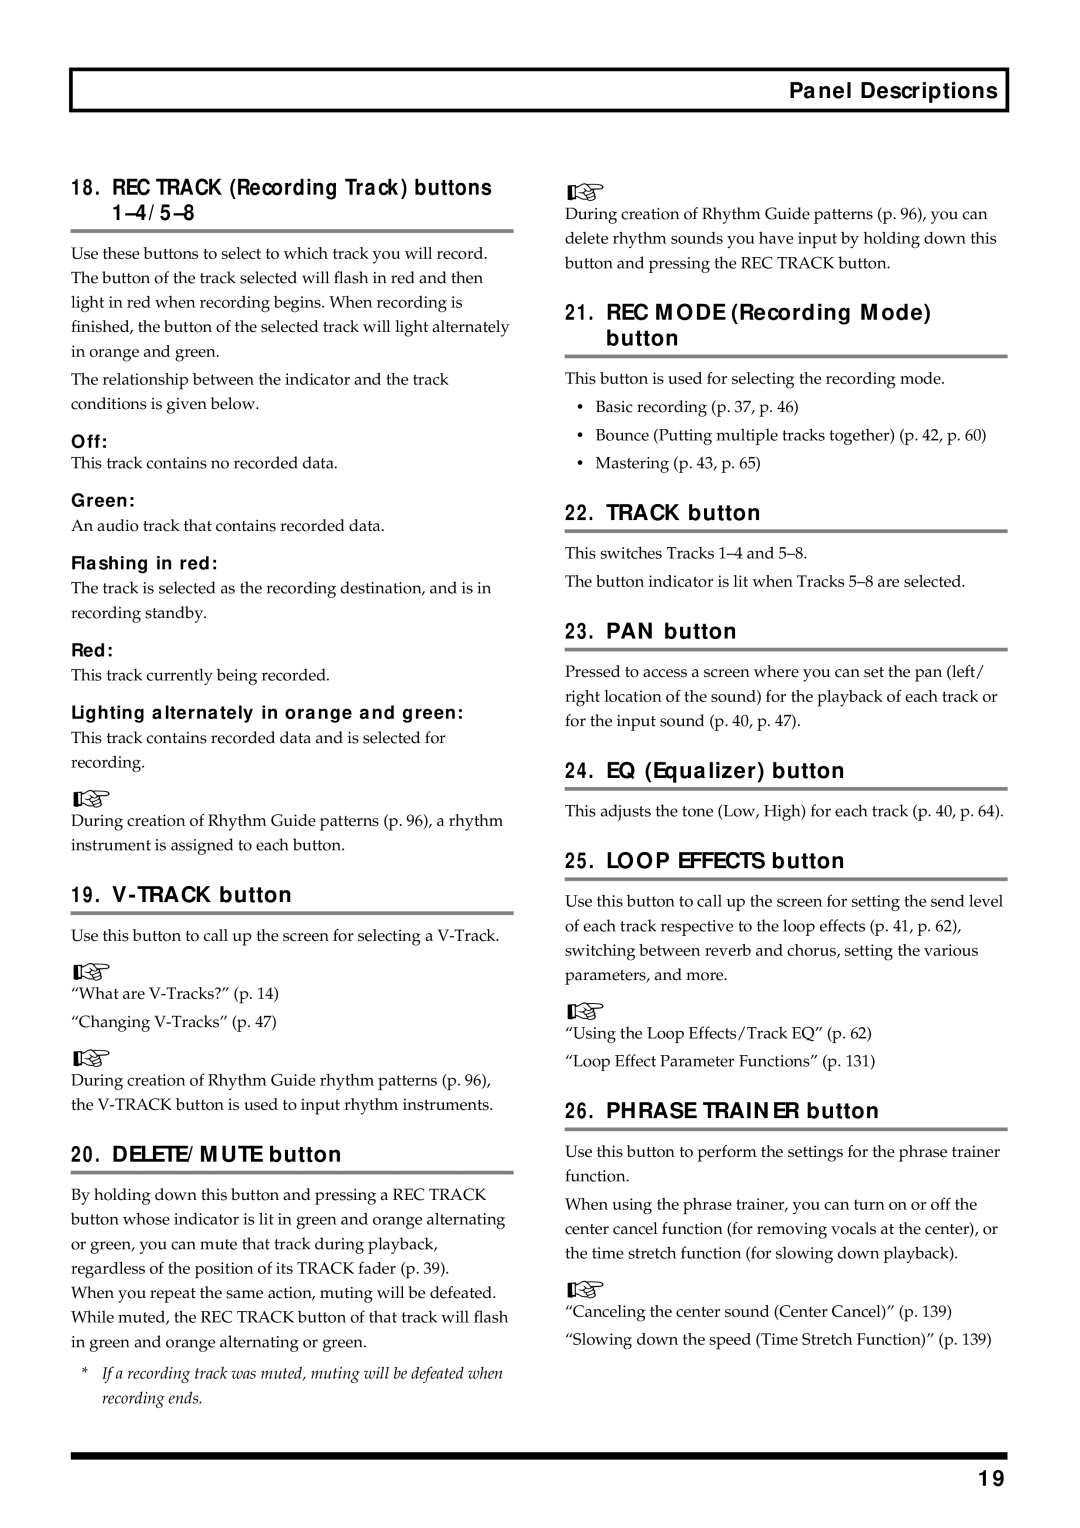
Panel Descriptions
REW button
Panel Descriptions Input Level knob
Tuner button
Zero button
PAN button
REC Mode Recording Mode button
Track button
DELETE/MUTE button
Cursor buttons
Headphones jack
ENTER/YES button
EXIT/NO button
Rear Panel
Display
Inserting batteries
Quick Start
Listening to the demo songs
Connecting peripheral devices
Play Screen
Turn on the BR-864
Lower the Master fader on the BR-864
Listening to a demo song
Adjusting the Display Contrast
Selecting a song
Moving to the start of a play
Playing Back a Song
Changing the current position
Elapsed time display
Moving through a song in measures or beats
Turning off the power
Make sure that playback of the song is stopped
Inserting the memory card
Turn on the power
Preparing the memory card
Formatting the memory card initialize
Recording time
Select the song to record
Recording a new song
About data types
Choose which jack you will use to connect your instrument
Connecting instruments
Turn the TIME/VALUE dial to select the desired data type
Turning off the internal microphone
Adjusting the input sensitivity
Level meter display
Using insert effects
Adjusting the input level
Switch effect patches
LIN Line
Recording without insert effects
GTR
MIC
Changing arrangements
Using the rhythm guide
What is the Rhythm Guide?
Playing the rhythm guide
Tapping to change the tempo of the arrangements or patterns
Changing patterns
If Input Select GUITAR/BASS or MIC are lit
Basic recording
Selecting the recording track
About the recording REC modes
What is a Mastering Tool Kit?
Procedure
When you finish recording, press Stop
Press Zero to move to the time location
Playing back recorded music
Overdubbing
Silencing the sound of specific tracks Mute
Press PAN
Adjusting the sound for each track
Adjusting the tone Track EQ
Some tips for overdubbing
Press Loop Effects
What is a loop effect?
When using CHO/DLY
When using REV
Putting multiple tracks together
Press Cursor to display the Send Level settings screen
When using CHO/DLY When using REV
Bounce
Tracks with recorded data Tracks without data
Mastering
Removing the memory card
Section Recording
Selecting the recording track
Recording
Press Cursor to display
Changing V-Tracks
Changing the position Input sound
Press V-TRACK
Tone Load
Recording Operations
Repeating Playback Repeat
Setting the repeat portion
Enter the repeat start point a
Setting the repeat portion with accurate timing
Re-recording only a mistake Punch-in/out
Manually punching in and out using REC
Manually punching in/out
Specifying the area for auto punching in/out
Manually punching in and out using a foot switch
Order to use a foot switch
Auto punching in and out
Make sure that the Auto Punch ON/OFF indicator is dark
How to Record
Erasing a registered auto punch in/out location
Press Stop Press Auto Punch ON/OFF
Setting the portion to be repeated
Press UNDO/REDO
Canceling an Operation Undo/Redo
Canceling the Undo Redo
Reversing the last operation Undo
User patches U
Using the insert effects
Preset patches P
Effect patches and banks
Press Cursor to move the cursor to EDIT, and press Enter
Editing insert effect settings
Press Effects
Select an effect patch
Entering the patch name
Saving insert effects settings Write
Use Cursor and the TIME/VALUE dial to enter the patch name
Track 1-8, 1&2, 3&4, 5&6, 7&8
Turn the TIME/VALUE dial to switch the Insert Mode
Input
Putting multiple tracks together Bounce
Press Play to check the sound bounced to tracks 3
Putting multiple tracks together Bounce
Selecting the loop effect
Using the loop effects/Track EQ
When using CHO/DLY
When using REV
705d
Adjusting how the loop effect is applied
Setting the Track EQ
Mastering
What is Mastering Tool Kit?
Press Exit to return to the Play screen Press REC
Editing the Mastering Tool Kit settings
When you finish mastering, press Stop
Carry out Steps 1-6 from p , and switch to Mastering mode
808d
Saving the Mastering Tool Kit settings Write
Displaying the remaining available recording time
Displaying the song information
Displaying the memory card usage
Section Editing
Deleting a locator point
Registering time Locator Function
Registering a locator point
Moving to the locator point
Hold down Stop and press Play
Scrubbing to find the music starting/ending point
Scrub Function
Preview Function
Enabling use of the Preview function with REW and FF
Changing the scrub points
Press REW Preview to Press FF
Ex Copying twice to the same track
About the Measure/Time Specification screen
Copying data Track Copy
Copying the repeated portion AB
Ex Copying twice to another track
Copying by specifying the time TME/MES
319d
Copying a complete track ALL
Ex Moving twice to another track
Moving data Track Move
Moving the repeated portion AB
Ex Moving twice to the same track
Press Cursor to move the cursor to MOV, and press Enter
Moving by specifying the time TME/MES
Turn the TIME/VALUE dial to select AB and press
Moving a complete track ALL
Press Cursor to move the cursor to ERS, and press Enter
Erasing data Track Erase
Erasing by specifying the time TME/MES
Turn the TIME/VALUE dial to select ALL and press
Erasing a complete track ALL
Exchanging data Track Exchange
If No more Memory! appears
Organizing the songs you’ve recorded
Copying a Song Song Copy
Erasing songs Song Erase
Naming songs Song Name
Saving memory on the memory card Song Optimize
To continue with the optimization, press Enter YES
Hold down Stop and press REC
Saving the current settings to the song
Protecting a song Song Protect
Press Cursor to move the cursor to PRT, and press Enter
Disabling digital copying
Creating a master tape
Recording to a cassette tape recorder analog connection
Recording to a digital recorder digital connection
Rotate TIME/VALUE dial to select the on
What is SCMS?
Memo
Section
Types of patterns
About the Rhythm Guide
About the patterns
About the arrangements
Performing arrangements
Switching the Rhythm Guide mode
Performing arrangements and patterns
Selecting arrangements
Performing patterns
Selecting patterns
Time Signature
Creating original arrangements
Starting Measure
Pattern Number
Erasing a step
Inserting a step
Naming arrangements
Once you have decided on the copy destination, press Enter
Press Enter YES to copy. To cancel, press Exit no
Copying arrangements
Erasing arrangements
Step Recording
Creating original patterns
Creating patterns in Realtime Recording
Realtime Recording
Rhythm PAD Lit
Measure
Quantize
Indicated in the matrix
Rehearsing recordings
Press Cursor repeatedly to move the cursor to Click
Changing the metronome volume
Turn the TIME/VALUE dial to adjust the metronome volume
Deleting unneeded drum sounds
100
Creating patterns in Step Recording
Input the drum sound
101
Method 1 Inputting with the REC Track buttons
Method 2 Inputting with the Enter
Method
Naming patterns
Changing the velocity
102
Erasing patterns
Copying patterns
103
Selecting drum kits
About the drum kits
Performing the drums
105
Creating original drum kits Tone Load
Loading from the tracks
About the drum kits
Start Point S
106
End Point E
107
Copying drum sounds from other drum kits
Press Tone Load or Exit to return to the Play screen
Changing the position pan of the drum sounds
Erasing drum sounds
108
109
Section Effects
Insert Effect Parameter Functions
Setting Procedure
Insert Effect Parameter Functions
Algorithm List
111
112
Bass SIM
113
Bass Multi
114
Bank MIC Vocal Multi Cosm Comp VCL
Lo-Fi Noise Suppressor
115
Guitar
116
16. VO+AC.SIM
Bass Simulator
Parameter List
Acoustic Guitar Simulator
Acoustic Processor
Defretter
Compressor
Cosm Comp compressor/Limiter
De-esser
Equalizer
Delay
Enhancer
Doubling
120
Foot Volume
Flanger
Guitar Synth
121
Lo-Fi Box
Harmonist
122
Pitch Shifter
Phaser
Noise Suppressor
Octave
Ring Modulator
Preamp
124
125
Slow Attack
Speaker Simulator
Tremolo/Pan
Wah
Voice Transformer
126
Algorithm
Mastering Tool Kit Parameter Functions
128
Bass Cut Filter
Input
Mastering Tool Kit Parameter Functions
129
Expander
130
Mixer
Limiter
Output
Loop Effect Parameter Functions
Loop Effect Parameter Functions
CHORUS/DELAY/DBLN Doubling
132
Hi G
Track EQ Parameter Functions
Lo G
Lo F
134
135
Section Other Convenient Functions
Press Cursor and select Foot SW
Using a foot switch or expression pedal
When using a foot switch
When using an expression pedal
Changing to the tuner
Tuning an instrument Tuner
Explanation of the indications that appear while tuning
Press Tuner to access the Tuner screen
138
Tuning
Setting the reference pitch of the tuner
Tuning an instrument Tuner
Copying difficult songs Phrase Trainer
Canceling the center sound Center Cancel function
Slowing down the speed Time Stretch function
140
Copying difficult songs Phrase Trainer
Midi Fundamentals
Midi Connectors
About Midi Implementation Charts
Synchronizing with Midi devices
142
Synchronizing playback with a Midi sequencer
Synchronized playback with the BR-864 as the master
Synchronizing with Midi devices
What are drop and non-drop formats?
143
144
Using MMC
Setting the MTC offset
Operating MMC-compatible devices with the BR-864
145
External Mixer
Using the Audio Sub Mix function
Initializing all the BR-864’s settings
Initializing the BR-864’s settings
Initializing the system settings
148
Initializing the effect settings
149
Initializing the Memory Card
Deactivating the power save function
Conserving battery power Power Save
About the System parameters
Utility parameter list
About the Sync parameters
Utility parameter list
About the Scrub parameters
152
Insert Mode
About the effects Insert mode
153
154
155
USB
Compatible OS
Before Using USB Overview
Composition of data on memory cards
Before Using USB Overview USB Folder
Connecting a computer
157
With Windows
Backing up the BR-864’s data
159
Using the BR-532’s Data
With Macintosh
Backing up the BR-864’s data
Delete the BR-864 Roland folder
160
With Windows
With Macintosh
Mono
When saving in mono
When saving in stereo
Press Cursor to select the file format, then press Enter
Turn the TIME/VALUE dial to select the track to be saved
When saving in mono When saving in stereo
Saving BR-864 track data in WAV/AIFF format WAV/AIFF Export
162
119d
163
When loading to the tracks in stereo
When loading to the tracks in mono
165
Loading WAV/AIFF files in BR-864 tracks WAV/AIFF Import
Use Cursor and the TIME/VALUE dial to specify
166
434d
Importing SMFs and creating patterns
168
Importing SMFs and creating patterns
169
513d
Loading drum sounds from WAV/AIFF files
171
Loading drum sounds from WAV/AIFF files
Press Cursor to move the cursor to FILE, and press Enter
172
173
174
175
Section Appendices
Arrangement / Pattern List
Preset Arrangement List
END
Pattern Name Initial Beat Measure
Preset Pattern List
Arrangement / Pattern List
177
Reverb
Chorus / Delay / Doubling
Parameter List
Mixer Parameter *1
Sync Parameter *2
Recorder Parameter *1
Song Parameter *1
System Parameter *2
Arrangement Parameter *1
Insert Mode Parameter *3
Scrub Parameter *3
Rhythm Guide Parameter *1
Problems with the sound
Troubleshooting
Other problems
Problems with the memory card
Synchronization problems Cannot synchronize
Problems with USB
Error Messages
Mastering Mode! Step disallowed
Error Messages ERROR! No File
Power Down
Lack of Event
Midi Time Code Quarter Frame Messages
Song Position Pointer
Timing Clock
Active Sensing
186
Decimal/Hexadecimal table
Commands Transmitted
187
Locate MCP
Midi Implementation Chart
BR-864 Digital Studio
Specifications
190
Numerics
Index
GUITAR/BASS
192
MIC
193
194
REV
195
Utility
196
197
Track Sheet
Insert Mode Patch Mastering Tool Kit
Avis