Phaser Color Printer
Page
Phaser 360 Printer Warranty
Users safety summary
Terms in manual Caution
Contents
Installing Printer Software
Printing Basics
Vii
Viii Phaser 360 Color Printer
Troubleshooting
Customer Support
Index
About Your Printer
Features of your new printer
Media letter or A4-size Copier paper
On-line support
An illustrated guide to your printer
9922-146
6Phaser 360 Color Printer
Maintenance tray and waste liner
Printer parts and components
Consumables
ColorStix solid-ink sticks
Printer parts
Manual feed slot
Transit restraint
Back panel
Options and accessories
Lower Paper Tray Assembly
High-capacity transparency tray
Tektronix transparency media
About Your Printer
Getting Set Up
Setting up the printer at a glance
Phaser 360 Color Printer Quick Reference Guide
What you get with your printer
Choosing a printer location
Removing the packing material
Registering the printer
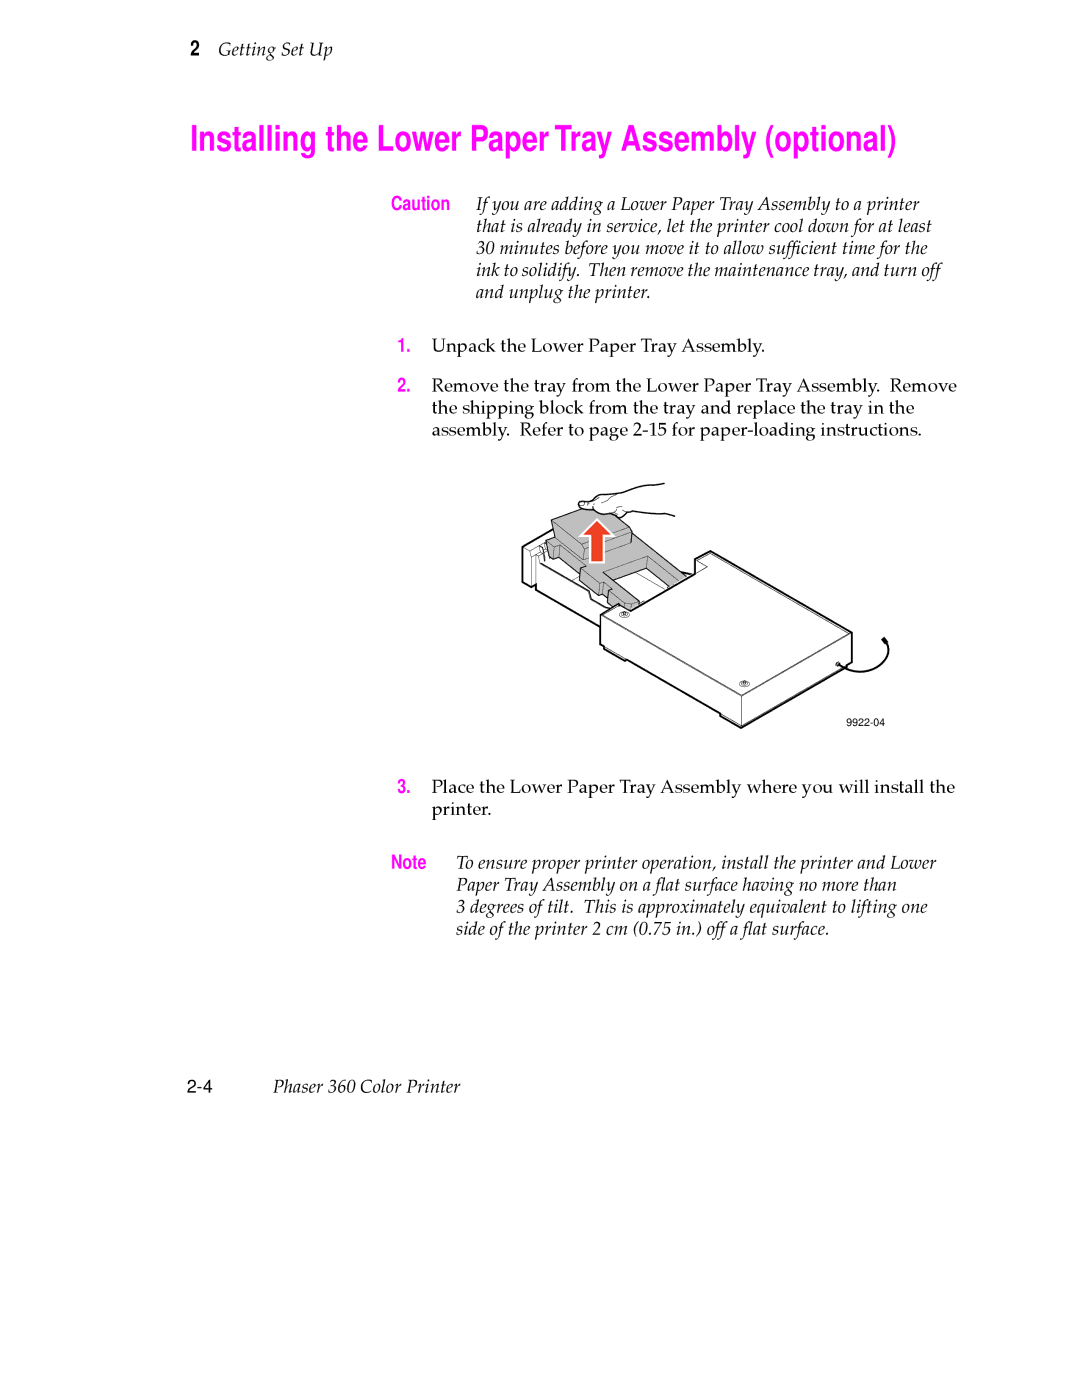
Installing the Lower Paper Tray Assembly optional
Place the printer on top of the Lower Paper Tray Assembly
6Phaser 360 Color Printer
Unlocking the transit restraint
Installing the maintenance tray
Using both thumbs, push the tray in Þrmly until it latches
Loading the ink sticks
For ordering information, see Printer supplies on
Loading the media trays
Loading paper and transparency trays
To load paper
Set the switch on the side of the tray to Transparency
To load transparencies
14Phaser 360 Color Printer
Loading the optional Lower Paper Tray Assembly
16Phaser 360 Color Printer
Connecting an external hard disk optional
Connecting the printer
Printer ports
Connecting to a network
Connecting a PC or Unix workstation to the parallel port
Parallel
Connecting to a Macintosh
Turning on the printer
Front panel display and controls
Letting the printer warm up
Selecting a language for the front panel
Help Pages Menu
Printing a Configuration
Menu Map Print
Tips for optimum printing performance
Installing Printer Software
Overview
PC/Windows software
Installing printer software for Windows
Easy Installation
Samplers
Custom Installation
Use the default Destination Directory or click Browse
Drivers/PPDs
Printer Utilities
Finish Installation Completed dialog box, click Finish
Installing printer software for Windows NT
Custom Installation
Network printer server, and click Next
Finish Installation Completed dialog box, click Finish
Either Services for Macintosh AppleTalk or TCP/IP print
Custom Installation
Installation Completed dialog box, click Finish
Tektronix Printer Driver
14Phaser 360 Color Printer
Click Continue in the PostScript Printer Driver Setup
Under Installed Printers , select your
Phaser 360 TekColor printer, click Connect
After Windows restarts, the Install PostScript Printer
Install
Mac OS software
Easy
Using the Mac OS installer
Select Easy Install or Custom Install
Easy Install Custom Install
Select Custom Install from
Setting up the Phaser 360 printer driver
Phaser 360 Driver in the Custom Install window
Setting up the Apple LaserWriter 8.3.4 driver
20Phaser 360 Color Printer
Setting up the Phaser 360 GX driver
22Phaser 360 Color Printer
PhaserPrint for Unix software
Unix workstation software
Downloadable printer utility files
Installing Printer Software 24Phaser 360 Color Printer
Printing Basics
Print features overview
Selecting print features
TekColor correction
Media tray selection
Check Print See
Image Smoothing See
Adjusting print speed and resolution
Fast Color
Enhanced
All about media
Acceptable media sizes, types, and weight
Tray type Media type
Margins and image area
Letter-size X 11 A4-size 210 x 297 mm
Mm 0.2 200 mm 10.45 283 mm Mm 0.35
Media trays
Media tray settings
Changing the default media tray setting
Default setting
Changing to Upper and Lower settings
Printing letterhead
12345678
Printing labels
Printing transparencies
Printing transparencies from the transparency tray
Printing transparencies from the standard paper tray
Transparency quality tips
When to use the manual-feed slot
12345678
Sec
Using Windows printer drivers
Using the printer’s front panel
Printing from a PC
Downloading utility files
Media size
Quick Collate
Using the AdobePS 4 driver with Windows
Settings, then Printers
Details tab
Paper tab
Graphics tab
Device Options tab
Graphics tab
Optional Lower Tray or Optional Hard Drive
PostScript tab
Using the Tektronix driver for Windows
Interface Select Then do the following
LPTx
LPTx or COMx Printers-Network Connections dialog box
26Phaser 360 Color Printer
Close
If you are using PC/NFS
Network Settings
Print Net Jobs Direct box
Using the Adobe PostScript driver for Windows
Features tab
Corrections, Print Quality modes, and Optional Lower Tray
Job Control tab
Using the Windows NT 3.51 PostScript driver
Using the Windows NT 4.0 PostScript driver
Setting up installed options
Phaser 360 printer, and select Properties in the menu
Making default settings
Selecting a printers Default Document Properties
Device Settings sheet, locate Form To Tray Assignment
Selecting printer options within an application Page Setup
Selecting printer options within an application Print
Document Defaults Properties Advanced tab
Printing from MS-DOS
Using Macintosh printer drivers
Printing from a Macintosh
Media size Tray selection
Select Image Smoothing
Using the Phaser 360 printer driver
Select media size
Select printer-specific options
TekColor Options dialog box
Using the Apple LaserWriter 8 printer driver
Using the Phaser 360 GX printer driver
Printing with a desktop printer
Selecting printing options
Printing from a Unix workstation
Overview
Unix workstations
Workstation Operating System
OpenVMS workstations
Printing from specific applications
Printing Beyond the Basics
Adjusting the color of your prints
TekColor correction descriptions
Automatic General all-purpose printing
Vivid Color Printing the brightest colors and a truer blue
Simulate Display Simulating screen colors
Press options Matching printing press colors
Use Printer Setting Using the printer’s current default
None Turning off all color corrections
Monochrome Printing in gray scale
Printing and using the color sampler charts
Process Sampler
Tips for working with color
General guidelines
If your Phaser 360 printer is shared on a network
If you are using an unsupported driver
Special considerations
Application color corrections
Using the Quick Collate option
Previewing with Check Print
Using Image Smoothing
Setting the Check Print timeout
Printer languages
Working with fonts
Resident typefaces PostScript and PCL5
Downloading fonts
Using fonts with Windows
Printing a list of fonts
Printing a font list from a Macintosh
Printing a font list from a PC
From the Utilities menu, choose Download PostScript File
Improving print speed
All users
Macintosh and Windows users
Windows 3.1 users
Select Use PostScript Level 2 features
Windows 95 users
Unix workstation users
Selecting page sizes in Windows applications
Windows
Properties from the File menu
Front panel indicators
Indicator Blinking Off
Front panel overview
Two-line display
Front panel buttons
Enabling and disabling the front panel menu
Menus
Front panel menu map
Press
Printer Help Pages
Menu Map
Configuration
Startup
Printing the Help Pages
Demonstration
RGB and Cmyk Color Samplers
Printer standby modes
Normal standby
Caring For Your Printer
Moving or shipping your printer
Remove and store the maintenance tray
Lock the transit restraint
32434-06
Adding ink
Ink handling tips
Emptying the waste liner
Waste Liner a Full Open Front Cover
Waste Liner a Full Remove Tray B
9101-39
Replacing the maintenance tray
fluid if tipped. Never ship a partially used maintenance tray
Using both thumbs, push the tray in Þrmly until it latches
Cleaning the printer
Problem Cleaning procedure
If the printer has frequent media jams
If prints have light stripes or smears
Cleaning
Selecting the Cleaning Page source
Cleaning Page Source Menu
Cleaning supplies
Using isopropyl alcohol
Cleaning for ink smears and jams internal paper path
Approximate time to complete 3-6 minutes
CleanLight Stripes Clean Test
Cleaning for jams and ink smears paper-feed rollers
Approximate time to complete 5 minutes
Open the front cover
To clean the upper black rubber rollers
To clean the upper white plastic rollers
To clean the lower rubber paper-feed rollers
To clean the lower white plastic rollers
Cleaning for ink smears paper-exit path
Approximate time to complete 10 minutes
9922-138
9922-114
To clean the rubber exit rollers
To clean the white plastic exit rollers
9922-116
Cleaning for upper media tray jams media-pick roller
Automatically cleaning the media-pick roller
Print Instructions? Continue Print
9101-27
Cleaning
9922-142
Manually cleaning the media-pick roller
40Phaser 360 Color Printer
To clean the top surface of the media-pick roller
To clean the bottom of the media-pick roller
Scrub the bottom surface of the pick roller thoroughly
Cleaning for lower tray jams paper-pick rollers
Approximate time to complete 1 minute
Caring For Your Printer 44Phaser 360 Color Printer
Troubleshooting
Front panel error messages
Message Action
Front panel messages contd
Upper Media Tray
Troubleshooting quick reference
Symptom Solution
Image Quality Problems
Printing to Off
Print using color option
Print Options dialog box, select Color/Grayscale
Transmission Retry to
Turn off Background Printing through the Chooser
Printing and installation problems contd
SymptomSolution
Displays Processing
Network problems Macintosh
Light stripes on prints cleaning the printhead
Approximate time to complete 10 minutes
Black Cyan Magenta Yellow
14Phaser 360 Color Printer
Media jams and misfeeds
Preventing media jams
Locating jammed media
Clearing a media jam
9922-60
9922-123
Ink smears
If your file doesn’t print
General things to check for
Macintosh users
Windows users general
Details tab
If you are using PC/NFS
If you can’t print from Windows to an LPT port
Properties
Click Add Port
Checking the printer’s language mode
PostScript printing errors
Mac OS users
Windows 3.1 users
Windows 95 users
Using a PostScript error handler
Fixing timeout problems in Windows
Windows timeout From Windows
Windows timeout From DOS and Windows
Mode LPT1,,P
Printer’s timeout
Printed colors are not what you expected
Printing Pantone Colors
Blue colors look too purple
Troubleshooting
Prints do not reflect your settings
Sharing the printer on a network
If the Apple Printer Utility does not work
Receiving email update notices
On-line support
Customer Support Centers
Getting information by fax
Country Numbers
Customer Support
Supplies, Accessories Expanding Your Printing System
Customizing your printer
Printer supplies
Supplies Order number Description
PhaserShare network cards
Description Order number
Lower Paper Tray Assembly 625-sheet capacity
Paper and transparency trays
Description Order number High-capacity transparency tray
Memory upgrade
Tektronix external hard disk
Additional software Unix and VMSPhaserPrint for Unix
Description Connectors and cable length
Interface cables and adapters
Page
Regulatory Information Specifications
Declaration of conformity
Regulatory Information and Specifications
Environmental phenomena Test specification Basic standard
Material Safety Data Sheets
FCC Class B warning for 115 VAC equipment
Msds for ColorStix ink sticks
California Prop Not listed
Original preparation date March 10, 1994 RC
Msds for silicone oil drum fluid
Stability Stable
Original preparation date October 21, 1994 RC
Specifications
Printer tilt
11-9
Safety and emissions
Certified EN60950
Index
Index-1
Index-2Phaser 360 Color Printer
Check Print
Index-3
Index-4Phaser 360 Color Printer
Index-5
Index-6Phaser 360 Color Printer
Index-7
Index-8Phaser 360 Color Printer
Index-9
Index-10Phaser 360 Color Printer