GSC-R60/GSC-R30
Page
Toshiba America Consumer Products, L.L.C
Preface
Copyright /Image Rights
Before Using Your Camera
Tradema rk Information
This hard disk camera supports Exif Print
CD-ROM
Accessories
Graphic symbol definitions
Safety Precautions
When using the product
Do not swing the camera while walking
About the AC adapter
About the battery
Use only the specified battery GSC-BT5
Contents
Advanced Deletion
Pa y a tt entio n to Condensation
Handling Your Camera and Cradle
Avoid S ubjec ting t he Camera to Vibrations or Impacts
Be C arefu l o f Ele ctromagnetic Waves
Whe n Cleaning the Camera
Be C arefu l o f Magnetic Fields
Sp ec ifications
Handling the AC Adapter
Whe n not Using the Battery for a Long Time
Handling the Battery
About Battery Use
Sp ec ificat ions
Getti ng the Most Out of Your Battery
Char ging the Bat tery
Us ing the Hard Disk Drive
About the Built-in Hard Disk Drive
About SD Memory Cards
Preparation
Ca mera
Component Names
Camera LEDs
Using the OK Button
Cradle Operation
Cr ad le* o nly with GSC-R60
Cradle LEDs
REC
Mode REC
Mode Play
Re mo te Con trol
Close the battery cover
Inserting and Removing the Battery
Inser ting the Battery
Open the battery cover
Re mo ving the Battery
Connect the components in the sequence to above
Charging
Char ging with the Camera in the Cradle
Char ging in the Camera
Battery Level Display
Ca mera O pe ratio n Time Using the Battery
Re mo ving an SD Card
Inserting and Removing SD Cards
Inser ting an SD Card
Turning the Camera On and Off
Turning the Ca mera On and Off by Sliding the Power Switch
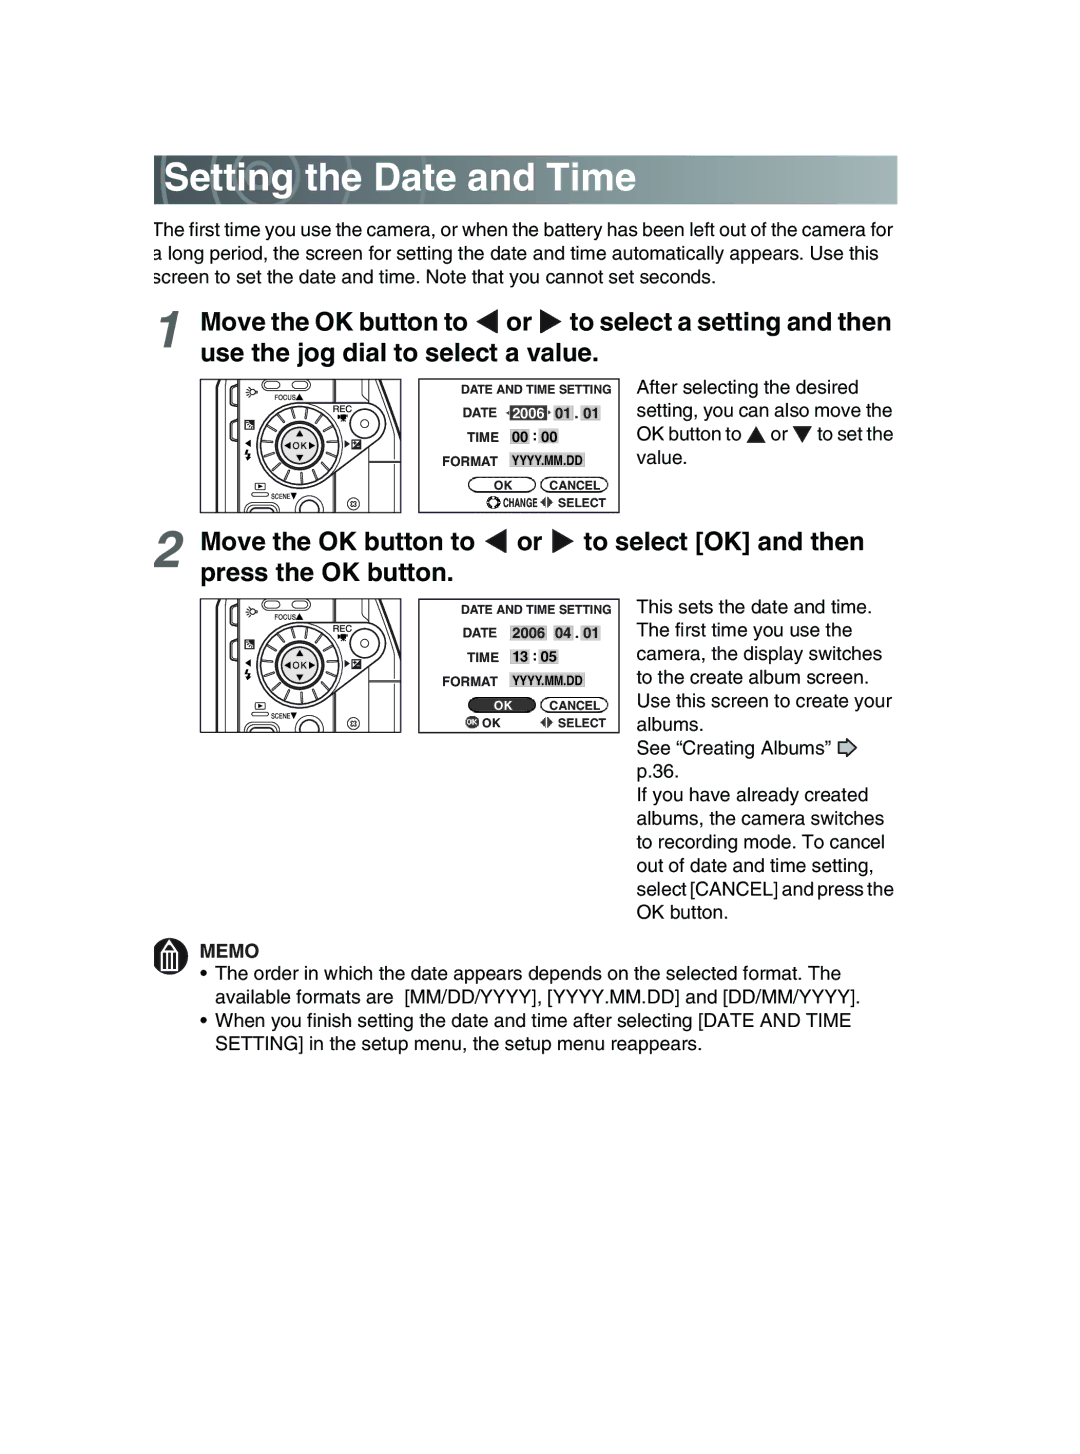
Setting the Date and Time
Album Types
Creating Albums
Use the jog dial to select an album type
Press the OK button
Albums and Drives
Drive SD card Album
Using the LCD Monitor
Effect ive Range
About the Remote Control
Lo a d ing the Battery
Videos
Quick Reference Guide
To print still images To save images onto
Shooting Video
Adjus ting th e Grip Belt
Before You Shoot
Holding the Cam era
LCD Display W hen in Recording Mode Information Display
LCD Display When in Recording Mode Normal Display
Press the REC button
Pausing Video Recording
Shooting Video
Memo
REC Pause OFF REC Pause on
LCD Monitor Display during Video Recording
Button Operations during Video Recording
Taking Still Images
Fo c u sing
When the Camera Will not Focus
Zoom Bar Display
Shooting with the Zoom
Memo
LCD Monitor Display during Still Image Playback
Playback
Playi ng back Still Images
Move the OK button to
Play i ng Back Vid eo
Use the jog dial to select the video you want to play
While a video is playing or paused, move the OK button to
Button Operations during Video Playback
One-touch Skip/Replay
Reservation
LCD Monitor Display during Video Playback
Select Erase ONE Image and press the OK button
Erasing Images Erase one Image
Advanced Photography
Flash Restrictions Imposed by Scene Settings
Setting the Scene
Set the camera to recording mode and move the OK button to
Memo
Suggested Situations for the Flash Settings
Setting the Flash
Memo
Shooting Range Imposed by Focus Settings
Setting the Focus
Use the jog dial to focus the shot
Focus settings p.62, select
Anual Focus
Subjects for Which Exposure Bias Works
Using Exposure Bias
Set the camera to recording mode and press the button
Using the Backlight Compensation Function
Photography Using the Assist Light
Duringfully. video recording, press the REC button down
Shooting Still Images during Video Recording
Using the Conversion Lens or Lens Hood
To return to shooting, press the Menu button
Changing the Recording Menu Settings
Recording mode, press the Menu button
Use the jog dial to select a menu and press the OK button
Button Operations during Recording Menu Setting
Recording Menu
Use the jog dial to select HDD and press the OK button
Creating and Selecting Albums
Cr eatin g Albums on the Hard Disk Drive
Ch anging t he Type of an Album on the Hard Disk Drive
Use the jog dial to select YES or no and press the OK button
Shooting with the Self-timer
Continuous Recording
Continuous Recording
Memo
Spwide
Setting the Video Quality
Approximate Video Recording Times
Hqwide
Memo
Approximate Number of Available Shots for Still Images
Setting the Still Image Size
Memo
Incandescent Lamp
Auto
Cloud
Fluorescent Light
Us ing P rese t Dat a
Over wri ting Pres et Data
Changing the Sensitivity
Shooting with Image Stabilization
Wind Noise Reduction
Less
Changing the Microphone Sensitivity
More
Digital Zooming
Center Weighted
Selecting the Metering Mode
Selecting the Focus Area AF Mode
Vivid
Changing Image Colors
Standard
Soft
Changing the Image Contrast
Hard
Changing the Image Sharpness
Previewing Images
Pausing Video Recording
Changing the LCD Brightness
While recording video, press the Menu button
Ch anging t he LCD Brightness during Video Recording
Advanced Playback
To Move to Another Album
Changing Levels
Displaying Images as a List Thumbnail Display
Album display, slide the zoom lever towards W
Se lecting Albums and Drives for Playback
Select thumbnail display Slide the zoom lever towards W
File
Selecting the Video Playback Method
Continuous Play
Press the REC button down fully
Capturing Single Video Frames as Still Images
Use the jog dial to select a chapter and press the OK button
Slide the zoom lever towards T
Zo omed Still Ima ge Playback
Using Zoomed Playback
Zo omed Video Playback
Viewing Rotated Still Images
Selectimage.playback mode and use the jog dial to select
Switching the Playback Display
To exit the play menu, press the Menu button
Changing Playback Settings
Specify the desired options in the settings screen
Playback mode, press the Menu button
Play Menu
Button Operations during Play Menu Setting
Animation
Setting up and Running Auto Play
Se ttin g up a uto Play
Play Interval
Use the jog dial to select Execute and press the OK button
Runnin g Auto Play
Confirming Images in Enlarged View
Protecting Images
Selecting an d Protecting Images
Move the OK button to to select OK and press the OK button
To Protect all the Albums
Protecti ng Albums
To Unprotect all the Images in an Album
Re mo ving Protection
Use the jog dial to select Next and press the OK button
Copying Images
Copying all Images in an Album
Moving Images
Moving all Images in an Album
Use the jog dial to select SET and press the OK button
Spe c ifying Indivi dual Dpof Settings
Printing all Images in an Album
Use the jog dial to select Clear ALL and press the OK button
Clea ring Dpof S ettings
Printing Directly from the Camera Using PictBridge
Print Date
Paper Size
Layout
Paper Type
Move the OK button to to play the video
When you have identified the point, press the OK button
Editing Videos
Specify Thumbnail Images
Button Operations during Video Editing
Deleting the Previous Part
Deleting the Remainder
Thumbnail Screen
Creating Image Lists for Recording to DVD
Recording all Images in an Album
Advanced Deletion
Erasing Selected Images
Erasing all Images in an Album
To Erase all the Albums on a Drive
Erasing all the Files on a Drive
Basic Camera Settings
Changing the Basic Camera Settings
Setup Menu
Button Operations during Setup Menu Setting
Sound
Press the Menu button to return to the setup menu
Recording LED
Setting the LEDs
AF Assist Light
Auto Power Off
LCD-linked Power
Video Output
Language
Us ing the Hard Disk Drive Protection Function
System
Re se tting the System
Use the jog dial to select Reset and press the OK button
Use the jog dial to select Format and press the OK button
Fo rmatting Drive s
Displaying the Version Information
Connecting to Other Devices
Connecting to a TV
Connecting to a TV for Playback
Connecting to a PC
Press the USB button on the cradle
HIG H S Peed MO DE and Full Speed Mode
Disc onnecting the Camera from the PC
Connecting to a DVD Recorder with DVR
Press the LAN button on the cradle
Working with Images on Your P
About the Bundled Software
About the Software
DVD-VR DVD-RW, DVD-RAM DVD+VR DVD+R/+RW
Supported PCs
Sy s t em Requirements for Connected PCs
RAM
Fo ld er Confi gura tion for Image Backups
About the Fi le Configuration
Restart your PC
Installing the Software
Click the acdsee7 PowerProducer 3 icon
Viewing Camera Images on a PC
Select USB mode
Click View data using ACDSee
ACDSee Main Window
Click the Next button
Click Backup data to CD/DVD
Backing up Camera Data
Complete the disc label and then click the Next button
Select the folder to be copied and click the Next button
Click Backup data to PC using synchronization
Click the button
Click Create a DVD-Video using DVD creation list
Us ing a DVD Cre ation List to Create DVDs
Set the options and click the Next button
Click Backup data using Acquire Wizard
Us ing the Import Wizard to Back Up Data to a PC
Select the images to be copied and click the Next button
Print ing
Printing Still Images
Printing with the Ca mera Connected Directly to the Printer
Click Done
Resizing Images
Copying Still Images from a PC to the Camera
Writing Print Information on a PC
Insert a DVD into the drive on the PC and click the button
Recording Images onto DVDs
Memo
Connecting to a DVD Recorder with DVR
Group Name
Password
Su pported DVD Recorders with DVR
Camera Name
IP Config Manual IP Address
When you have finished entering text, press the OK button
OK Cancel Selectchange
Transferring Videos to a DVD Recorder with DVR
Transferring Videos to a DVD Recorder with DVR
Use the jog dial to select Transfer and press the OK button
Transferring all Images in an Album
Appendix
Specifications
Recording format MPEG-2 PS
Troubleshooting
Edit one or more videos
Slide the Power switch across
AUTO, flash use is restricted
Sunset
Suppressed Flash
RED-EYE Reduction
Flash
Back still Was changed on a PC, etc Or file names
Unprotect an Image SD card is locked Unlock the SD card
You have already specified Maximum number of prints
An album Images
CD-ROM
AC adapter is not Connect the AC adapter
Error Messages
Storing
Paper Error
No INK
No Paper
Backlight compensation
Glossary
Jpeg
Index
Above Warranties are Subject to the Following Conditions
How to Obtain Warranty Services
Limited One 1 Year Warranty on Parts and Labour
Page
Arbitration and Dispute Resolution
Page
Page
Page
Page
Page
Page
Page
Page
Page
Page
Page
Page
Page
Page
Page
Page
Page
Page
Page
Page
Page
Page
Page
Page
Page
Page
Page
Page
Page
Page
Page
Page
Page
Page
Page
Page
Page
Page
Page
Page
Page
Page
Page
Page
Page
Page
Page
Page
Page
Page
Page
Page
Page
Page
Page
Page
Page
Page
Page
Page
Page


 Setting the Date and Time