UNIT LOUVER

[3] Writing the setting data to EEPROM

The settings stored in the EEPROM of the P.C. board for indoor unit servicing are the factory-set values. Step 1 Push SET , CL and TEST buttons on the remote controller simultaneously for more than 4 seconds.

In the group control operation, the unit No. displayed for the first time is the header unit No.

At this time, the CODE No. (DN) shows “￿￿￿”. Also, the fan of the indoor unit selected starts its operation and the swing operation starts if it has the louvers.

(The unit No. “￿￿” is displayed if the auto-address setting mode is interrupted in [2] step 2 a))

Step 2 Every time when button is pushed, the indoor unit No. in the group control operation are displayed in order.

(The settings stored in the EEPROM of the P.C. board for indoor unit servicing are the factory-set values.)

Specify the indoor unit No. with its P.C. board replaced to the P.C. board for indoor unit servicing. (You cannot perform this operation if “￿￿” is displayed.)

Step 3 Select the CODE No. (DN) can be selected by pushing the / button for the temperature setting.

Set the indoor unit type and capacity.

The factory-set values shall be written to the EEPROM by changing the type and capacity.

1.Set the CODE No. (DN) to “￿￿￿”. (without change)

2.Select the type by pushing / buttons for the timer setting.

(For example, 4-way Air Discharge Cassette Type is set to “0001”. Refer to table 2)

3.Push SET button.

(The operation completes if the setting data is displayed.)

4.Change the CODE No. (DN) to “￿￿￿” by pushing / buttons for the temperature setting.

5.Select the capacity by pushing / buttons for the timer setting. (For example, 80 Type is set to “0012”. Refer to table 3)

6.Push SET button.

(The setting completes if the setting data are displayed.)

7.Return to the normal stop status by pushing TEST button.

(Approx. 1 minute is needed to start operation of the remote controller.)

Step 4 Write the on-site setting data to the EEPROM, such as address setting, etc. Perform the steps 1 and 2 above again.

Step 5 Change the CODE No. (DN) to “￿￿￿” by pushing / buttons for the temperature setting. (this is the setting for the filter sign lighting time.)

Step 6 Check the setting data displayed at this time with the setting data put down in [1].

1.If the setting data is different, modify the setting data by pushing / buttons for the timer setting to the data put down in [1].

The operation completes if the setting data is displayed.

2.If the data is the same, proceed to next step.

Step 7

Change the CODE No. (DN) by pushing

/

buttons for the temperature setting.


As described above, check the setting data and modify to the data put down in [1].

Step 8

Repeat the steps 6 and 7.


Step 9

After the setting completes, push TEST button to return to the normal


stop status. (It takes approx. 1 min until the remote control

operation is available again.)

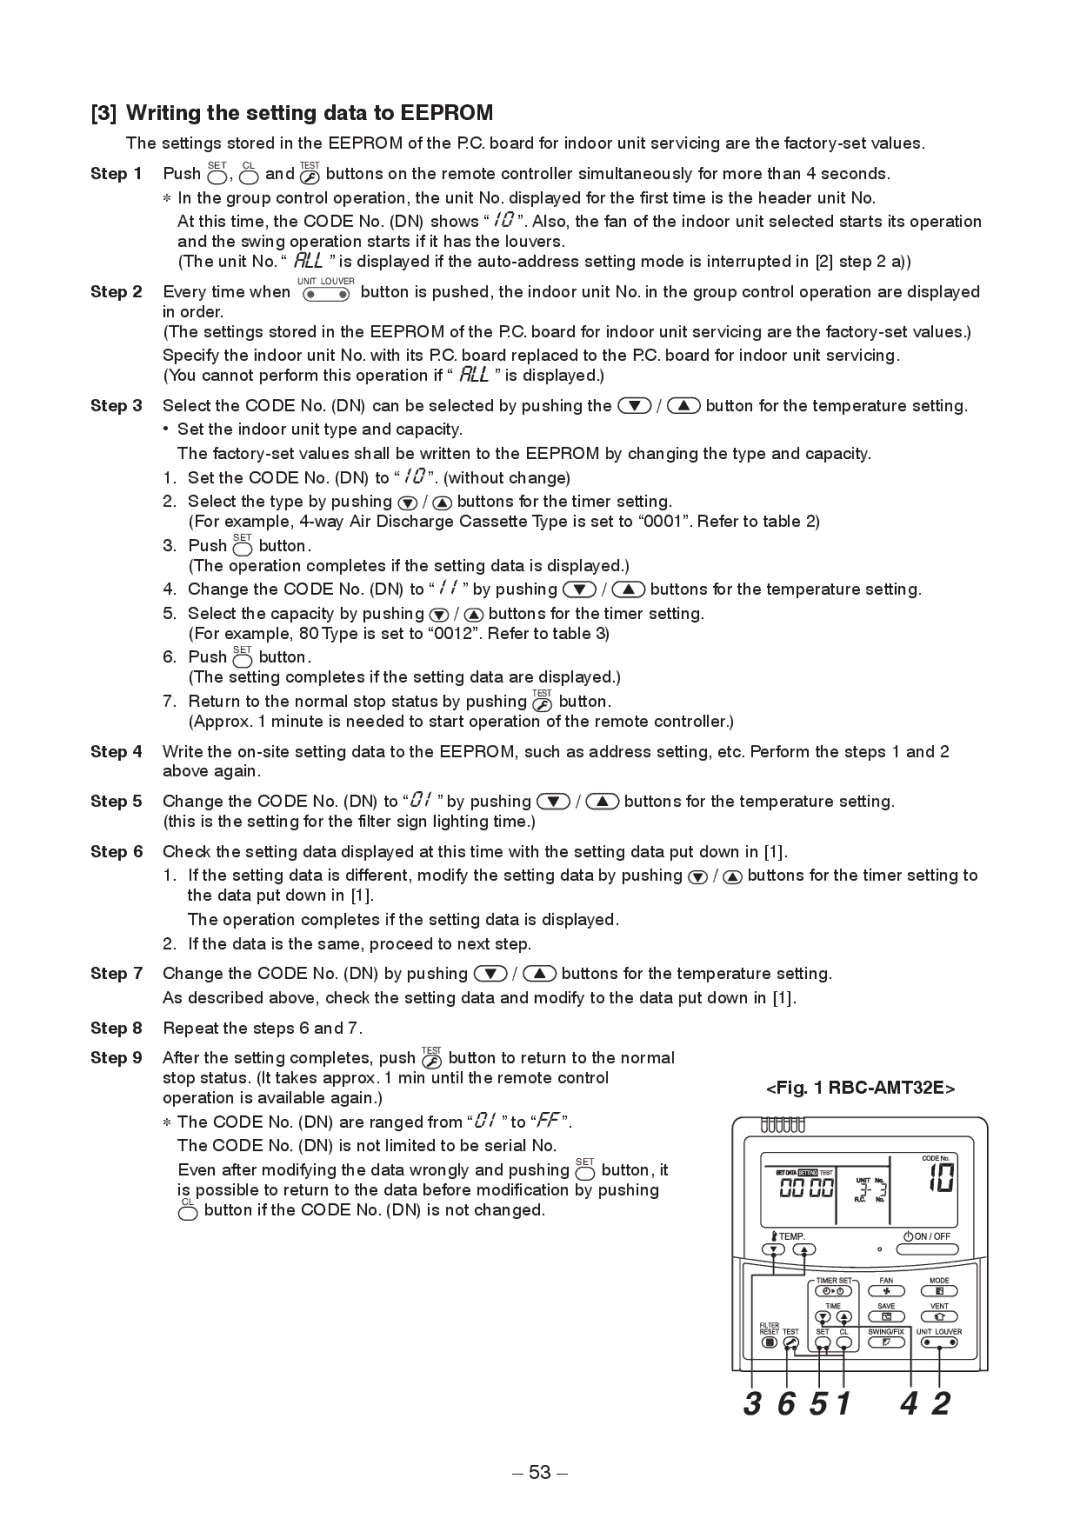
<Fig. 1 RBC-AMT32E>


The CODE No. (DN) are ranged from “￿￿￿” to “..￿”. The CODE No. (DN) is not limited to be serial No.

Even after modifying the data wrongly and pushing SET button, it is possible to return to the data before modification by pushing CL button if the CODE No. (DN) is not changed.

3 6 5 1

4 2

– 53 –

Page 53
Image 53
Toshiba RAV-SM2802DT-TR, RAV-SM2802DT-E Writing the setting data to Eeprom, Step, Operation is available again

RAV-SM2802DT-TR, RAV-SM2242DT-TR, RAV-SM2802DT-E specifications

Toshiba has long been a leader in heating, ventilation, and air conditioning (HVAC) technology, offering innovative solutions that cater to both residential and commercial needs. Among their impressive lineup, the Toshiba RAV-SM2802DT-E and RAV-SM2242DT-E stand out as exceptional models designed for efficiency, performance, and comfort.

The RAV-SM2802DT-E is a powerful unit ideal for larger spaces, boasting a cooling capacity of 28,000 BTU/h and a heating capacity of 31,000 BTU/h. This model features a highly efficient inverter compressor, which adjusts the power consumption based on the cooling or heating demand, ensuring optimal energy use. This inverter technology not only reduces energy consumption but also maintains a stable indoor temperature for enhanced comfort.

On the other hand, the RAV-SM2242DT-E is tailored for mid-sized applications with a cooling capacity of 22,000 BTU/h and a heating capacity of 25,000 BTU/h. This model also embraces inverter technology, promoting lower operational costs while delivering reliable performance. Both units come with a high energy efficiency rating, reducing environmental impact and saving on utility bills.

One of the key characteristics of these Toshiba models is their advanced filtration system. Equipped with a high-performance filtration mechanism, they can effectively reduce dust, allergens, and other pollutants, ensuring a healthier indoor environment. The units also operate quietly, contributing to a peaceful atmosphere, whether in a home, office, or commercial space.

Both the RAV-SM2802DT-E and RAV-SM2242DT-E are designed with user convenience in mind. They come with a user-friendly remote control, allowing for easy adjustments and settings from anywhere in the room. Compatibility with smart home systems further enhances user experience by enabling remote monitoring and control through smartphones or tablets.

Constructed with durability in mind, these units are built to withstand diverse weather conditions, making them suitable for various climatic environments. Additionally, their aesthetic design allows for seamless integration into any setting, ensuring that performance does not compromise on looks.

In summary, Toshiba's RAV-SM2802DT-E and RAV-SM2242DT-E offer a blend of superior technology, energy efficiency, and user-friendly features. With their inverter technology, advanced filtration systems, and durable designs, these models represent Toshiba's commitment to quality and innovation in the HVAC industry. Whether for residential or commercial applications, these units guarantee comfort and reliability all year round.