9. Windows Client (continued)
9.4.3Panel Array Mode (continued)
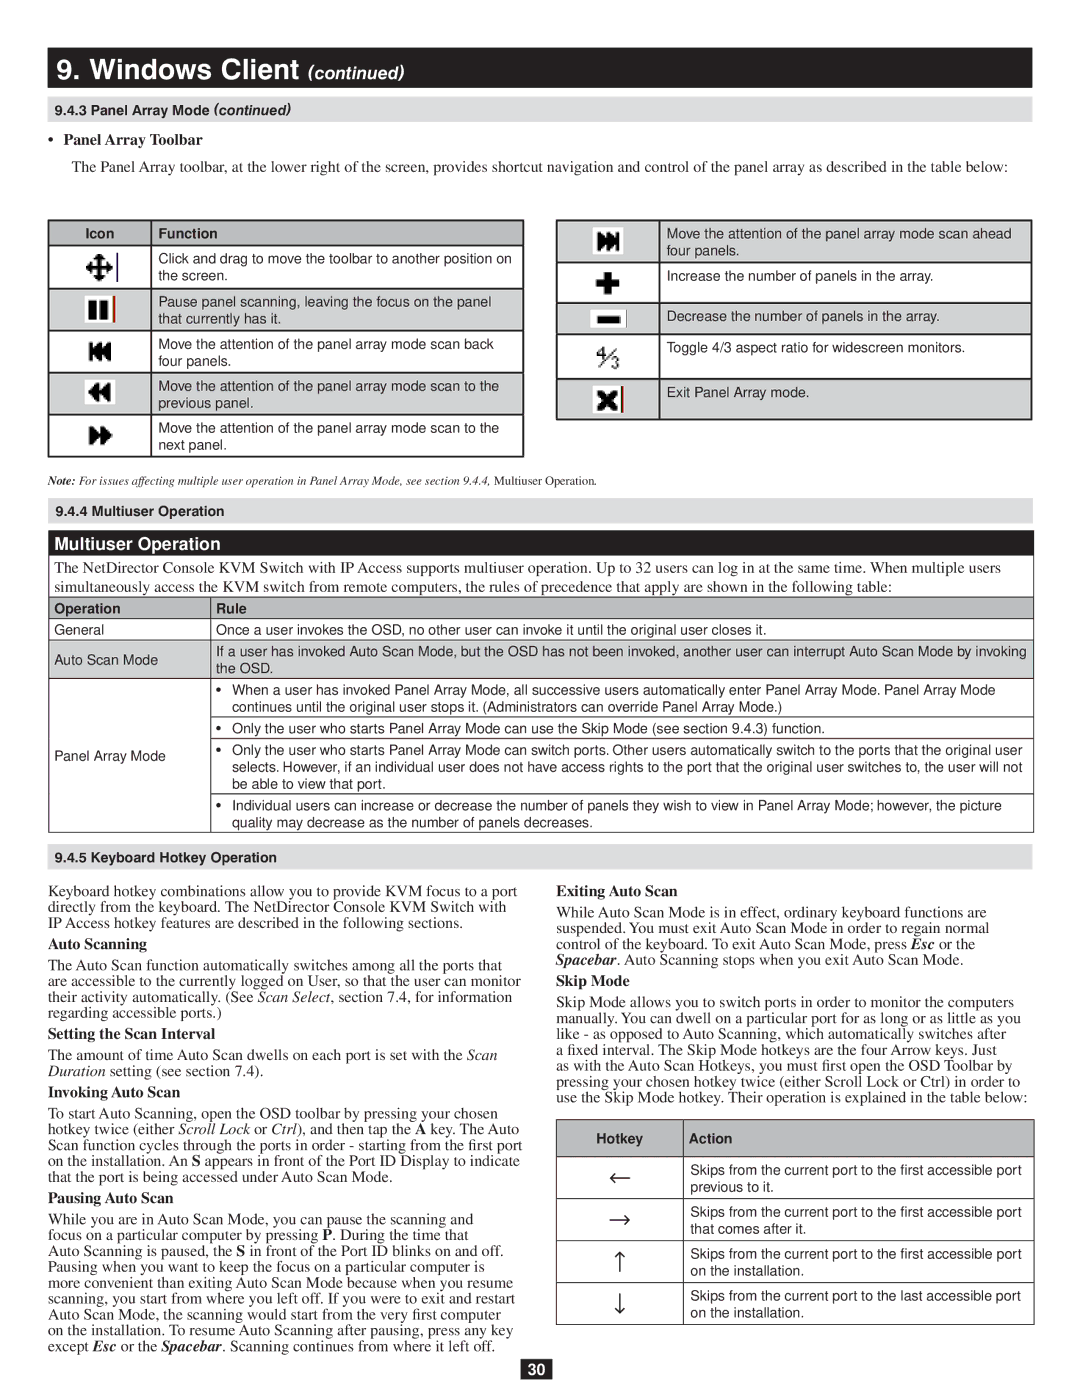
•Panel Array Toolbar
The Panel Array toolbar, at the lower right of the screen, provides shortcut navigation and control of the panel array as described in the table below:
Icon | Function |
|
|
| Click and drag to move the toolbar to another position on |
| the screen. |
|
|
| Pause panel scanning, leaving the focus on the panel |
| that currently has it. |
|
|
| Move the attention of the panel array mode scan back |
| four panels. |
|
|
| Move the attention of the panel array mode scan to the |
| previous panel. |
|
|
| Move the attention of the panel array mode scan to the |
| next panel. |
|
|
Move the attention of the panel array mode scan ahead four panels.
Increase the number of panels in the array.
Decrease the number of panels in the array.
Toggle 4/3 aspect ratio for widescreen monitors.
Exit Panel Array mode.
Note: For issues affecting multiple user operation in Panel Array Mode, see section 9.4.4, Multiuser Operation.
9.4.4 Multiuser Operation
Multiuser Operation
The NetDirector Console KVM Switch with IP Access supports multiuser operation. Up to 32 users can log in at the same time. When multiple users simultaneously access the KVM switch from remote computers, the rules of precedence that apply are shown in the following table:
Operation | Rule | |
General | Once a user invokes the OSD, no other user can invoke it until the original user closes it. | |
Auto Scan Mode | If a user has invoked Auto Scan Mode, but the OSD has not been invoked, another user can interrupt Auto Scan Mode by invoking | |
the OSD. | ||
| ||
|
| |
| • When a user has invoked Panel Array Mode, all successive users automatically enter Panel Array Mode. Panel Array Mode | |
| continues until the original user stops it. (Administrators can override Panel Array Mode.) | |
|
| |
| • Only the user who starts Panel Array Mode can use the Skip Mode (see section 9.4.3) function. | |
|
| |
Panel Array Mode | • Only the user who starts Panel Array Mode can switch ports. Other users automatically switch to the ports that the original user | |
selects. However, if an individual user does not have access rights to the port that the original user switches to, the user will not | ||
| ||
| be able to view that port. | |
| • Individual users can increase or decrease the number of panels they wish to view in Panel Array Mode; however, the picture | |
| quality may decrease as the number of panels decreases. | |
|
|
9.4.5 Keyboard Hotkey Operation
Keyboard hotkey combinations allow you to provide KVM focus to a port directly from the keyboard. The NetDirector Console KVM Switch with IP Access hotkey features are described in the following sections.
Auto Scanning
The Auto Scan function automatically switches among all the ports that are accessible to the currently logged on User, so that the user can monitor their activity automatically. (See Scan Select, section 7.4, for information regarding accessible ports.)
Setting the Scan Interval
The amount of time Auto Scan dwells on each port is set with the Scan Duration setting (see section 7.4).
Invoking Auto Scan
To start Auto Scanning, open the OSD toolbar by pressing your chosen hotkey twice (either Scroll Lock or Ctrl), and then tap the A key. The Auto Scan function cycles through the ports in order - starting from the first port on the installation. An S appears in front of the Port ID Display to indicate that the port is being accessed under Auto Scan Mode.
Pausing Auto Scan
While you are in Auto Scan Mode, you can pause the scanning and focus on a particular computer by pressing P. During the time that Auto Scanning is paused, the S in front of the Port ID blinks on and off. Pausing when you want to keep the focus on a particular computer is more convenient than exiting Auto Scan Mode because when you resume scanning, you start from where you left off. If you were to exit and restart Auto Scan Mode, the scanning would start from the very first computer on the installation. To resume Auto Scanning after pausing, press any key except Esc or the Spacebar. Scanning continues from where it left off.
Exiting Auto Scan
While Auto Scan Mode is in effect, ordinary keyboard functions are suspended. You must exit Auto Scan Mode in order to regain normal control of the keyboard. To exit Auto Scan Mode, press Esc or the Spacebar. Auto Scanning stops when you exit Auto Scan Mode.
Skip Mode
Skip Mode allows you to switch ports in order to monitor the computers manually. You can dwell on a particular port for as long or as little as you like - as opposed to Auto Scanning, which automatically switches after a fixed interval. The Skip Mode hotkeys are the four Arrow keys. Just as with the Auto Scan Hotkeys, you must first open the OSD Toolbar by pressing your chosen hotkey twice (either Scroll Lock or Ctrl) in order to use the Skip Mode hotkey. Their operation is explained in the table below:
Hotkey | Action |
Skips from the current port to the first accessible port previous to it.
Skips from the current port to the first accessible port that comes after it.
Skips from the current port to the first accessible port on the installation.
Skips from the current port to the last accessible port on the installation.
30