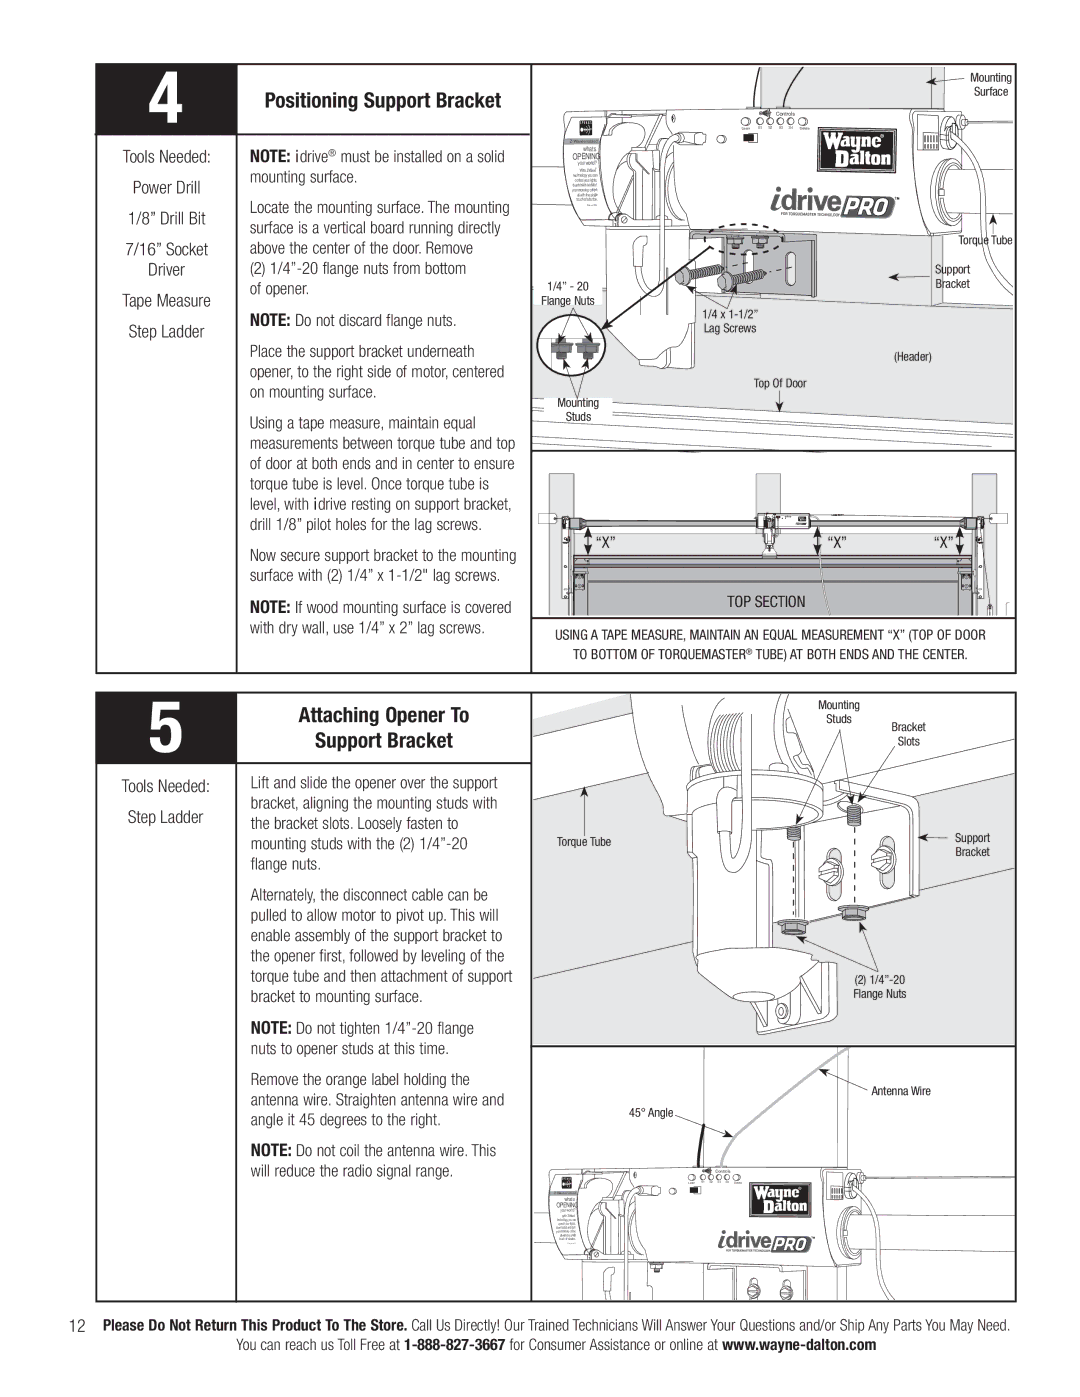
4Positioning Support Bracket
Tools Needed: | NOTE: idrive® must be installed on a solid | |
Power Drill | mounting surface. | |
| ||
1/8” Drill Bit | Locate the mounting surface. The mounting | |
surface is a vertical board running directly | ||
| ||
7/16” Socket | above the center of the door. Remove | |
Driver | (2) | |
Tape Measure | of opener. | |
NOTE: Do not discard flange nuts. | ||
Step Ladder | ||
| ||
| Place the support bracket underneath | |
| opener, to the right side of motor, centered | |
| on mounting surface. | |
| Using a tape measure, maintain equal | |
| measurements between torque tube and top | |
| of door at both ends and in center to ensure | |
| torque tube is level. Once torque tube is | |
| level, with idrive resting on support bracket, | |
| drill 1/8” pilot holes for the lag screws. | |
| Now secure support bracket to the mounting | |
| surface with (2) 1/4” x | |
| NOTE: If wood mounting surface is covered | |
| with dry wall, use 1/4” x 2” lag screws. |
|
| Mounting |
|
| Surface |
| Controls |
|
Learn S1 S2 | S3 S4 Delete |
|
|
| |
what’s |
|
|
OPENING |
|
|
your world? |
|
|
® |
|
|
|
| |
technology you can |
|
|
control yourlights, |
|
|
thermostat andstart |
|
|
your morning coffee, |
|
|
all withthe single |
|
|
touch of a button. |
|
|
Find out more: |
|
|
|
| |
|
| Torque Tube |
|
| Support |
1/4” - 20 |
| Bracket |
Flange Nuts |
|
|
1/4 x |
|
|
Lag Screws |
|
|
|
| (Header) |
Top Of Door |
| |
Mounting |
|
|
Studs |
|
|
“X” | “X” | “X” |
TOP SECTION |
| |
USING A TAPE MEASURE, MAINTAIN AN EQUAL MEASUREMENT “X” (TOP OF DOOR | ||
TO BOTTOM OF TORQUEMASTER® TUBE) AT BOTH ENDS AND THE CENTER. | ||
5 | Attaching Opener To |
|
|
|
| Mounting | |
|
|
|
|
| |||
|
|
|
|
| Studs | Bracket | |
| Support Bracket |
|
|
|
|
| |
|
|
|
|
|
| Slots | |
Tools Needed: | Lift and slide the opener over the support |
|
|
|
|
|
|
Step Ladder | bracket, aligning the mounting studs with |
|
|
|
|
|
|
the bracket slots. Loosely fasten to |
|
|
|
|
|
| |
|
|
|
|
|
| Support | |
| mounting studs with the (2) | Torque Tube |
|
|
|
| |
|
|
|
|
| Bracket | ||
| flange nuts. |
|
|
|
|
| |
|
|
|
|
|
|
| |
| Alternately, the disconnect cable can be |
|
|
|
|
|
|
| pulled to allow motor to pivot up. This will |
|
|
|
|
|
|
| enable assembly of the support bracket to |
|
|
|
|
|
|
| the opener first, followed by leveling of the |
|
|
|
|
|
|
| torque tube and then attachment of support |
|
|
|
|
| (2) |
| bracket to mounting surface. |
|
|
|
|
| Flange Nuts |
| NOTE: Do not tighten |
|
|
|
|
|
|
| nuts to opener studs at this time. |
|
|
|
|
|
|
| Remove the orange label holding the |
|
|
|
|
| Antenna Wire |
| antenna wire. Straighten antenna wire and |
|
|
|
|
| |
| 45° Angle |
|
|
|
|
| |
| angle it 45 degrees to the right. |
|
|
|
|
| |
|
|
|
|
|
|
| |
| NOTE: Do not coil the antenna wire. This |
|
|
|
|
|
|
| will reduce the radio signal range. |
|
|
| Controls |
|
|
|
| Learn | S1 | S2 | S3 S4 | Delete |
|
|
|
|
|
|
|
| |
|
| what’s |
|
|
|
|
|
|
| OPENING |
|
|
|
|
|
|
| your world? |
|
|
|
|
|
|
| ® |
|
|
|
|
|
|
| With |
|
|
|
|
|
|
| technology you can |
|
|
|
|
|
|
| control your lights, |
|
|
|
|
|
|
| thermostatandstart |
|
|
|
|
|
|
| your morning coffee, |
|
|
|
|
|
|
| allwiththesingle |
|
|
|
|
|
|
| touch of a button. |
|
|
|
|
|
|
| Find out more: |
|
|
|
|
|
|
|
|
|
|
|
| |
12Please Do Not Return This Product To The Store. Call Us Directly! Our Trained Technicians Will Answer Your Questions and/or Ship Any Parts You May Need.
You can reach us Toll Free at