TorqueMaster®
12 | Setting Spring Tension | |
| ||
|
| |
Tools Needed: | See chart below for proper spring tension setting. | |
| ||
Power Drill | Beginning with the right hand side, ensure the counterbalance | |
cable is in the first groove of the cable drum. NOTE: Apply | ||
| ||
7/16" Socket | light pressure to the canoe clip on counter while winding | |
Driver | springs. | |
| ||
7/16" Wrench | Using a power drill (high torque/gear reduced to 1300 RPM | |
preferred) with a 7/16" socket driver, carefully rotate right | ||
| ||
Step Ladder | hand winding bolt clockwise, until counter shows | |
This will keep the counterbalance cable taut while adjusting | ||
| ||
| the left hand side counterbalance cable. | |
| Adjust left hand counterbalance cable tension (Refer to step | |
| 10). | |
| NOTE: Single spring applications require no spring winding | |
| on left hand side, but need cable tension adjusted. | |
| IMPORTANT! Ensure counterbalance cable tension is equal | |
| for both sides prior to fully winding spring(s) to appropriate | |
| number of turns. If cable tension is unequal, refer to Step 10. | |
| See the Spring Turn chart. | |
| For SINGLE SPRING applications, return to the right hand | |
| side and carefully rotate the winding bolt head clockwise until | |
| the counter shows the correct number of turns for your door | |
| or the number record during the | |
| page II. | |
| For DOUBLE SPRING applications, remain on the left hand | |
| side and carefully rotate the winding bolt head clockwise until | |
| the counter shows the correct number of turns for your door | |
| or the number record during the | |
| page II. Then return to the right hand side and wind the right | |
| hand spring to the required number of turns for your door or | |
| the number recorded during the | |
| page II. | |
| IMPORTANT! DO NOT OVERWIND. | |
| After spring is wound, hold the lock nut (in back of end | |
| bracket) stationary with a 7/16" wrench while rotating the | |
| winding bolt clockwise until snug. Tightening of the lock nut | |
| prevents spring from unwinding. Repeat for opposite side on | |
| double spring Torquemaster® systems. | |
| IMPORTANT! CAUTIOUSLY REMOVE VICE CLAMPS FROM | |
| VERTICAL TRACKS. ADJUSTMENTS TO THE RECOMMENDED | |
| NUMBER OF TURNS MAY BE REQUIRED. IF DOOR RAISES | |
| OFF THE FLOOR UNDER SPRING TENSION ALONE, THEN | |
| REDUCE SPRING TENSION UNTIL DOOR RESTS ON THE | |
| FLOOR. IF THE DOOR IS HARD TO RAISE OR DRIFTS DOWN | |
| ON ITS OWN, THEN ADD SPRING TENSION. AN | |
| UNBALANCED DOOR CAN CAUSE IDRIVE® OPERATION | |
| PROBLEMS. | |
| IMPORTANT! IF YOU ARE INSTALLING THE IDRIVE® | |
| OPENER ON A NEW GARAGE DOOR, REAR SUPPORTS WILL | |
| NEED TO BE FABRICATED/ INSTALLED TO SUPPORT THE | |
| HORIZONTAL TRACKS. REAR SUPPORTS ARE | |
| CONSTRUCTED USING PERFORATED ANGLES, HEX HEAD | |
| BOLTS/NUTS AND THEN THE MUST BE SECURELY | |
| ATTACHED TO SOUND FRAMING MEMBERS WITH LAG | |
| SCREWS. FOR DETAILED INFORMATION ON | |
| CONSTRUCTING/ SUPPORTING THE REAR SUPPORTS, | |
| REFER TO YOUR DOORS INSTALLATION INSTRUCTIONS | |
| AND OWNER’S MANUAL. | |
|
|
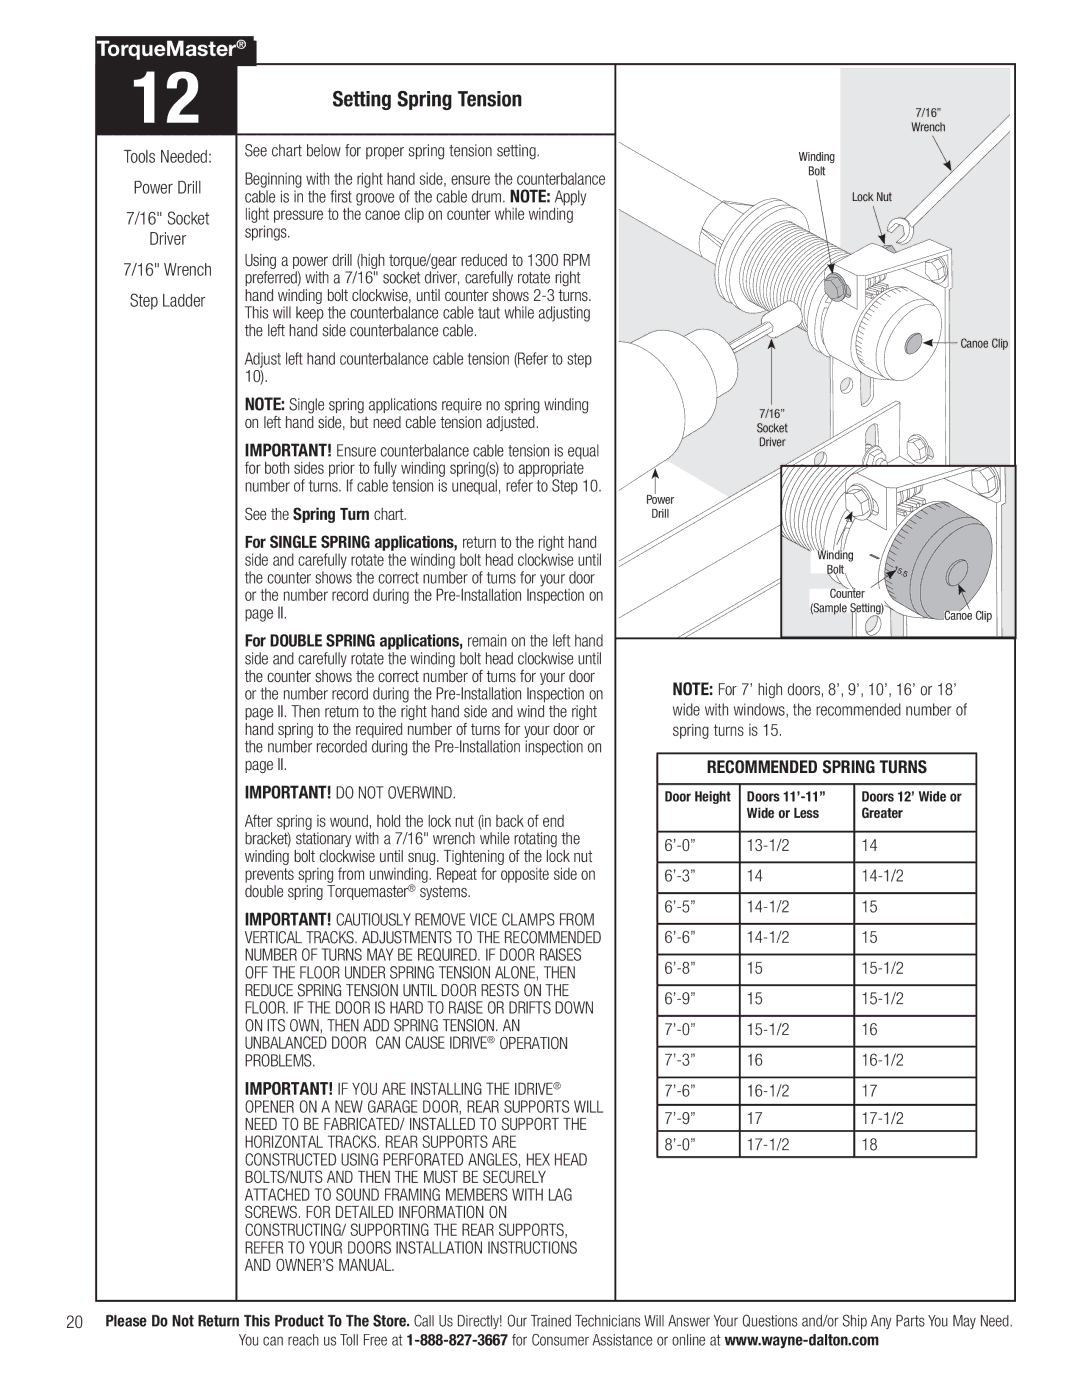
7/16” Wrench
Winding
Bolt
Lock Nut
![]()
![]() Canoe Clip
Canoe Clip
7/16” Socket Driver
Power
Drill
Winding
Bolt
Counter
(Sample Setting)
Canoe Clip
NOTE: For 7’ high doors, 8’, 9’, 10’, 16’ or 18’ wide with windows, the recommended number of spring turns is 15.
RECOMMENDED SPRING TURNS
Door Height | Doors | Doors 12’ Wide or |
| Wide or Less | Greater |
|
|
|
|
| 14 |
|
|
|
| 14 |
|
|
|
|
| 15 | |
|
|
|
| 15 | |
|
|
|
| 15 |
|
|
|
|
| 15 | |
|
|
|
16 | ||
|
|
|
16 |
| |
|
|
|
17 | ||
|
|
|
17 |
| |
|
|
|
18 | ||
|
|
|
20Please Do Not Return This Product To The Store. Call Us Directly! Our Trained Technicians Will Answer Your Questions and/or Ship Any Parts You May Need.
You can reach us Toll Free at