Drum Kit List
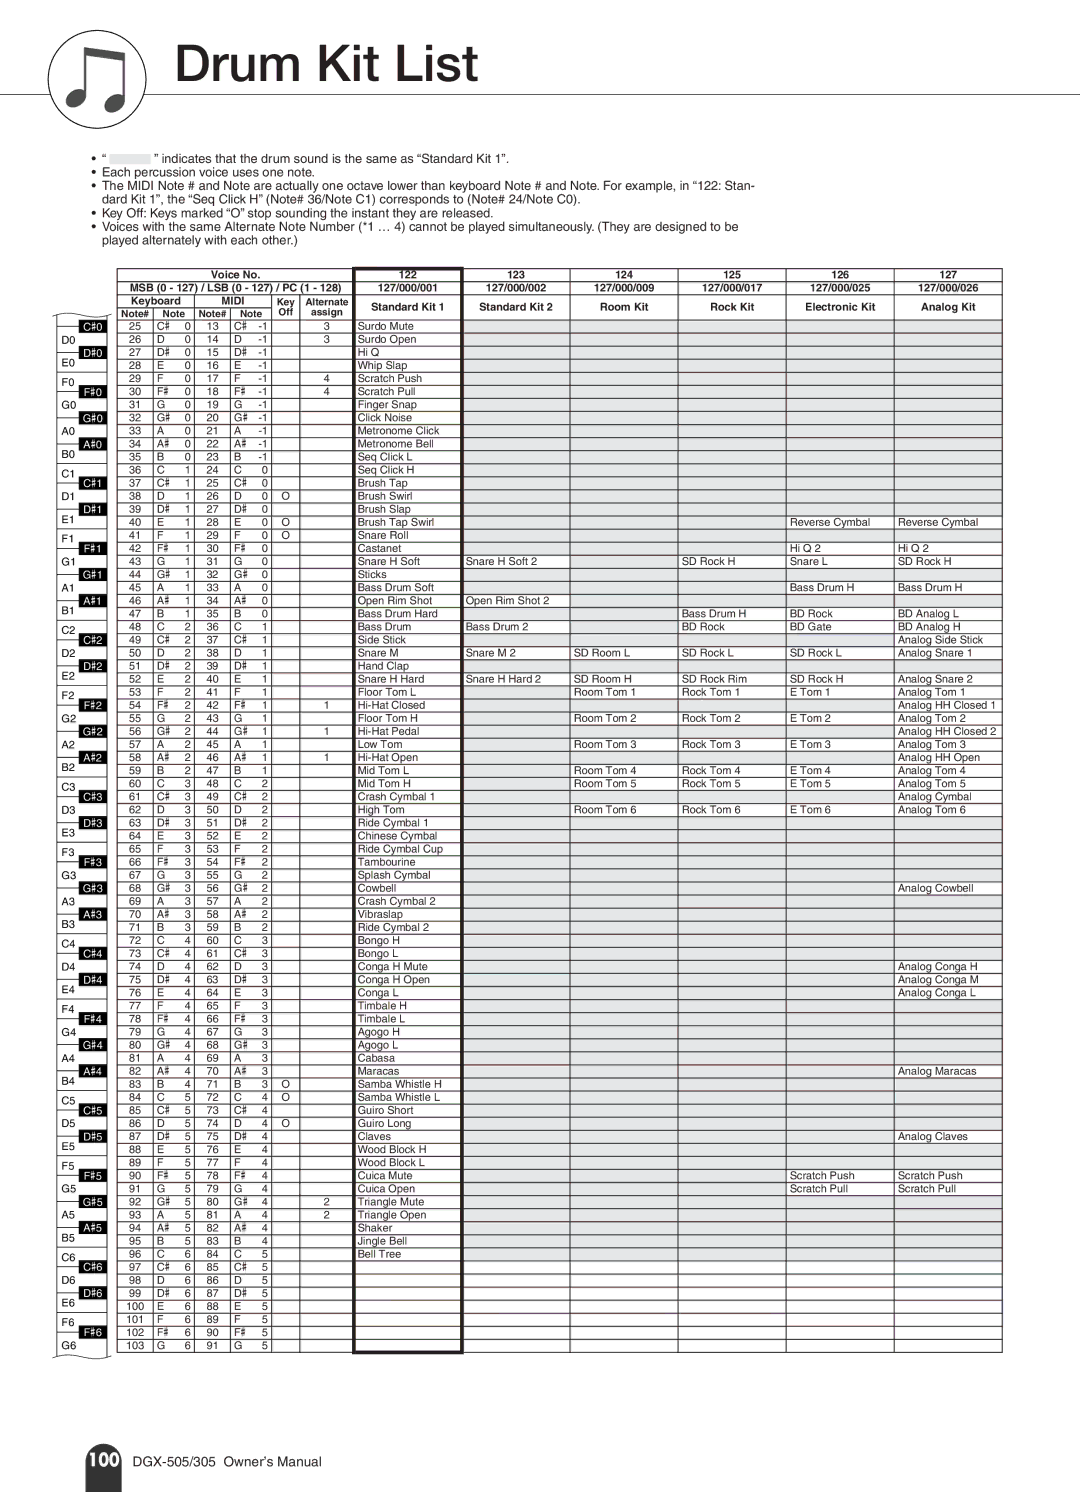
•“ ![]() ” indicates that the drum sound is the same as “Standard Kit 1”.
” indicates that the drum sound is the same as “Standard Kit 1”.
•Each percussion voice uses one note.
•The MIDI Note # and Note are actually one octave lower than keyboard Note # and Note. For example, in “122: Stan- dard Kit 1”, the “Seq Click H” (Note# 36/Note C1) corresponds to (Note# 24/Note C0).
•Key Off: Keys marked “O” stop sounding the instant they are released.
•Voices with the same Alternate Note Number (*1 … 4) cannot be played simultaneously. (They are designed to be played alternately with each other.)
C#0
D0
D#0
E0
F0
F#0
G0
G#0
A0
A#0
B0
C1
C#1
D1
D#1
E1
F1
F#1
G1
G#1
A1
A#1
B1
C2
C#2
D2
D#2
E2
F2
F#2
G2
G#2
A2
A#2
B2
C3
C#3
D3
D#3
E3
F3
F#3
G3
G#3
A3
A#3
B3
C4
C#4
D4
D#4
E4
F4
F#4
G4
G#4
A4
A#4
B4
C5
C#5
D5
D#5
E5
F5
F#5
G5
G#5
A5
A#5
B5
C6
C#6
D6
D#6
E6
F6
F#6
G6
|
|
| Voice No. |
|
| 122 | 123 | 124 | 125 | 126 | 127 | ||
MSB (0 - 127) / LSB (0 - 127) / PC (1 - 128) | 127/000/001 | 127/000/002 | 127/000/009 | 127/000/017 | 127/000/025 | 127/000/026 | |||||||
Keyboard |
| MIDI |
| Key | Alternate | Standard Kit 1 | Standard Kit 2 | Room Kit | Rock Kit | Electronic Kit | Analog Kit | ||
Note# | Note | Note# | Note | Off | assign |
|
|
|
|
|
| ||
25 | C# | 0 | 13 | C# |
| 3 | Surdo Mute |
|
|
|
|
| |
26 | D | 0 | 14 | D |
| 3 | Surdo Open |
|
|
|
|
| |
27 | D# 0 | 15 | D# |
|
| Hi Q |
|
|
|
|
| ||
28 | E | 0 | 16 | E |
|
| Whip Slap |
|
|
|
|
| |
29 | F | 0 | 17 | F |
| 4 | Scratch Push |
|
|
|
|
| |
30 | F# | 0 | 18 | F# |
| 4 | Scratch Pull |
|
|
|
|
| |
31 | G | 0 | 19 | G |
|
| Finger Snap |
|
|
|
|
| |
32 | G# | 0 | 20 | G# |
|
| Click Noise |
|
|
|
|
| |
33 | A | 0 | 21 | A |
|
| Metronome Click |
|
|
|
|
| |
34 | A# | 0 | 22 | A# |
|
| Metronome Bell |
|
|
|
|
| |
35 | B | 0 | 23 | B |
|
| Seq Click L |
|
|
|
|
| |
36 | C | 1 | 24 | C | 0 |
|
| Seq Click H |
|
|
|
|
|
37 | C# | 1 | 25 | C# | 0 |
|
| Brush Tap |
|
|
|
|
|
38 | D | 1 | 26 | D | 0 | O |
| Brush Swirl |
|
|
|
|
|
39 | D# | 1 | 27 | D# | 0 |
|
| Brush Slap |
|
|
|
|
|
40 | E | 1 | 28 | E | 0 | O |
| Brush Tap Swirl |
|
|
| Reverse Cymbal | Reverse Cymbal |
41 | F | 1 | 29 | F | 0 | O |
| Snare Roll |
|
|
|
|
|
42 | F# | 1 | 30 | F# | 0 |
|
| Castanet |
|
|
| Hi Q 2 | Hi Q 2 |
43 | G | 1 | 31 | G | 0 |
|
| Snare H Soft | Snare H Soft 2 |
| SD Rock H | Snare L | SD Rock H |
44 | G# | 1 | 32 | G# | 0 |
|
| Sticks |
|
|
|
|
|
45 | A | 1 | 33 | A | 0 |
|
| Bass Drum Soft |
|
|
| Bass Drum H | Bass Drum H |
46 | A# | 1 | 34 | A# | 0 |
|
| Open Rim Shot | Open Rim Shot 2 |
|
|
|
|
47 | B | 1 | 35 | B | 0 |
|
| Bass Drum Hard |
|
| Bass Drum H | BD Rock | BD Analog L |
48 | C | 2 | 36 | C | 1 |
|
| Bass Drum | Bass Drum 2 |
| BD Rock | BD Gate | BD Analog H |
49 | C# | 2 | 37 | C# | 1 |
|
| Side Stick |
|
|
|
| Analog Side Stick |
50 | D | 2 | 38 | D | 1 |
|
| Snare M | Snare M 2 | SD Room L | SD Rock L | SD Rock L | Analog Snare 1 |
51 | D# | 2 | 39 | D# | 1 |
|
| Hand Clap |
|
|
|
|
|
52 | E | 2 | 40 | E | 1 |
|
| Snare H Hard | Snare H Hard 2 | SD Room H | SD Rock Rim | SD Rock H | Analog Snare 2 |
53 | F | 2 | 41 | F | 1 |
|
| Floor Tom L |
| Room Tom 1 | Rock Tom 1 | E Tom 1 | Analog Tom 1 |
54 | F# | 2 | 42 | F# | 1 |
| 1 |
|
|
|
| Analog HH Closed 1 | |
55 | G | 2 | 43 | G | 1 |
|
| Floor Tom H |
| Room Tom 2 | Rock Tom 2 | E Tom 2 | Analog Tom 2 |
56 | G# | 2 | 44 | G# | 1 |
| 1 |
|
|
|
| Analog HH Closed 2 | |
57 | A | 2 | 45 | A | 1 |
|
| Low Tom |
| Room Tom 3 | Rock Tom 3 | E Tom 3 | Analog Tom 3 |
58 | A# | 2 | 46 | A# | 1 |
| 1 |
|
|
|
| Analog HH Open | |
59 | B | 2 | 47 | B | 1 |
|
| Mid Tom L |
| Room Tom 4 | Rock Tom 4 | E Tom 4 | Analog Tom 4 |
60 | C | 3 | 48 | C | 2 |
|
| Mid Tom H |
| Room Tom 5 | Rock Tom 5 | E Tom 5 | Analog Tom 5 |
61 | C# | 3 | 49 | C# | 2 |
|
| Crash Cymbal 1 |
|
|
|
| Analog Cymbal |
62 | D | 3 | 50 | D | 2 |
|
| High Tom |
| Room Tom 6 | Rock Tom 6 | E Tom 6 | Analog Tom 6 |
63 | D# | 3 | 51 | D# | 2 |
|
| Ride Cymbal 1 |
|
|
|
|
|
64 | E | 3 | 52 | E | 2 |
|
| Chinese Cymbal |
|
|
|
|
|
65 | F | 3 | 53 | F | 2 |
|
| Ride Cymbal Cup |
|
|
|
|
|
66 | F# | 3 | 54 | F# | 2 |
|
| Tambourine |
|
|
|
|
|
67 | G | 3 | 55 | G | 2 |
|
| Splash Cymbal |
|
|
|
|
|
68 | G# | 3 | 56 | G# | 2 |
|
| Cowbell |
|
|
|
| Analog Cowbell |
69 | A | 3 | 57 | A | 2 |
|
| Crash Cymbal 2 |
|
|
|
|
|
70 | A# | 3 | 58 | A# | 2 |
|
| Vibraslap |
|
|
|
|
|
71 | B | 3 | 59 | B | 2 |
|
| Ride Cymbal 2 |
|
|
|
|
|
72 | C | 4 | 60 | C | 3 |
|
| Bongo H |
|
|
|
|
|
73 | C# | 4 | 61 | C# | 3 |
|
| Bongo L |
|
|
|
|
|
74 | D | 4 | 62 | D | 3 |
|
| Conga H Mute |
|
|
|
| Analog Conga H |
75 | D# | 4 | 63 | D# | 3 |
|
| Conga H Open |
|
|
|
| Analog Conga M |
76 | E | 4 | 64 | E | 3 |
|
| Conga L |
|
|
|
| Analog Conga L |
77 | F | 4 | 65 | F | 3 |
|
| Timbale H |
|
|
|
|
|
78 | F# | 4 | 66 | F# | 3 |
|
| Timbale L |
|
|
|
|
|
79 | G | 4 | 67 | G | 3 |
|
| Agogo H |
|
|
|
|
|
80 | G# | 4 | 68 | G# | 3 |
|
| Agogo L |
|
|
|
|
|
81 | A | 4 | 69 | A | 3 |
|
| Cabasa |
|
|
|
|
|
82 | A# | 4 | 70 | A# | 3 |
|
| Maracas |
|
|
|
| Analog Maracas |
83 | B | 4 | 71 | B | 3 | O |
| Samba Whistle H |
|
|
|
|
|
84 | C | 5 | 72 | C | 4 | O |
| Samba Whistle L |
|
|
|
|
|
85 | C# | 5 | 73 | C# | 4 |
|
| Guiro Short |
|
|
|
|
|
86 | D | 5 | 74 | D | 4 | O |
| Guiro Long |
|
|
|
|
|
87 | D# | 5 | 75 | D# | 4 |
|
| Claves |
|
|
|
| Analog Claves |
88 | E | 5 | 76 | E | 4 |
|
| Wood Block H |
|
|
|
|
|
89 | F | 5 | 77 | F | 4 |
|
| Wood Block L |
|
|
|
|
|
90 | F# | 5 | 78 | F# | 4 |
|
| Cuica Mute |
|
|
| Scratch Push | Scratch Push |
91 | G | 5 | 79 | G | 4 |
|
| Cuica Open |
|
|
| Scratch Pull | Scratch Pull |
92 | G# | 5 | 80 | G# | 4 |
| 2 | Triangle Mute |
|
|
|
|
|
93 | A | 5 | 81 | A | 4 |
| 2 | Triangle Open |
|
|
|
|
|
94 | A# | 5 | 82 | A# | 4 |
|
| Shaker |
|
|
|
|
|
95 | B | 5 | 83 | B | 4 |
|
| Jingle Bell |
|
|
|
|
|
96 | C | 6 | 84 | C | 5 |
|
| Bell Tree |
|
|
|
|
|
97 | C# | 6 | 85 | C# | 5 |
|
|
|
|
|
|
|
|
98 | D | 6 | 86 | D | 5 |
|
|
|
|
|
|
|
|
99 | D# | 6 | 87 | D# | 5 |
|
|
|
|
|
|
|
|
100 | E | 6 | 88 | E | 5 |
|
|
|
|
|
|
|
|
101 | F | 6 | 89 | F | 5 |
|
|
|
|
|
|
|
|
102 | F# | 6 | 90 | F# | 5 |
|
|
|
|
|
|
|
|
103 | G | 6 | 91 | G | 5 |
|
|
|
|
|
|
|
|
100