Connecting Monitors and Other Equipment
Using the loopback cable
Connecting a monitor to your Power Macintosh
Connecting a single monitor
Connecting a monitor to your Power Macintosh
Connecting two monitors
Connecting two monitors to your Power Macintosh
Loopback cable into
Connecting an AppleVision monitor
Connecting an AudioVision monitor
Connecting a Midi device
Connecting a pointing device
Connecting a printer
Connecting a PC game controller
Connecting a modem or other serial device
Connecting to a network
Connecting a security dongle
Page
Installing the PC Compatibility Card Software
Software is automatically installed on your hard disk
Installing the Mac OS PC Compatibility software
Click Install
Name Location
Creating a drive container
Dialog box appears
PC Setup control panel appears
Choose a location for the drive container
New drive container is created
You can type up to 31 characters
Open the PC Setup control panel and click Switch to PC
Installing Windows
Installing the PC Compatibility Card Software
Follow the instructions that appear on the screen
Installing support software for Windows
To install the software, follow these steps
If necessary, switch to the PC environment
Configuring network support in Windows
Installing PC utilities
When installation is complete, restart the PC
Installing keyboard files in Windows
Installing Sound Blaster software for Windows
Installing QuickTime for Windows
Keyboard files are located in the following directory
Installing video software for Windows
Installing your own PC software
Setting Up the PC Environment
About the PC Setup control panel
Setting Up the PC Environment
Using the PC Setup Control Strip module
Configuring monitors
You can switch to the Mac OS by typing x-Return
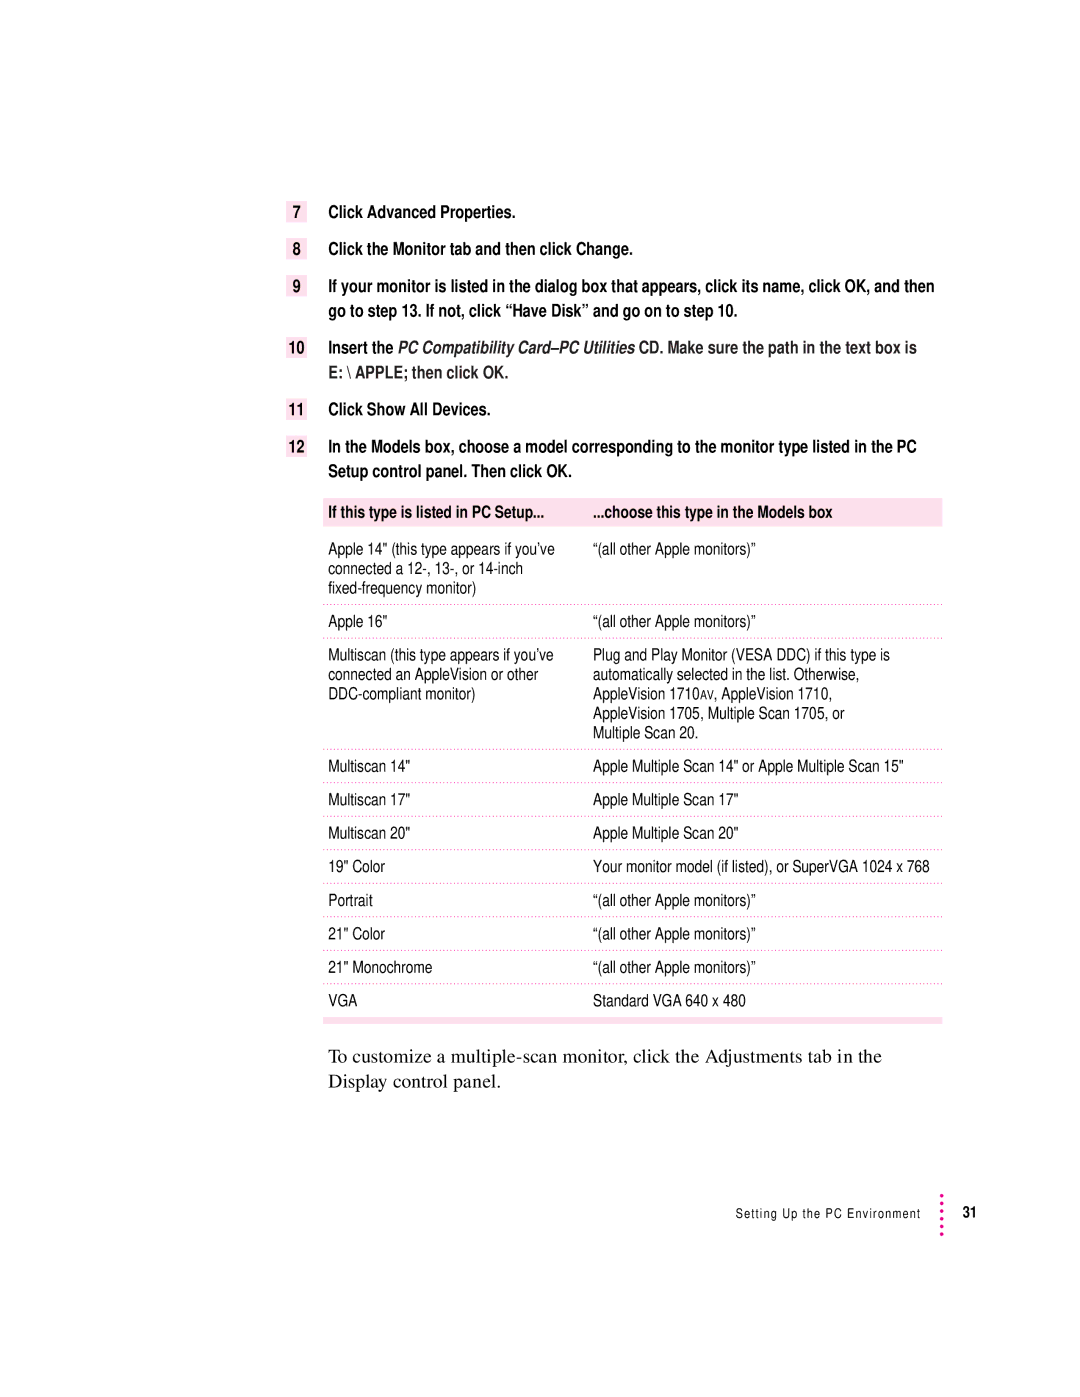
Selecting and configuring monitors in Windows
Choose this type in the Models box
If this type is listed in PC Setup
Restart Windows
RAM information
Setting up printing in the Mac OS
Setting printer options
Open the Extensions folder inside the System Folder
Chapter
Choose an option under Interpret Print Data as
Epson emulation and page setup options
Chapter
Epson font TrueType font
Setup dialog box for the printer currently selected appears
Select the desired page size and click OK
Resetting the default printing preferences
Details page appears
Setting up printing in the PC environment
Spool Settings dialog box appears
Properties window for the printer you have selected appears
Properties window, click the PostScript tab Click Advanced
Configure LPT Port dialog box appears
Properties window, click Port Settings
Advanced PostScript Options dialog box appears
Close the Properties window
Printing from Windows
PC beep sounds
Configuring PC sound
Saving a printer file
You can use three kinds of sound in the PC environment
Turning PC sound on and off
Close the PC Setup control panel
Creating a single partition/bootable drive container
Configuring PC drives
Creating a multiple partition/bootable drive container
Click Create
Assigning a drive to a PC-formatted hard disk
Click Restart PC
Using shared volumes
Open the PC Setup control panel
Changing a drive assignment
Sharing files between the Mac OS and the PC
To set up a shared volume, follow these steps
Chapter
Turning off automatic sharing
Setting up your PC on a network
Turning off volume sharing
If you no longer want to share a volume, follow these steps
Configuring the PC serial ports
Setting up a modem or other serial device
HSKi
Connecting a joystick
Building a custom cable
DB-9 DB-25 RS-232 name HSKo
Editing the CONFIG.SYS file
Setting up your DOS configuration files
Replace it with this line
Editing the AUTOEXEC.BAT file
Setting the number of drive letters
Working in the PC Environment
Switching with the PC Setup control panel
Switching between the Mac OS and PC environments
To switch back to the Mac OS, press x-Return
Switching with a keyboard command
Switching with the Control Strip
To set a new hot key, follow these steps
Turning the PC on and off in the Mac OS environment
Turning the PC on and off with the PC Setup control panel
Turning the PC on and off with the Control Strip
Starting the PC automatically
F10 F11 F12 F13 F14 F15 Lock
Restarting the PC in the PC environment
Restarting the PC from a floppy disk
Using floppy disk drives and floppy disks
Using a pointing device
Using CD-ROM discs and drives
PC key Macintosh keyboard equivalent
Using keyboards
Chapter
Working in the PC Environment
Transferring large bitmap images
Using onscreen help in the PC environment
Using PC files in the Mac OS environment
Using shared folders and volumes
Finder, double-click the drive container to open it
Icon opens and you have access to the files inside it
Double-click the container’s disk icon
Troubleshooting
PC didn’t start up
PC Setup icon has a red slash through it at startup
Starting up
Macintosh freezes during startup
Troubleshooting
There is a delay when switching between environments
Switching to and from the PC
My monitor flashes oddly when I switch environments
Monitor problems
Tried configuring my display and now it won’t work properly
Troubleshooting
My modem is not working correctly in Windows
Problems using a modem
Want my drive container to have more than one partition
Problems with files and disks
Can’t share all the folders I want
Shared drive is still usable
Shared folders don’t get updated in Windows
Want to change the size of my drive container
Am unable to use Microsoft Backup
Copying and pasting between environments isn’t working
Problems with information transfer
Tips for copying and pasting images
Cannot open or save my files in a shared folder
My PC communications software doesn’t work
Communication and network problems
My system freezes when I am using ODI with Windows
Can’t connect to a network in the PC environment
Can’t hear PC sounds
Configuration problems
Sound problems
Can’t assign a COM port to a Macintosh serial port
AUTOEXEC.BAT for Windows
CONFIG.SYS for Windows 95 or Windows
CD sound went away when I switched environments
Check that the AUTOEXEC.BAT file contains this line
Printing doesn’t work
Printing problems
Chapter
Can’t print a test page in Windows
Can’t configure my pointing device
Other problems
Page
What you need
Be sure to pull the plugs, not the cables
Disconnecting the cables
Removing the PC Compatibility Card hardware
Opening the computer, expansion card cover, and chassis
Remove any other cables from the PC Compatibility Card
Replacing the computer’s cover
Installing the port access cover
Installing the audio ribbon cable
Removing the card
Page
Page
PC Compatibility Card Audio cables for Scsi CD-ROM drives
Opening the computer
Installing the PC Compatibility Card hardware
Release buttons
Remove the cover from the computer
Power supply case
Disconnect the power cord
Remove the power cord from the back of your computer
Disconnect the audio ribbon cable from the CD-ROM drive
Disconnecting the CD-ROM audio cable
Position the support foot
Support foot holds the computer’s chassis when you open it
Opening the expansion card cover and chassis
Flip open the expansion card cover
You can use this tab to lift the top chassis
Unlock the chassis release switches
Support arm
Prepare the first PCI expansion slot
Inserting the PC Compatibility Card
Insert the card
Align the card with the first expansion slot
Connecting the Sound Out cable
113
Connector labeled Revsndout on the PC Compatibility Card
Processor card
Connecting the CD In cable to the card
117
Replacing the chassis and expansion card cover
Replace the support foot
Lock the release switches
Appendix B
Connecting the CD In cable to the CD-ROM drive
Make sure all connectors are firmly attached
Two-inch gap Front of computer
If you removed the security bar earlier, replace it now
Reconnect all equipment
Reinsert the power cable and all other equipment cables
Page
Appendix C Adding Memory to Your PC Compatibility Card
Remove any cables from the PC Compatibility Card ports
Installing memory on the card involves the following steps
Removing the card
Open the computer
129
Make sure the Dimm lever is in the open position
Installing the new Dimm
Handle the Dimm by its edges. Avoid touching the connectors
Remove the Dimm from its static-proof bag
Make sure the Dimm is snapped into place on both ends
Reinstalling the card
Appendix D Installing Network Client Software
Ndis 2.0 driver with the following protocols
Installing NetWare client software version 1.02 for Windows
NetBEUI and IPX/SPX in Windows TCP/IP in Windows
ODI driver with the following protocols
List of network interface controller NIC drivers appears
Error message is
To switch to the disk, type the following
To start the installation process, type the following
Select the Identification tab
Computer must have a unique identity to access the network
Click Start and choose Run from the menu that appears
Dialog box that appears, type
Your computer scans for other machines on the network
Install NetWare Client version 1.02 for Windows
Installing NetBEUI and IPX/SPX in Windows
Installing Client 32 for Windows
Installing TCP/IP in Windows
Network Configuration dialog box appears
Windows 95 will install all the necessary network components
PROTOCOL.INI
Installing Microsoft TCP/IP-32 IP protocol stack in Windows
143
Running the Network Protocol Setup Setnet utility
Type the following
Using a modem connected to the Macintosh serial port
Enter the modem information and then click Next
Installing a modem in Windows
Click Finish
Dial-up networking installation
Making a PPP connection
Page
About video capabilities
Appendix E Configuring Video Software
Installing Mpeg video support in Windows
Installing and configuring Mpeg video support
To install the Mpeg video support, follow these steps
Optimizing Mpeg playback in Windows
To adjust CD-ROM caching settings, follow these steps
To set ATI Mpeg Player properties, follow these steps
Video mode tables
Bits per pixel
MHz Depth bpp 640 x
Dram accelerator mode
800 x
1152 x
MHz Depth bpp 1024 x
1280 x
Maximum color Resolution Depth bpp
Vesa Bios Extension modes
Minimum Dram MB
Fixed-frequency monitors
Color depth bpp Resolution
Refresh rate 68.7 kHz horizontal, 75.08 Hz vertical
Refresh rate 49.7 kHz horizontal, 74.55 Hz vertical
Refresh rate 60.2 kHz horizontal, 74.9 Hz vertical
Refresh rate 35 kHz horizontal, 66.67 Hz vertical
User-adjustable monitors
Index
PC Compatibility Card-PC Utilities
DOS
Index
Index
Index
Index
ADB
Index
Index
Index
Apple Publishing System
Apple Computer, Inc
PC Compatibility Card
Apple Computer, Inc
Contents
Installing the PC Compatibility Card Software
Working in the PC Environment
Appendix a Removing the PC Compatibility Card From Your
Troubleshooting
133
Appendix B Reinstalling the PC Compatibility Card in Your
Index
151
Radio and television interference
FCC declaration of conformity
Vcci Class 2 statement
Industry Canada statement
Quick Start
Port access cover
Getting started
Switch to the PC environment by pressing x-Return
Start up the Mac OS environment
Follow the instructions on the screen to set up Windows