Local and remote user access
Local users (directly connected) and remote users (via a ServSwitch CX Remote extender) gain access to the ServSwitch CX unit in exactly the same way. Global users, linking via a special viewer, are handled in a different manner.
To gain access as a local or remote user:
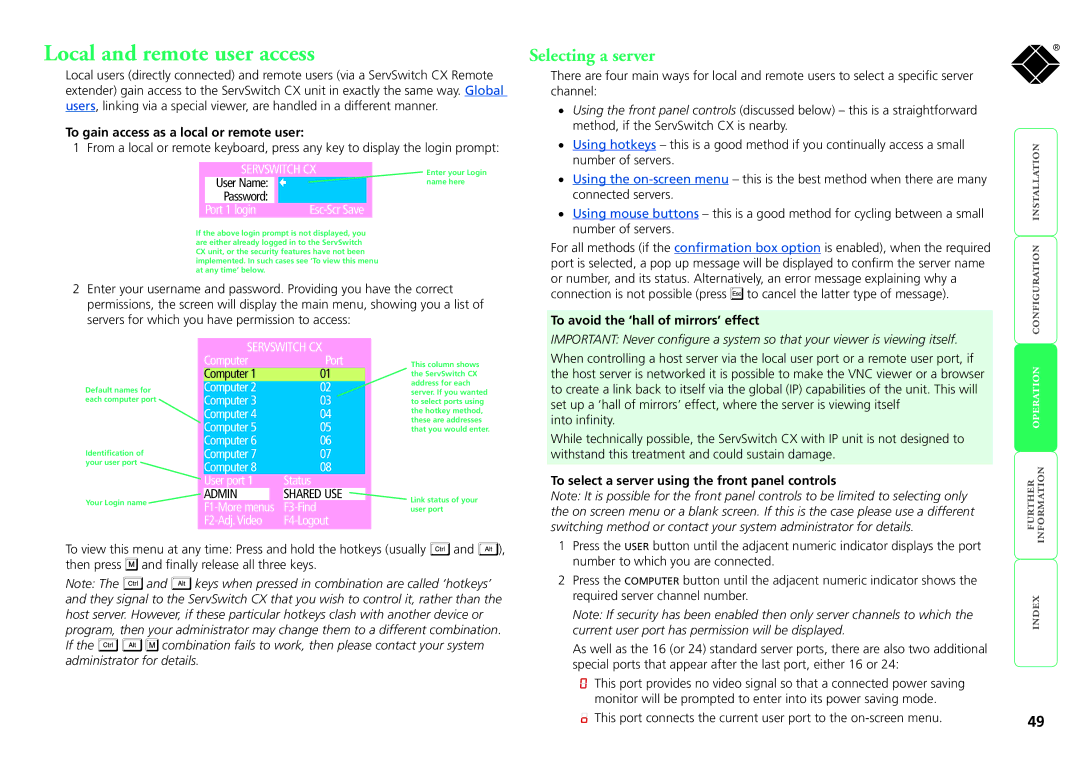
1 From a local or remote keyboard, press any key to display the login prompt:
| SERVSWITCH CX | Enter your Login | |||
| User Name: |
|
|
| name here |
| Password: |
|
|
|
|
| Port 1 login |
|
|
|
|
If the above login prompt is not displayed, you are either already logged in to the ServSwitch CX unit, or the security features have not been implemented. In such cases see ‘To view this menu at any time’ below.
2Enter your username and password. Providing you have the correct permissions, the screen will display the main menu, showing you a list of servers for which you have permission to access:
Selecting a server
There are four main ways for local and remote users to select a specific server channel:
•Using the front panel controls (discussed below) – this is a straightforward method, if the ServSwitch CX is nearby.
•Using hotkeys – this is a good method if you continually access a small number of servers.
•Using the
•Using mouse buttons – this is a good method for cycling between a small number of servers.
For all methods (if the confirmation box option is enabled), when the required port is selected, a pop up message will be displayed to confirm the server name or number, and its status. Alternatively, an error message explaining why a connection is not possible (press ![]() to cancel the latter type of message).
to cancel the latter type of message).
To avoid the ‘hall of mirrors’ effect
®
Default names for each computer port
Identification of your user port
Your Login name ![]()
SERVSWITCH CX
Computer | Port | |
Computer 1 | 01 | |
Computer 2 | 02 | |
Computer 3 | 03 | |
Computer 4 | 04 | |
Computer 5 | 05 | |
Computer 6 | 06 | |
Computer 7 | 07 | |
Computer 8 | 08 | |
User port 1 | Status | |
ADMIN |
| SHARED USE |
| ||
This column shows the ServSwitch CX address for each server. If you wanted to select ports using the hotkey method, these are addresses that you would enter.
Link status of your user port
IMPORTANT: Never configure a system so that your viewer is viewing itself.
When controlling a host server via the local user port or a remote user port, if the host server is networked it is possible to make the VNC viewer or a browser to create a link back to itself via the global (IP) capabilities of the unit. This will set up a ‘hall of mirrors’ effect, where the server is viewing itself
into infinity.
While technically possible, the ServSwitch CX with IP unit is not designed to withstand this treatment and could sustain damage.
To select a server using the front panel controls
Note: It is possible for the front panel controls to be limited to selecting only the on screen menu or a blank screen. If this is the case please use a different switching method or contact your system administrator for details.
To view this menu at any time: Press and hold the hotkeys (usually ![]() and
and ![]() ), then press
), then press ![]() and finally release all three keys.
and finally release all three keys.
Note: The ![]() and
and ![]() keys when pressed in combination are called ‘hotkeys’ and they signal to the ServSwitch CX that you wish to control it, rather than the host server. However, if these particular hotkeys clash with another device or program, then your administrator may change them to a different combination.
keys when pressed in combination are called ‘hotkeys’ and they signal to the ServSwitch CX that you wish to control it, rather than the host server. However, if these particular hotkeys clash with another device or program, then your administrator may change them to a different combination.
If the ![]()
![]()
![]() combination fails to work, then please contact your system administrator for details.
combination fails to work, then please contact your system administrator for details.
1Press the USER button until the adjacent numeric indicator displays the port number to which you are connected.
2Press the COMPUTER button until the adjacent numeric indicator shows the required server channel number.
Note: If security has been enabled then only server channels to which the current user port has permission will be displayed.
As well as the 16 (or 24) standard server ports, there are also two additional special ports that appear after the last port, either 16 or 24:
This port provides no video signal so that a connected power saving monitor will be prompted to enter into its power saving mode.
![]()
![]() This port connects the current user port to the
This port connects the current user port to the
49