Placing ServSwitch CX with IP behind a router or firewall
A possible point of contention between the ServSwitch CX with IP and a firewall can occasionally arise over the use of IP ports. Every port through the firewall represents a potential point of attack from outside and so it is advisable to minimise the number of open ports. The ServSwitch CX with IP usually uses two separate port numbers, however, these are easily changeable and can even be combined into a single port.
IMPORTANT: The correct configuration of routers and firewalls requires advanced networking skills and intimate knowledge of the particular network. Black Box cannot provide specific advice on how to configure your network devices and strongly recommend that such tasks are carried out by a qualified professional.
Port settings
As standard, the ServSwitch CX with IP uses two ports to support its two types of viewer:
•Port 80 for users making contact with a web browser, and
•Port 5900 for those using the VNC viewer.
When these port numbers are used, VNC viewers and web browsers will locate the ServSwitch CX with IP correctly using only its network address. The firewall/ router must be informed to transfer any traffic requesting these port numbers through to the ServSwitch CX with IP.
When a web server is also on the local network
If you need to change the VNC port number
If you change the VNC port to anything other than 5900, then each VNC viewer user will need to specify the port address as well as the IP address. For instance, if you set the VNC port to ‘11590’ and the IP address is ‘192.168.47.10’ then VNC viewer users will need to enter:
192.168.47.10::11590
(Note the double colons that separate the IP address and port number).
The firewall/router would also need to be informed to transfer all traffic to the new port number through to the ServSwitch CX with IP.
Addressing
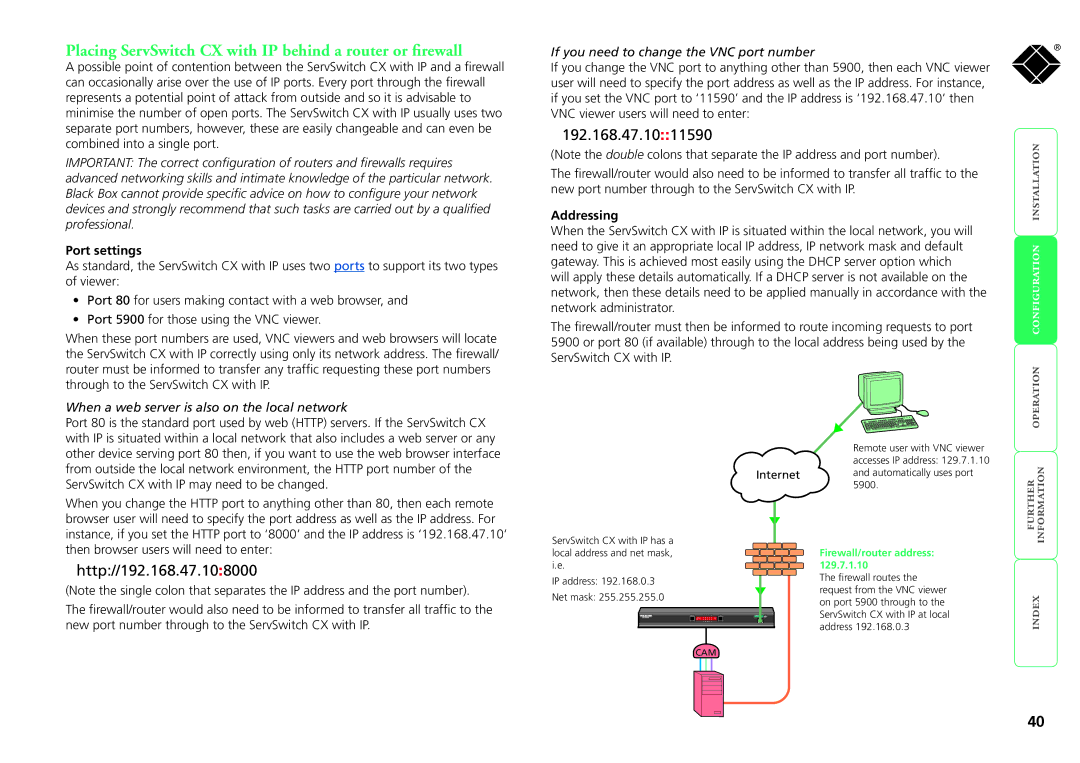
When the ServSwitch CX with IP is situated within the local network, you will need to give it an appropriate local IP address, IP network mask and default gateway. This is achieved most easily using the DHCP server option which will apply these details automatically. If a DHCP server is not available on the network, then these details need to be applied manually in accordance with the network administrator.
The firewall/router must then be informed to route incoming requests to port 5900 or port 80 (if available) through to the local address being used by the ServSwitch CX with IP.
®
Port 80 is the standard port used by web (HTTP) servers. If the ServSwitch CX with IP is situated within a local network that also includes a web server or any other device serving port 80 then, if you want to use the web browser interface from outside the local network environment, the HTTP port number of the ServSwitch CX with IP may need to be changed.
When you change the HTTP port to anything other than 80, then each remote browser user will need to specify the port address as well as the IP address. For instance, if you set the HTTP port to ‘8000’ and the IP address is ‘192.168.47.10’ then browser users will need to enter:
http://192.168.47.10:8000
(Note the single colon that separates the IP address and the port number).
The firewall/router would also need to be informed to transfer all traffic to the new port number through to the ServSwitch CX with IP.
ServSwitch CX with IP has a local address and net mask, i.e.
IP address: 192.168.0.3
Net mask: 255.255.255.0
CAM
Remote user with VNC viewer accesses IP address: 129.7.1.10
Internet and automatically uses port
5900.
Firewall/router address: 129.7.1.10
The firewall routes the request from the VNC viewer on port 5900 through to the ServSwitch CX with IP at local address 192.168.0.3
40
