Registering servers (edit computer list)
To create/edit server entries
1Display the Configuration menu. Note: You must be
2Highlight ‘Edit Computer List’ and press ![]() .
.
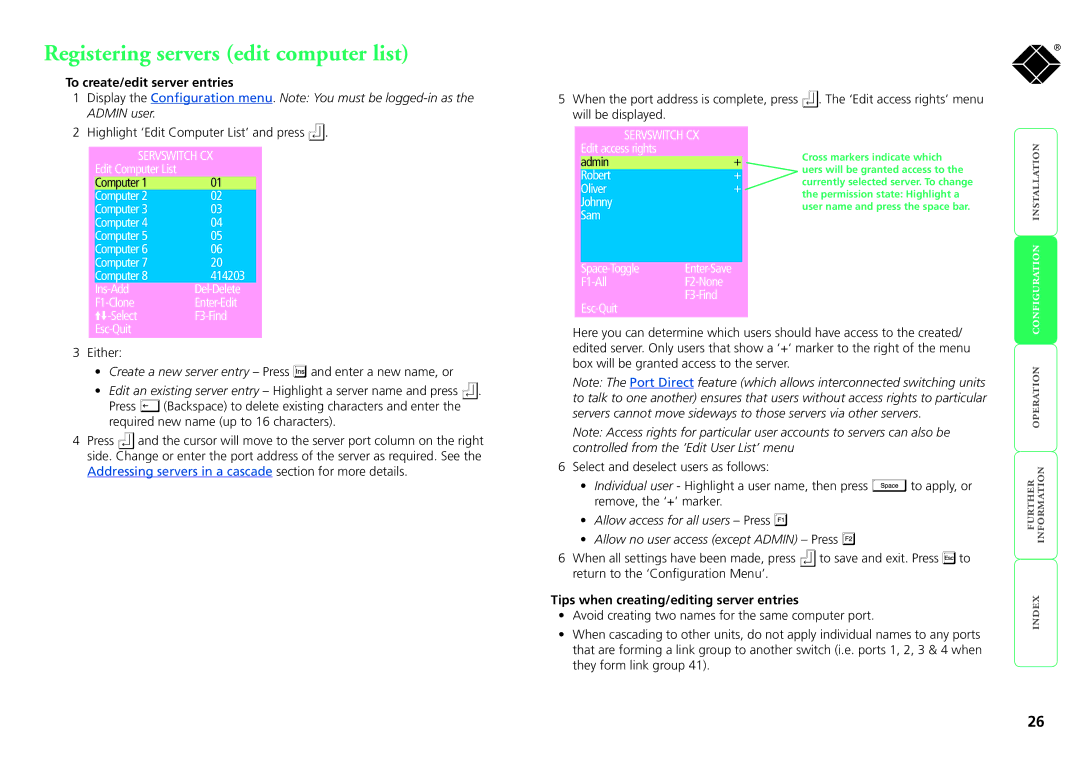
SERVSWITCH CX
Edit Computer List |
|
Computer 1 | 01 |
Computer 2 | 02 |
Computer 3 | 03 |
Computer 4 | 04 |
Computer 5 | 05 |
Computer 6 | 06 |
Computer 7 | 20 |
Computer 8 | 414203 |
|
3Either:
•Create a new server entry – Press ![]() and enter a new name, or
and enter a new name, or
•Edit an existing server entry – Highlight a server name and press ![]() .
.
Press ![]() (Backspace) to delete existing characters and enter the required new name (up to 16 characters).
(Backspace) to delete existing characters and enter the required new name (up to 16 characters).
4Press ![]() and the cursor will move to the server port column on the right side. Change or enter the port address of the server as required. See the Addressing servers in a cascade section for more details.
and the cursor will move to the server port column on the right side. Change or enter the port address of the server as required. See the Addressing servers in a cascade section for more details.
5When the port address is complete, press ![]() . The ‘Edit access rights’ menu will be displayed.
. The ‘Edit access rights’ menu will be displayed.
SERVSWITCH CX |
|
| |
Edit access rights |
| Cross markers indicate which | |
admin | + | ||
uers will be granted access to the | |||
Robert | + | ||
currently selected server. To change | |||
Oliver | + | ||
the permission state: Highlight a | |||
Johnny |
| ||
| user name and press the space bar. | ||
Sam |
|
|
Space-Toggle Enter-Save
F1-All F2-None
F3-Find
Esc-Quit
Here you can determine which users should have access to the created/ edited server. Only users that show a ‘+’ marker to the right of the menu box will be granted access to the server.
Note: The Port Direct feature (which allows interconnected switching units to talk to one another) ensures that users without access rights to particular servers cannot move sideways to those servers via other servers.
Note: Access rights for particular user accounts to servers can also be controlled from the ‘Edit User List’ menu
6Select and deselect users as follows:
•Individual user - Highlight a user name, then press ![]() to apply, or remove, the ‘+’ marker.
to apply, or remove, the ‘+’ marker.
•Allow access for all users – Press ![]()
•Allow no user access (except ADMIN) – Press ![]()
6When all settings have been made, press ![]() to save and exit. Press
to save and exit. Press ![]() to return to the ‘Configuration Menu’.
to return to the ‘Configuration Menu’.
Tips when creating/editing server entries
•Avoid creating two names for the same computer port.
•When cascading to other units, do not apply individual names to any ports that are forming a link group to another switch (i.e. ports 1, 2, 3 & 4 when they form link group 41).
®
26