Computerized Embroidery and Sewing Machine
Read Before DOWNLOADING, COPYING, Installing or Using
Trademarks
Important Safety Instructions
Introduction
8For repair or adjustment
For Users in the UK, EIRE, Malta Cyprus only
Important Safety Instructions
Label location
Outstanding Features
Checking the Needle Location in the Screen Edge Sewing
Duplicating a Pattern
Print and Stitch Combining the Embroidery and Printing
What YOU can do with this Machine
Sewing Basics
HOW to USE this Manual
Contents
Embroidery 181
Xii
Front View
Machine
Right-side/Rear View
Needle and Presser Foot Section
Presser foot
Embroidery Unit
Operation Buttons
Using the Flat Bed Attachment
Using the Accessory Case
Opening the Accessory Case
Closing the Accessory Case
Included Accessories
Using the Embroidery Unit Carrying Case
Storing Bobbin Clips
75/11
Part Code
Options
SABF6000D
Using the Spool Stand
How to Assemble the Spool Stand
How to Remove
Getting Ready
Turning the Machine ON/OFF
Turn the main power switch to I to turn on the machine
Turn the main power switch to O to turn off the machine
LCD Screen
Home Page Screen
Utility Stitch LCD Screen
Key Functions
D e U t J k l
Presser foot/Needle
USB Connectivity
Connecting the Machine to the Computer
Using a USB Mouse
Clicking a Key
Changing Pages
LCD Screen
Using the Machine Setting Mode Key
Sewing settings
General settings
Embroidery settings
Changing the Pointer Shape When a USB Mouse Is Used
Display 3/7 page 3 of 7 of the General settings screen
Changing the Screen Saver Image
Press
Sewing settings screen appears
HSelect the device that is connected
GPress to select the first image
IPress a file name to select image and then
Selecting the Initial Screen Display
Press to return to the original screen
Choosing the Display Language
EPress to return to the original screen
Changing the Background Colors of the Embroidery Patterns
Select the background color from the 66 settings available
Press to return to the original screen
Using the Sewing Machine Help Key
Using the Operation Guide Function
Read the instructions
Using the Sewing Guide Function
Enterpage. Utility Stitch category from the home Press
APress
Using the Pattern Explanation Function
Read the explanations and select the appropriate stitch
Screen shows information
Lower Threading
Using the Supplemental Spool Pin
Winding the Bobbin
Setposition.the supplemental spool pin in the up
Guide slit with built-in cutter Bobbin winder seat
Using the Spool Pin
Pass the thread through the thread guide
Using the Spool Stand
HFollowthroughsteps40. g through k on
Untangling Thread from Beneath the Bobbin Winder Seat
Setting the Bobbin
Press Slide the bobbin cover latch to the right
Cutter Cutter cuts the thread
Pulling Up the Bobbin Thread
Replace the bobbin cover
Upper Threading
Upper Threading
Press the Needle Position button to raise the needle
Look in the upper groove area
Needle bar thread guide
Using the Twin Needle Mode
Press and install the twin needle Changing the Needle on
IPress Select a stitch pattern. Example
KPress to select the twin needle mode
Start sewing
When using thread on a cone spool, use the spool holder
Using Threads that Unwind Quickly
Using the Spool Net
Changing the Presser Foot
Removing the Presser Foot
Attaching the Presser Foot
Raise the presser foot lever
Attaching the Walking Foot
Memo
Changing the Needle
Press to unlock all keys and buttons
About the Needle
Fabric/Thread/Needle Combinations
Sewing Basics
Install the presser foot Changing the Presser Foot on
Sewing
Sewing a Stitch
Lower the presser foot
Using the Foot Controller
Adjust the sewing speed with the speed control slide
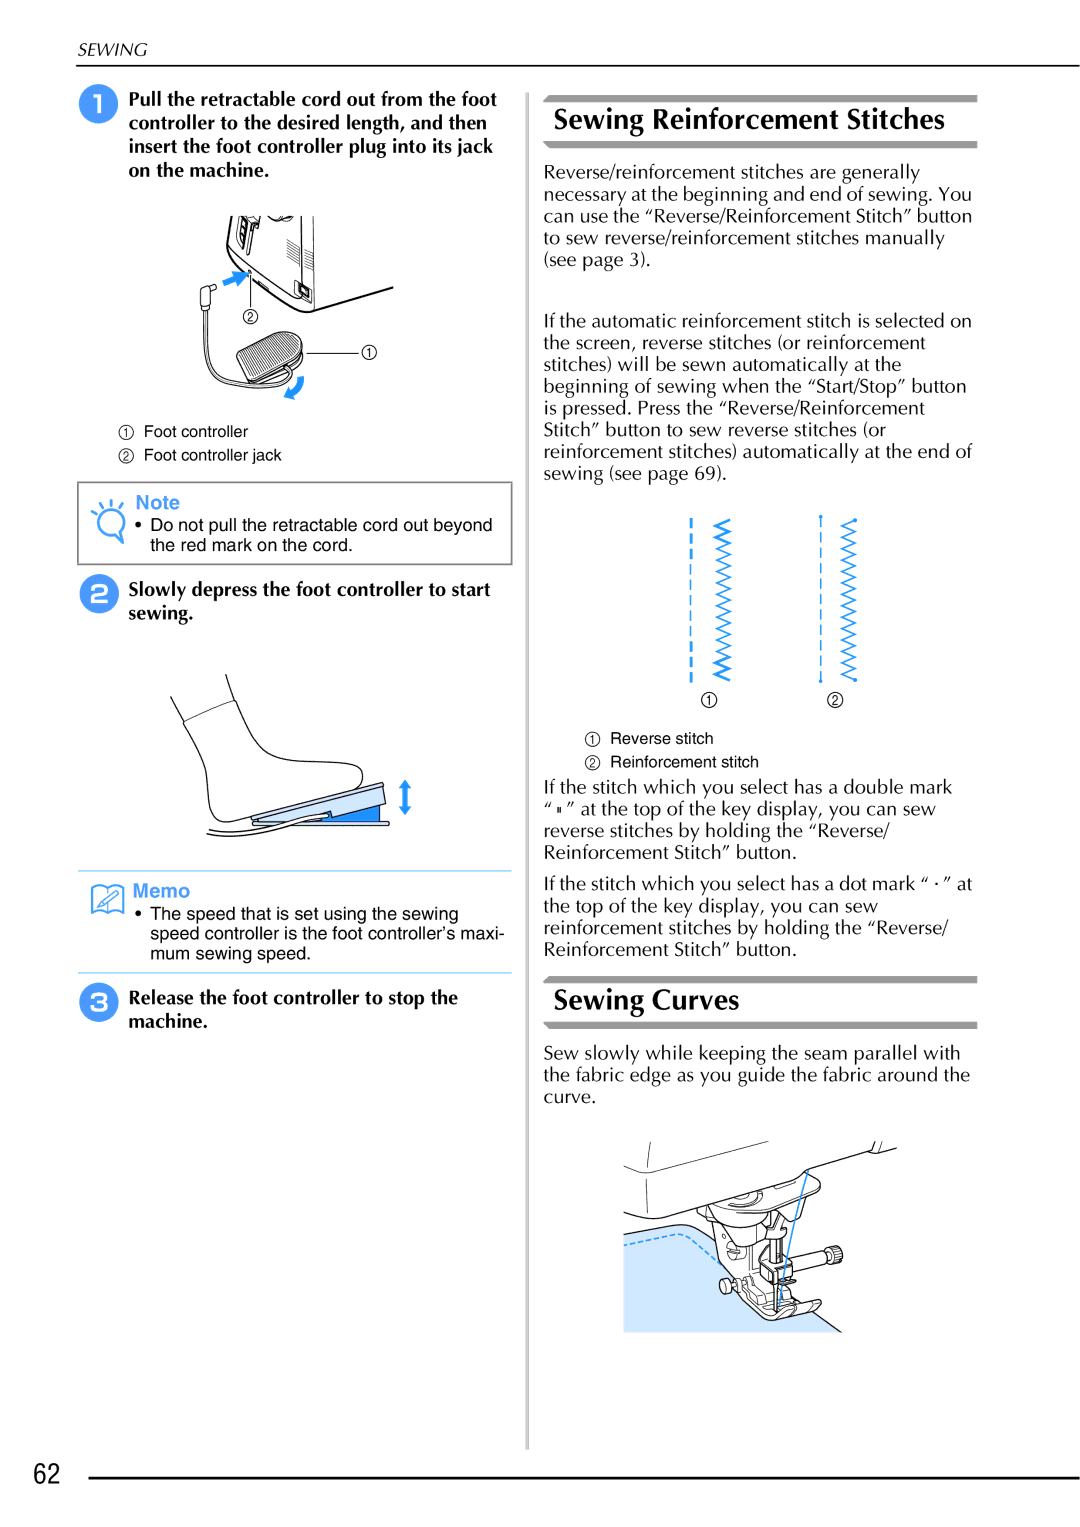
Sewing Reinforcement Stitches
Sewing Curves
Sewing Heavyweight Fabrics
Changing Sewing Direction
Sewing a Seam Allowance of 0.5 cm or Less
If the Fabric does not Fit under the Presser Foot
Sewing Hook-and-Loop Fastener
Sewing Lightweight Fabrics
If the Fabric does not Feed
Sewing Stretch Fabrics
Stitch Settings
Setting the Stitch Width
Setting the Thread Tension
Setting the Stitch Length
Proper Thread Tension
Upper Thread is Too Tight
Upper Thread is Too Loose
Automatic Reinforcement Stitching
Useful Functions
Select a stitch pattern
Automatic Thread Cutting
Setsewing.the fabric in the start position and start
Using the Knee Lifter
Select a stitch BPress to select the pivot setting
Pivoting
Rotate the fabric, and then press the Start/ Stop button
CPress to return to the original screen
Needle Position Stitch Placement
Locking the Screen
Checking the Needle Location in the Screen
Sew your project
Useful Functions
Utility Stitches
Selecting Utility Stitches
Stitch Selection Screens
Selecting a Stitch
Using the Mirror Image Key
BUse to select the category you want
Using the Image Key
Press to go back to the original screen
Saving Your Stitch Settings
Saving Settings
Retrieving Saved Settings
Select a stitch
Sewing the Stitches
Straight Stitches
Select a stitch Attach presser foot J
Pressforward.the Start/Stop button to sew
Example Left/Middle needle position stitches
Or press
Grasp the bobbin case, and then pull it out
JInsertfoot. needle and attach the straight stitch
Basting
Sew while keeping the fabric straight
Dart Seam
Gathering
ASelect and attach presser foot J
Selectfoot J.a straight stitch and attach presser
Spread the fabric out along the finish line
Flat Fell Seam
GSew on the seam line and remove Basting stitch
Pintuck
Iron the folds in the same direction
Appliqué Using a Zigzag Stitch
Overcasting Using a Zigzag Stitch
Zigzag Stitches
Sewing Curves Using a Zigzag Stitch
Cord Guide Bobbin Cover Using a Zigzag Stitch
Patchwork for Crazy Quilt
Remove the bobbin cover from the machine see
Tape Attaching
Elastic Zigzag Stitches
Overcasting
Overcasting Using Presser Foot G
Overcasting
Overcasting Using Presser Foot J
Overcasting Using the Side Cutter
Notch in presser foot holder Pin Side cutter is attached
When Sewing Straight Stitches While Using the Side Cutter
Lower the presser foot and start
Quilting
Zigzag stitch Left
100
101
Sewing the Stitches
102
Piecing
Quilting
ASelect or and attach presser foot J
103
Appliqué
104
Quilting with Satin Stitches
Using Free motion Quilting Foot C
105
Free Motion Quilting
BSelect or
106
Press to set the machine to free motion sewing mode
DRemove55. the presser foot holder see
Using free motion Open Toe Quilting Foot O
HPress to cancel the free motion sewing mode
107
GPressmode. to cancel the free motion sewing
Echo Quilting Using the Free Motion Echo Quilting Foot E
108
ASelect Press to set the machine to free motion sewing mode
109
HPress to cancel the free motion sewing mode
110
111
Blind Hem Stitches
Turn the skirt or pants wrong side out
112
Attach blind hem foot R GSelect or
Appliqué
113
If the Needle Catches Too Much of the Hem Fold
If the Needle does not Catch the Hem Fold
Shelltuck Stitches
114
Appliqué Sharp Curves
Appliqué Corners
115
Scallop Stitches
Trim along the seam, making sure not to cut the stitches
Smocking Stitches
Crazy Quilting
116
Fagoting
Tape or Elastic Attaching
117
HPull out the straight stitch threads
118
ESelect or
Sew over the tape or elastic
Pull out the straight stitch threads
Heirloom
119
Hemstitching 1 Daisy Stitch
Hemstitching 2 Drawn Work
120
Hemstitching 3 Drawn Work
One-step Buttonholes
121
122
123
Sewing Stretch Fabrics
124
Lower the presser foot and start sewing
Four-step Buttonholes
125
126
127
Darning
128
Bar Tacks
129
Bar Tacks on Thick Fabrics
130
Gently hold the end of the upper thread and begin sewing
Button Sewing
131
Raise the presser foot
Gently hold the end of the upper thread and start sewing
132
Attaching 4 Hole Buttons
Attaching a Shank to the Button
Pullsewing.the shank lever toward you before
Eyelet
133
Multi-directional Sewing Straight Stitch and Zigzag Stitch
134
BSelect and attach monogramming foot N
135
Zipper Insertion
Centered Zipper
136
Inserting a Side Zipper
137
Set the presser foot in the 3 mm approx /8 inch margin
Edge Sewing
138
BAttachV. the vertical stitch alignment foot
139
Peel off the transparent sheet of the edge sewing sheet
140
EPress
When the Built-In Camera Can Detect the Edge of the Fabric
141
When the Fabric Edge Indicator Line Does Not Appear
142
Example When a straight stitch is selected
143
144
Press
Character/Decorative Stitches
Selecting Stitch Patterns
146
147
7mm Satin Stitch Patterns Cross Stitch
Cross Stitch/Utility Decorative Stitch Patterns
Alphabet Characters
148
Press , or to select a font
CPress Then enter B EPress
149
DPress and then enter lue FPress again and enter S
150
Adjusting the Character Spacing
Deleting Characters
BPress to adjust character spacing
151
Sewing Stitch Patterns
Sewing Attractive Finishes
Basic Sewing
152
153
Making Adjustments
APress Select On 16/16
Sew the stitch pattern again
154
FPress to return to the original screen
Editing Stitch Patterns
155
156
Changing the Size
Creating a Vertical Mirror Image
157
Actual Stitch Pattern Size
Creating a Horizontal Mirror Image
Sewing a Pattern Continuously
Changing Thread Density For Satin Stitch Patterns Only
158
159
Returning to the Beginning of the Pattern
Press the Start/Stop button to stop Machine, and then press
160
Checking the Image
Press to display the enlarged image
161
Press to return to the original screen
Combining Stitch Patterns
Before Combining
Combining Various Stitch Patterns
162
163
Combining Large and Small Stitch Patterns
164
Combining Horizontal Mirror
Image Stitch Patterns
Combining Stitch Patterns of Different Length
165
166
BSelect again, then press 3 times
167
Press BPress
CPress again EPress
DPress
168
More Examples
Stitch Data Precautions
Using the Memory Function
169
170
Trademarks
Saving Stitch Patterns in the Machine’s Memory
171
If the Memory is Full
172
Choose a stitch pattern to delete
173
Saving Stitch Patterns to USB Media
174
Saving Stitch Patterns in the Computer
175
Retrieving Stitch Patterns from the Machine’s Memory
176
177
Recalling from USB Media
Choose a stitch pattern to retrieve
178
Recalling from the Computer
179
180
Embroidery
Embroidery Step by Step
Before Embroidering
182
Attaching Embroidery Foot W
183
Attaching the Embroidery Unit
184
About the Embroidery Unit
HPress to unlock all keys and buttons
Turn the main power to on
Turn the main power to OFF
185
Removing the Embroidery Unit
186
Selecting Patterns
Copyright Information
187
Pattern Selection Screens
188
189
Press the key of the pattern you want to embroider
Selecting Alphabet Character Patterns
190
191
DPress and then enter B
192
Selecting Frame Patterns
HPress and then enter ky
193
Press the key of the frame pattern you want to embroider
194
Selecting Patterns from Embroidery Cards
Followpattern.the steps on page 189 to select a
Selecting Patterns from USB Media/Computer
195
Viewing the Sewing Screen
196
197
Key Functions
Preparing the Fabric
198
199
200
Hooping the Fabric in the Embroidery Frame
Types of Embroidery Frames
201
Inserting the Fabric
Using the Embroidery Sheet
Return the frame adjustment screw to its initial position
202
Remove the embroidery sheet
Embroidering Small Fabrics or Fabric Edges
203
Embroidering Small Fabrics
Embroidering Edges or Corners
204
Attaching the Embroidery Frame
With the holder’s
205
Removing the Embroidery Frame
Confirming the Pattern Position
206
207
After selecting the pattern, press Then press
208
Following message appears. Press
Checking the Pattern Position
209
Fabric, and press
Press Press the Start/Stop button to begin embroidering
210
Previewing the Completed Pattern
That you want to check
211
BPress to select the frame used in the preview
Sewing AN Embroidery Pattern
212
213
Sewing Embroidery Patterns
Embroidery Needle Plate Cover
214
Press the Start/Stop button to start embroidering
215
Sewing Embroidery Patterns Which Use Appliqué
216
Press the Start/Stop button
Using iron-on paper Using printable fabric
217
218
Selecting a Pattern
Checking Only the Embroidery Pattern
Using USB Media
219
Using a USB Cable
220
221
Print the background image
222
Cut the paper printed with the center
Image on the fabric
After checking that a pattern is selected Press
If the Bobbin Runs Out of Thread
223
If the Thread Breaks During Sewing
224
Restarting from the Beginning
Resuming Embroidery After Turning Off the Power
225
Attach the embroidery frame and press
226
Continue embroidering
Making Embroidery Adjustments
Adjusting Thread Tension
227
Correct Thread Tension
228
Correct Tension
Using the Automatic Thread Cutting Function
229
Bobbin Thread is Too Loose
Bobbin Thread is Too Tight
Selecting the Length of Jump Stitch Not to Trim
230
Press BPress to turn off the thread trimming function
Adjusting the Embroidery Speed
Changing the Thread Color Display
231
To change the maximum embroidery speed
Changing the Embroidery Frame Display
DWhen the thread number #123 is
232
233
Changing the Pattern Position
Revising the Pattern
234
Aligning the Pattern and the Needle
235
236
Press EUse
On the fabric, and begin embroidering the pattern
APress BSelectsize. the direction in which to change
237
Rotating the Pattern
APress Select the angle of rotation for the pattern
Creating a Horizontal Mirror Image
238
APress Change the density
239
CPress to return to the pattern selection screen
240
Changing the Colors of Alphabet Character Patterns
APress so that it appears as
241
Embroidering Linked Characters
Select the character patterns for ABC
242
As in step a, select the character patterns for DEF Press
243
MUse
244
Embroidery Data Precautions
Types of Embroidery Data that can be Used
245
Tajima .dst Embroidery Data
Saving Embroidery Patterns in the Machine’s Memory
246
247
Select the pattern you want to delete
248
Saving Embroidery Patterns to USB Media
249
Saving Embroidery Patterns in the Computer
250
Retrieving Patterns from the Machine’s Memory
251
252
CPress
253
Pressretrieve.the key of the pattern you want to
254
Pressrecall.the key of the pattern you want to
255
FPress
Embroidery Applications
Using a Frame Pattern to Make an Appliqué
256
257
258
259
Sewing Split Embroidery Patterns
BSelect section to be embroidered
260
If necessary, edit the pattern
Embroidery Edit
Explanation of Functions
262
Selecting Patterns to Edit
263
264
Proceed to Editing Patterns on page 267 to edit the pattern
265
Select the font, then enter the characters. Example a B C D
Select the layout. Example
CPress to change the layout of the pattern
266
After you finish your selections, press
Editing Patterns
267
268
F g L k
Moving the Pattern
269
Changing the Size of the Pattern
270
Deleting the Pattern
Changing the Configuration Alphabet Character Patterns
271
272
Changing Alphabet Character Spacing
Press the key of the layout you want to embroider
273
Reducing Character Spacing
BUse to change the spacing
Use to select where the pattern is
Separating Combined Character Patterns
274
APress BPress
Use to select a pattern, Then use
275
Spacing
276
BIn the sewing screen, press Press
277
278
Changing the Thread Color
Pattern editing screen, press
279
Creating a Custom Thread Table
CPress to choose a new color from the color palette
280
Add a color on the custom thread table
281
EPress
282
GPress to return to the original screen
283
Color from the custom thread table
284
Designing Repeated Patterns
Sewing Repeated Patterns
Adjust the spacing of the repeated pattern
285
Repeating One Element of a Repeated Pattern
286
BUse and to select the cut line
287
Color Sorting Repeated Patterns
288
289
Assigning Thread Marks
APress BPress CPress
Sewn
After Editing
290
Combining Patterns
Editing Combined Patterns
291
Pattern BUse to view 2/7, then select Press
Press Press to enter the alphabet characters
292
FSelect and enter Spring
KWhen all editing is finished, press
293
Selecting combined embroidery pat- terns
IPress to change the layout Characters. Press
Sewing Combined Patterns
294
Color order on the right side of the display
BEmbroider
Press , and then display 7/7 of the settings screen
Various Embroidering Functions
Basting Embroidery
295
Screen DPress EPress to select the basting setting
Creating an Appliqué Piece
296
Creating an Appliqué Piece
Select the pattern, and edit it if necessary
297
Screen EPress
FPress to select the appliqué setting
298
299
Applique Material
Using a Frame Pattern for the Out- line
300
301
HPress
302
After selecting the pattern, press Then press
303
Press
304
Fabric and press
Using the Memory Function
305
Using iron-on paper Using printable fabric
306
Selecting a Pattern
307
Using USB Media
308
Using a USB Cable
309
310
Print the background image
311
Positioned aligned with the background image on the fabric
312
MY Custom Stitch
Designing a Stitch
314
Draw the stitch design on the grid sheet part code SA507
Decide the spacing of the stitch
315
Examples of Custom Stitches
Entering Stitch Data
316
317
Press to add the point indicated by
318
FUse To move
319
Moving a Point
Moving Part or All of the Design
APress or to move to the point that you want to move
Inserting New Points
320
CPress or to move the section
321
Storing Custom Stitches in Your List
Using Stored Custom Stitches
322
323
Retrieving Stored Stitches
Select the stitch pattern
324
329
335
Care and Maintenance
Cleaning the LCD Screen
Cleaning the Machine Casing
Cleaning the Race
Cleaning the Cutter in the Bobbin Case Area
327
About the Maintenance Message
328
Adjusting the Screen
Turn the main power to OFF, then turn it back to on
Touch Panel is Malfunctioning
329
Troubleshooting
330
331
Chart
332
333
334
Error Messages
335
336
337
338
This message is displayed
339
340
341
Alarm Sounds
342
Specifications
343
Upgrading Your MACHINE’S Software
Upgrade Procedure Using USB Media
344
Upgrade Procedure Using Computer
Copy the upgrade file to Removable Disk
345
Remove the USB media, and turn the machine off and on again
346
When the message disappears, press
Unplug the USB cable, and turn the machine off and on again
Stitch Setting Chart
347
348
349
Stippling
350
351
352
353
354
355
Index
356
357
MY Custom Stitch
Settings
358
Page
Page