Chapter 2 Installation
Optional Installation Procedures
Unstacking the Router
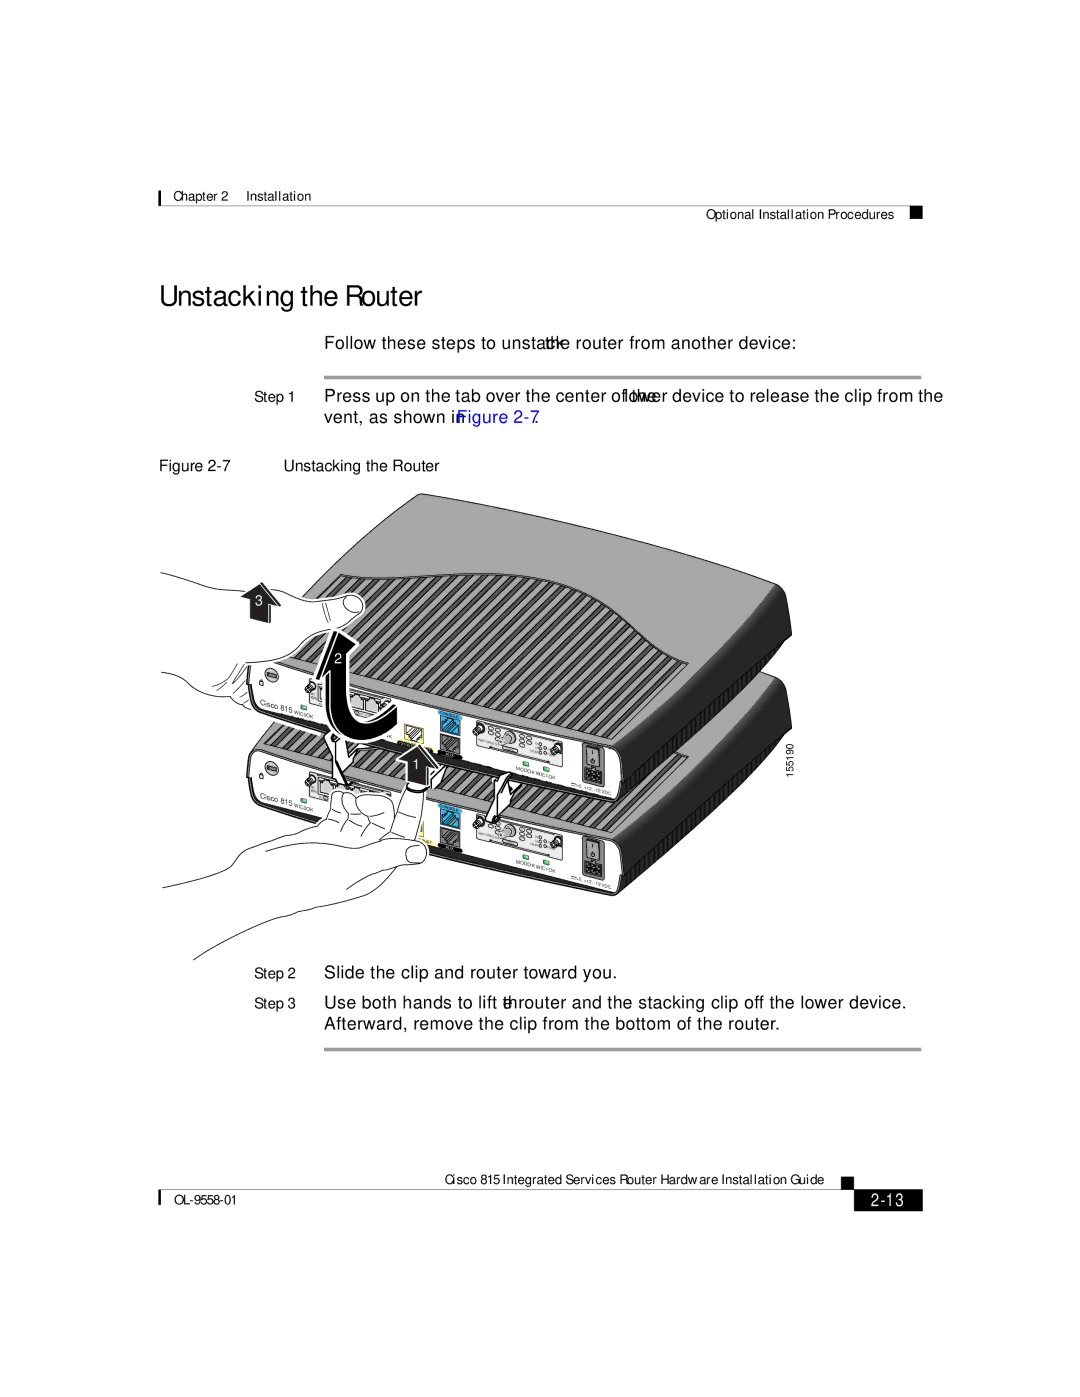
Follow these steps to unstack the router from another device:
Step 1 Press up on the tab over the center of the lower device to release the clip from the vent, as shown in Figure
Figure 2-7 Unstacking the Router
3![]()
2
|
|
| WIC |
|
|
|
|
|
|
|
|
|
|
Cisco |
|
| 4ESW |
| ACT 3x |
|
|
|
|
|
|
|
|
815 |
| ACT | LNK |
|
|
|
|
|
|
|
| ||
|
| 4x |
| LNK |
|
|
|
|
|
|
| ||
| W | IC0OK |
|
| ACT | 2x | LNK | ACT |
|
| CONSOLE | ||
|
|
|
|
|
| 1x LNK |
| ||||||
|
|
|
|
|
|
|
|
| FDX | 100 | LINK |
| |
|
|
|
|
|
|
|
|
|
|
|
| ||
|
|
|
|
|
|
|
|
|
|
|
|
| |
|
|
|
|
|
|
|
|
|
|
|
| 10/100 |
|
|
|
|
|
|
|
|
|
|
|
|
| 10/100 E | |
|
|
|
|
|
|
|
|
|
|
|
|
| AUX |
|
|
|
|
|
|
|
|
|
|
|
|
| 1 |
|
|
| WIC |
|
|
|
|
|
|
|
|
|
|
Cisco |
|
| 4ESW |
| ACT 3x |
|
|
|
|
|
|
|
|
815 |
| ACT | LNK |
|
|
|
|
|
|
|
| ||
|
| 4x |
| LNK |
|
|
|
|
|
|
| ||
| W | IC0OK |
|
| ACT | 2x | LNK | ACT 1x LNK |
| CONSOLE | |||
|
|
|
|
|
|
| |||||||
|
|
|
|
|
|
|
|
| |||||
|
|
|
|
|
|
|
|
| FDX | 100 | LINK |
| |
|
|
|
|
|
|
|
|
|
|
|
| ||
|
|
|
|
|
|
|
|
|
|
|
|
| |
|
|
|
|
|
|
|
|
|
|
|
| 10/100 | ETHER |
|
|
|
|
|
|
|
|
|
|
|
|
| |
|
|
|
|
|
|
|
|
|
|
|
|
| NET |
|
|
|
|
|
|
|
|
|
|
|
|
| AUX |
HWIC- |
|
|
|
|
|
DS |
|
|
|
| |
CABLE | US | LINK |
|
|
|
ONLINE |
|
|
| ||
|
| POWER |
|
|
|
| M |
|
|
|
|
| ODOK |
|
|
|
|
| WIC |
|
|
| |
|
| 1OK |
|
|
|
|
| +5, | +12, | VDC | |
|
|
| |||
|
|
|
|
| |
HWIC- |
|
|
|
|
|
DS |
|
|
|
| |
CABLE | US | LINK |
|
|
|
ONLINE |
|
|
| ||
| POWER |
|
|
| |
|
|
|
|
| |
| MO |
|
|
|
|
| DOK |
|
|
|
|
| WIC |
|
|
| |
|
| 1OK |
|
|
|
|
| +5, | +12, | VDC | |
|
|
| |||
|
|
|
| ||
|
|
|
|
| |
155190
Step 2 Slide the clip and router toward you.
Step 3 Use both hands to lift the router and the stacking clip off the lower device. Afterward, remove the clip from the bottom of the router.
|
| Cisco 815 Integrated Services Router Hardware Installation Guide |
|
|
|
|
| ||
|
|
| ||
|
|
|
