W . d e l l . c o m s u p p o r t . d e l l . c o m
Abbreviations and Acronyms
Contents
Program is designed for an earlier Microsoft Windows
Mail, Modem, and Internet Problems
Using Microsoft Windows XP System Restore
Advanced Troubleshooting
Resolving Software and Hardware Incompatibilities
Adding or Replacing a Second Hard Drive
Appendix
Safety Instructions
Safety Instructions
W . d e l l . c o m s u p p o r t . d e l l . c o m
Microsoft Windows License Label
Finding Information for Your Computer
Support questions
Downloads Drivers, patches, and software updates
Online courses
Technical support
Connecting a Parallel Printer
Setting Up a Printer
Setting Up and Using Your Computer
Printer Cable
Screws Clips Parallel printer Cable Notches
Connecting a USB Printer
Parallel connector on computer
USB connector on computer
Setting Up a Home and Office Network
Connecting to a Network Adapter
Network Setup Wizard
Connecting to the Internet
Click Checklist for creating a network
Network wall jack Network cable
If you have a CD, click Use the CD I got from an ISP
Setting Up Your Internet Connection
Click Connect to the Internet
Using Blank CD-Rs and CD-RWs
How to Copy a CD or DVD
Copying CDs and DVDs
Click Exact Copy
Click Hardware and click Device Manager
Hyper-Threading
Helpful Tips
Turn Off Computer Turn off computer window, click Turn off
Booting to a USB Device
Turning Off Your Computer
Solving Problems
Finding Solutions
W . d e l l . c o m s u p p o r t . d e l l . c o m See
Drive Problems
Battery Problems
Floppy drive problems
Finding Help Information
Back of floppy disk Write-protected Not write- protected
CD drive problems
DVD drive problems
Problems writing to a CD-RW drive
Hard drive problems
Mail, Modem, and Internet Problems
Error Messages
Computer stops responding
General Problems
Program stops responding
Other software problems
Program crashes repeatedly
Solid blue screen appears
General hardware problems
Other technical problems
Ieee 1394 Device Problems
Mouse Problems
Keyboard Problems
Network Problems
Speed light
Power Problems
Network integrity
Printer Problems
Scanner Problems
No sound from speakers
Sound and Speaker Problems
If the screen is blank
Video and Monitor Problems
No sound from headphones
If the screen is difficult to read
Solving Problems
Advanced Troubleshooting
Diagnostic Lights
Light Pattern Problem Description Suggested Resolution
Error
Identified a faulty module or
If available, install properly
If the problem persists, contact
Different connector and restart
If the problem persists or
You have identified a faulty
Connector or reinstalled all
That you are installing are
Connector placement
Memory module/memory
Requirements see
Starting the Dell Diagnostics
Dell Diagnostics
Tab Function
Dell Diagnostics Main Menu
Option Function
Reinstalling Drivers
What Is a Driver?
Drivers
Identifying Drivers
Manually Reinstalling Drivers
Using Windows XP Device Driver Rollback
Restoring Your Operating System
Click Roll Back Driver
Creating a Restore Point
Using Microsoft Windows XP System Restore
Click System Restore
Restoring the Computer to an Earlier Operating State
Using Dell PC Restore by Symantec
Click Performance and Maintenance
Enabling System Restore
Click the System Restore tab
Click Performance and Maintenance and click System
Advanced Troubleshooting
On computers with an optional floppy drive Adding Parts
Front and Back View of the Computer
Front View
Computer. Instead, perform an operating system shutdown
Back View
Network jack
Guide
Removing the Computer Cover
Computer cover Cover latch Back of computer
Looking Inside Your Computer
System Board
Securing screw Filler bracket
Adding Cards
Not fully seated card Fully seated card Bracket
Card Card cutout
Crossbar
Adding or Replacing the AGP Card
Notch Lever Tab Card clip AGP connector
Installing an AGP Card
PCI connector
AGP card Card clip lever Slot connector
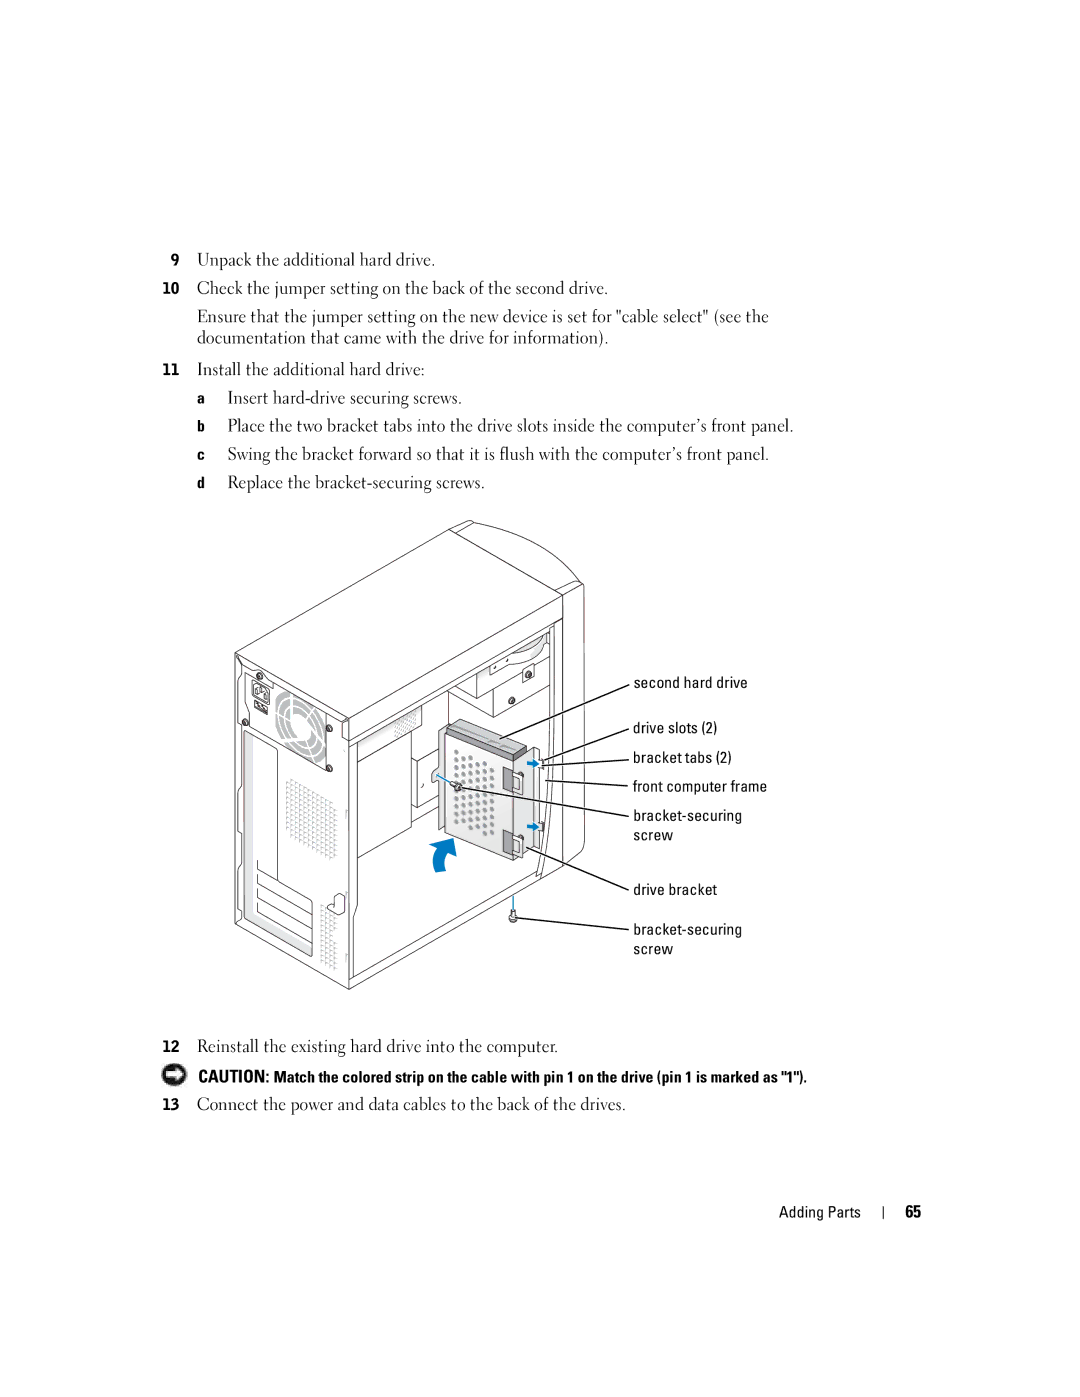
Adding or Replacing a Second Hard Drive
Drive bracket
Existing hard drive
Screws
Drive bracket
Adding a Floppy Drive
Bottom tab
Side hinges Front panel Top tab
Middle tab
Tabs Insert Top bracket screw Drive bracket Floppy drive
Side hinges Front panel
Adding a Second CD or DVD Drive
Bottom tab Adding Parts
Drive Alignment screws
Insert Tabs
Drive Securing screw
Side hinges Front panel
DDR Memory Overview
Memory Installation Guidelines
Adding Memory
Installing Memory
Notch
Securing clips Connector
Replacing the Computer Cover
System Information
Specifications
Expansion Bus
Appendix
Memory
Ports and Connectors
Other factors
Drives
Video
Power
Audio
Network
Environmental
System Setup
Overview
Keys Action
Viewing Settings
System Setup Screens
Changing Boot Sequence for the Current Boot
Boot Sequence
Option Settings
Changing Boot Sequence for Future Boots
Clearing Forgotten Passwords
Replacing the Battery
Battery Battery socket
Dell Technical Support Policy U.S. Only
Definition of Dell-Installed Software and Peripherals
FCC Notices U.S. Only
Definition of Third-Party Software and Peripherals
Class a Class B
FCC Identification Information
Contacting Dell
Appendix
Appendix
Appendix
Appendix
Appendix
Appendix
Appendix
Area Codes Local Numbers, Toll-Free Numbers
Appendix
100
101
102
103
104
105
106
Index 107
Index
108 Index
Index Help files accessing, 9
Compatibility, 27 restore to previous operating
Index 109
Wizard, 27 reinstalling, 47 scanner, 34 System Restore
Wizards Program Compatibility Wizard
Index 110

![]() bracket tabs (2)
bracket tabs (2)![]()
![]() front computer frame
front computer frame![]()
