Dell Latitude LS Family Portable Computers Users Guide
Initial Release 12 October Last Revised 22 March
Preface Dell Latitude LS Portable Computers Users Guide
About This Guide
Other Documents You May Need
Warranty and Return Policy Information
Notational Conventions
Typographical Conventions
Example del c\myfile.doc
No boot device available
Overview
Front/Right View of the Computer
Back/Left View of the Computer
Features
Introduction Dell Latitude LS Portable Computers Users Guide
Available Options
Getting Help
Back to Contents
Back to Contents
Service Tag
Identifying Your Computer
Preparing Your Computer for Travel
If Your Computer Is Lost or Stolen
Accessories
Cable
Page
Travel Tips
Carnet
Drivers Dell Latitude LS Portable Computers Users Guide
Back to Contents
Back to Contents
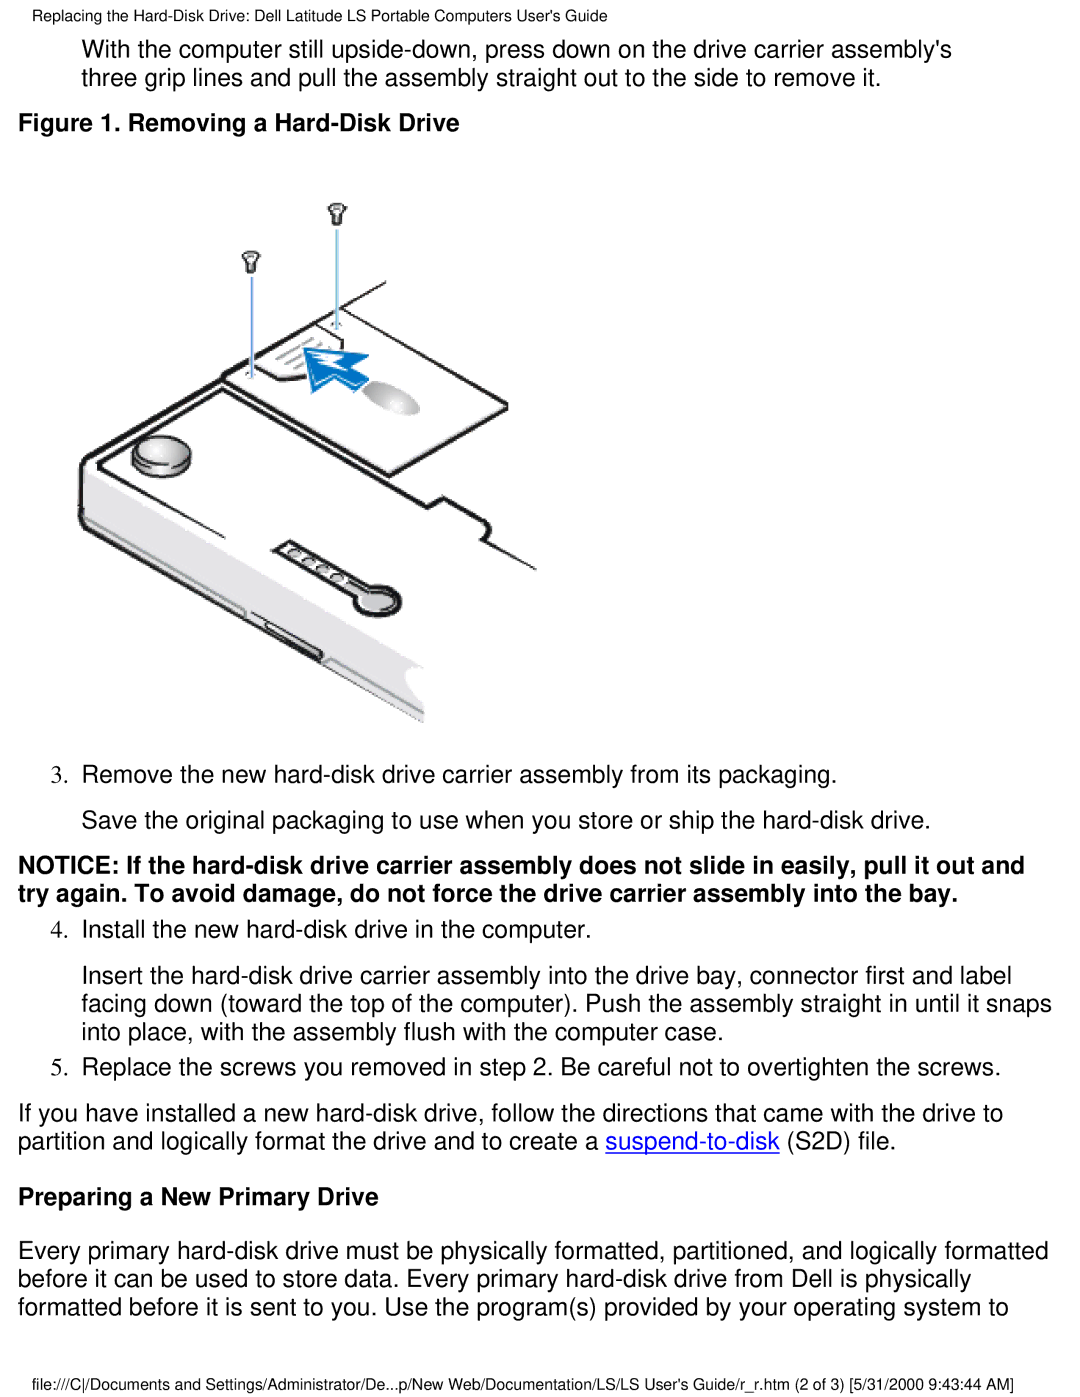
Removing a Hard-Disk Drive
Preparing a New Primary Drive
Back to Contents
Back to Contents
System chip set
Chip Set and Bus
PC Cards
CardBus controller
Connectors
Memory
Video
Audio
Display
Integrated Modem
Battery
Network Interface Controller
Keyboard
AC Adapter
Version
Operating To 40C 32 to 104F Storage 20 to 60C -4 to 140F
Physical
Environmental Computer
Simulates user environment
Touch Pad
Getting Help Dell Latitude LS Portable Computers Users Guide
Back to Contents
External Media Bay
Entering the System Setup Program
Overview
Back to Contents
Overview
Dell Diagnostics Main Screen Overview
Confirming the System Configuration Information
How to Use Dell Diagnostics
Using the AC Adapter
Connecting the AC Adapter
To turn on the computer, press the power button
Plug the AC adapter power cable into an electrical outlet
Turning On the Computer
Batteries Dell Latitude LS Portable Computers Users Guide
About the Batteries
Using the Battery
Charging a Hot Battery
Charging the Battery
Battery status indicator
Replacing the Battery
Removing a Battery
Battery Charge Gauge
Battery Charge Gauge
Battery charge indicators Battery test button
Percentage of Charge
Second Low-Battery Warning
First Low-Battery Warning
Detecting Battery Problems
Battery Disposal
About Battery Power
Turning On the Computer
Fn + down arrow
Adjusting the Brightness
Brightness Key Combinations and Their Functions
Fn + up arrow Increases brightness
Expanded Video Mode
Video Drivers and Video Resolution
Click Next again, click Finish, and click Close
Click OK, click Yes, and click OK
Supported combination
Customizing Video Resolution
Dual-Display Mode
Change the Colors option to High Color 16 bit
If You Have Display Problems
Change the Desktop Area to 1024 by 768 pixels Click Advanced
Cleaning the Display and Touch Pad
Back to Contents
Embedded Numeric Keypad
Embedded Numeric Keypad
Keypad off
When Keypad Is Off Function FnF9
Display Key Combinations
Keypad on
Speaker Key Combinations
Power Conservation Key Combinations
Power Conservation Key Combinations Function
Speaker Key Combinations Function
System Function Key Combinations
System Function Key Combinations
CD-ROM and DVD-ROM Drive Key Combinations
Down
PC Cards Dell Latitude LS Portable Computers Users Guide
About PC Cards
Installing PC Cards
Installing a PC Card
Removing PC Cards
Configuring PC Cards
To remove a PC Card see , perform the following steps
Back to Contents
Using the Touch Pad
Touch Pad
Cleaning the Touch Pad and Display
Customizing the Touch Pad
Display to the bottom
About Passwords
Using a Supervisor Password
Using a User Password
Using a Hard-Disk Drive Password
Physically Securing the Computer and the Hard-Disk Drive
Securing the Computer
Back to Contents
About the I/O Connectors
PS/2 mini-DIN connector
Mouse, Keyboard, and External Numeric Keypad
Mouse
USB Devices
Parallel Devices
Advanced Port Replicator
External Monitor
AC Adapter
Audio Devices
NIC Connector
Modem Connector
External Media Options
Identifies the power management key combinations
Experimenting With Power Conservation
Using Key Combinations
Key Combinations Feature
Suspend Mode
Closing the Display
Standby Mode
Suspend-to-Disk Hibernate Mode
Power Management Properties for Windows
Double-click the Power Management Properties icon
Power Management Properties for Windows NT
Power management settings
Installing MS-DOS CD-ROM Drivers
Installing Video Drivers for Windows
Click Have Disk
Set the Desktop area for your display to 800 x Click Apply
Close the Display Properties window
Installing Audio Drivers
Installing Software Wavetable
Installing MS-DOS CD-ROM Drivers
Installing Touch Pad Drivers
Installing the Internal Modem Driver
Page
Installing the NIC Driver
Installing the Softex Bay Manager Drivers
Installing the PC Card Utility
Click Display Type
Installing Video Drivers
Click OK in the Installing Driver window
Adapter Type box, click Change
Installing the Power Management Utility
Installing the PC Card Utility
Installing Audio Drivers
Installing the Software Wavetable
Back to Contents
Main Screen
Screen does not appear
Advanced Screen
Display Device
EPP
Security Screen
Power Screen
Power Screen Options
Minutes, and 2 Minutes
RAM. If Suspend Mode is set to Save to Disk, Resume on Modem
Boot Screen
Exit Screen
Load Setup
Creating an S2D File for Windows 95 or Windows
Page
Creating an S2D File for Windows NT
Type phdisk /create /partition and press Enter
Back to Contents
Error Messages
Action
Diagnostics
Nnnn
0260System timer error
Avoiding IRQ Assignment Conflicts
Memory Allocations
IRQ6
Memory Map
Upper Memory Map Address Range Use
LPT1
Technical Assistance
Help Tools
World Wide Web on the Internet
AutoTech Service
Problems With Your Order
Automated Order-Status System
Diagnostics Checklist
Before You Call
Back to Contents
Overview Europe Contact Numbers International Dialing Codes
International Dialing Codes
Country City
Korea Seoul
France Paris Montpellier Germany Langen
Italy Milan Japan Kawasaki
Malaysia Penang Mexico Colonia Granada
Americas Contact Numbers
Santiago Technical Support
Chile
Sales, Customer Support
Latin America Mexico
Technical Support Return Material Authorization Numbers
Return Material Authorization Numbers Customer Service
Dell Home and Small Business Group
Country City Austria
Department Name or Service
Europe Contact Numbers
Belgium
Denmark
Czech Republic
Finland
Germany
France
Ireland
Milan
Bray
Italy
Luxembourg
Netherlands
Norway
Spain
Mail norsupport@dell.com
Poland
Sweden
Asia and Other Regions Contact Numbers
Switzerland
Xiamen
Brunei China
Hong Kong Japan
Malaysia
Korea
Macau
New Zealand
709
Singapore
Southeast Asian/Pacific Countries
706
Taiwan
Thailand
Using CD-ROM and DVD-ROM Drives
Caring for CDs and DVDs
Types of Supported Discs
Back to Contents
Media Bay