865·6*8
Zzzghoofrp
Page
6DIHW\,QVWUXFWLRQV
KHQ8VLQJRXU&RPSXWHU6\VWHP
Page
KHQRUNLQJ,QVLGHRXU&RPSXWHU
Turn off your computer and any peripherals
3URWHFWLQJ$JDLQVWOHFWURVWDWLFLVFKDUJH
Page
Page
3UHIDFH
$ERXW7KLV*XLGH
2WKHURFXPHQWVRX0D\1HHG
DUUDQW\DQG5HWXUQ3ROLF\,QIRUPDWLRQ
1RWDWLRQDO&RQYHQWLRQV
DUQLQJV&DXWLRQV1RW
\SRJUDSKLFDO&RQYHQWLRQV
Example del c\myfile.doc
Kdswhu
PXE
Xvi
NIC
Xviii
$SSHQGL$
$SSHQGL%
ICU Error Messages Configuration Manager Messages
$SSHQGL
ESD
$SSHQGL DUUDQW\5HWXUQ3ROLF\ Dqghdu 6WDWHPHQWRI &RPSOLDQFH
ORVVDU\ QGH Ljxuhv
Dell OpenManage Program Front Panel
Card Configuration Dialog Box
Available Settings List Box
7DEOHV
Xxiv
Qwurgxfwlrq
\VWHPHDWXUHV
Dell Precision 210 Desktop Systems User’s Guide
Dell Confidential Preliminary 8/17/98
HOO2SHQ0DQDJH3URJUDP
DXOW0DQDJHPHQW
Security Management features of the Dell OpenManage include
RQILJXUDWLRQ0DQDJHPHQW
$VVHW0DQDJHPHQW
6HFXULW\0DQDJHPHQW
DNHXS2Q/$1
$XWR3RZHU2Q
PSRUWDQW1RWHWRLQGRZV
5HLQVWDOOLQJLQGRZV17
5HLQVWDOOLQJLQGRZVRULQGRZV
Dell Confidential Preliminary 8/17/98
Click Next on the Welcome Screen
Ljxuh
URQW3DQHO
DFN3DQHO
Rqqhfwlqjwhuqdohylfhv
6HFXULW\&DEOH6ORWDQG3DGORFN5LQJ
HWWLQJ+HOS
Dell Confidential Preliminary 8/17/98
8VLQJWKH6RIWZDUH6XSSRUW 8WLOLWLHV
\VWHP8WLOLWLHVDQG6HUYLFHV
HOO,QVWDOOHG6RIWZDUH6XSSRUW8WLOLWLHV
5HLQVWDOOLQJWKHHOO6\VWHP8WLOLWLHVDQG6HUYLFHVIRU LQGRZV17
5HPRYLQJD6HUYLFH
$VVHW7DJ8WLOLW\
HOO$XWR6KXWGRZQ6HUYLFH
Asset 1234$ABCD
HOO7KHUPDO6KXWGRZQ6HUYLFH
$XWR3RZHU2Q8WLOLW\
XV0DVWHULQJ,ULYHUV
0LFURVRIW8SGDWHG$7$3,ULYHUV
QDEOLQJWKHLQGRZVRULQGRZV%XV0DVWHULQJ ,ULYHU
Ulyhu
5HLQVWDOOLQJWKHLQGRZV170LFURVRIW8SGDWHG $7$3,ULYHU
Dell Confidential Preliminary 8/17/98
8VLQJWKH6\VWHP6HWXS3URJUDP
QWHULQJWKH6\VWHP6HWXS3URJUDP
\VWHP6HWXS6FUHHQV
Using the System Setup Program
8VLQJWKH6\VWHP6HWXS3URJUDP
Configuration options Title box Help
\VWHP6HWXS2SWLRQV
7LPH
DWH
LVNHWWHULYH$DQGLVNHWWHULYH%
ULYHV3ULPDU\DQG6HFRQGDU\
Specific drive-type number
IRX+DYHD3UREOHP
5HVHUYHG0HPRU\
KDVVLV,QWUXVLRQ
7KHUPDO3RZHU2II
\ERDUGUURUV
\VWHP3DVVZRUG
Password locked, not disabled
3DVVZRUG6WDWXV
+DUGLVNfound QO\
RRW6HTXHQFH
LJXUH6DPSOH HYLFH/LVW6FU
6HWXS3DVVZRUG
3RZHU0DQDJHPHQW
7LPH2XWV
Never
Minutes Hour
Minutes Hour 6DYLQJ Minimum,+DUG 20LVN minutesULYH
6RXQG
0RXVH
6HULDO3RUWDQG6HULDO3RUW
3DUDOOHO3RUW
3DUDOOHO0RGH
Lvnhwwh
6SHDNHU
\VWHPDWD
Verify that Password Status is set to Unlocked
$VVLJQLQJD6\VWHP3DVVZRUG
Type the password and press Enter
8VLQJRXU6\VWHP3DVVZRUGWR6HFXUHRXU6\VWHP
HOHWLQJRU&KDQJLQJDQLVWLQJ6\VWHP3DVVZRUG
8VLQJWKH6HWXS3DVVZRUGHDWXUH
$VVLJQLQJD6HWXS3DVVZRUG
2SHUDWLQJLWKD6HWXS3DVVZRUGQDEOHG
LVDEOLQJDRUJRWWHQ3DVVZRUG
HOHWLQJRU&KDQJLQJDQLVWLQJ6HWXS3DVVZRUG
5HVSRQGLQJWRUURU0HVVDJHV
Dell Precision 210 Desktop Systems User’s Guide
8VLQJWKH,6$&RQILJXUDWLRQ8WLOLW\
4XLFN6WDUW
$ERXWWKH,&8
8DWDEDVH
3UHSDULQJWR8VHWKH,&8
DFNLQJ8SWKH,&8 Lvnhwwh
6WDUWLQJWKH,&8
$FFHVVLQJ+HOS
0DNLQJ6HOHFWLRQVLQWKH,&8
$FWLRQ
$GGLQJD/LVWHG&DUG
Using the ISA Configuration Utility
Dell Precision 210 Desktop Systems User’s Guide
$GGLQJDQ8QOLVWHG&DUG
Dell Precision 210 Desktop Systems User’s Guide
0RGLI\LQJD&DUG
Dell Precision 210 Desktop Systems User’s Guide
9LHZLQJ5HVRXUFHV
5HPRYLQJD&DUG
6DYLQJWKH6\VWHP&RQILJXUDWLRQ
LWLQJWKH,&8
RFNLQJDQG8QORFNLQJ&DUGV
RFNLQJDQG8QORFNLQJ$OO5HVRXUFHV
RFNLQJDQG8QORFNLQJ&RQILJXUDWLRQ5HVRXUFHV
Click Settings
Rqwuroohu
Ljxuh
RQQHFWLQJWRD1HWZRUN
1HWZRUN&DEOH5HTXLUHPHQWV
6HWWLQJWKH1HWZRUNUDPH7\SHIRULQGRZV
RQILJXULQJWKH1
LQGRZV171,&ULYHU
LQGRZV1,&ULYHU
System Properties window, click the Device Manager tab
LQGRZVpasswords.2SHUDWLQJ6\VWHPV1RW,QVWDOOHGE\HOO
System Properties window, click the Device Manager tab
8VLQJWKH1,6ULYHULWKLQGRZV
LQGRZV1,&ULYHU
System Properties window, click Close
System detects a PCI Ethernet controller
At the Add New Hardware Wizard window, click Next
At the Add New Hardware Wizard window, click Next
8VLQJWKH,QWHJUDWHG$XGLR Rqwuroohu
RQQHFWLQJ$XGLRHYLFHV
6SHDNHUV
0LFURSKRQHV
5HFRUG3OD\EDFNHYLFHV
$GMXVWLQJ9ROXPH
$GMXVWLQJ9ROXPHLQLQGRZV
$GMXVWLQJ6RXQG
$GMXVWLQJ9ROXPHLQLQGRZV17
0XWLQJWKH,QWHUQDO6SHDNHU
8VLQJ$XGLR8WLOLWLHV
QVWDOOLQJ$XGLRULYHUV
$XGLRULYHUVIRULQGRZV
$XGLRULYHUVIRULQGRZV
$XGLRULYHUVIRULQGRZV17
Dell Precision 210 Desktop Systems User’s Guide
RUNLQJ,QVLGHRXU&RPSXWHU
HIRUHRX%HJLQ
Ruvkrfn
6DI W\LUVW URX GRX &RPSXWHU
5HPRYLQJWKH&RPSXWHU&RYHU
8QSDFNLQJRXU+DUGZDUH2SWLRQ
Ljxuh
5HSODFLQJWKH&RPSXWHU&RYHU
QVLGHRXU&RPSXWHU
LJXUHbracket&RPSXWHU
LJXUH,QVLGHWKH&KDVVLV
5RWDWLQJWKH3RZHU6XSSO\$ZD\URPWKH 6\VWHP%RDUG
Dell Precision 210 Desktop Systems User’s Guide
QVWDOOLQJ6\VWHP%RDUG2SWLRQV
Use -1 to locate the system board features
SDQVLRQ&DUGV
Ljxuh
SDQVLRQ6ORWV
Follow this general procedure to install an expansion card
QVWDOOLQJDQSDQVLRQ&DUG
Ljxuh connector
5HPRYLQJDQSDQVLRQ&DUG
$GGLQJ0HPRU\
64 MB 96 MB 128 MB 192 MB 32 MB
ALERT! Cover was previously removed
Ljxuh
0LFURSURFHVVRU8SJUDGHV
$GGLQJRU5HSODFLQJD0LFURSURFHVVRU
Ljxuh assembly
5HPRYDO
ALERT! Cover was previously removed
System Setup program, replace your battery
5HSODFLQJWKH6\VWHP%DWWHU\
Battery
ALERT! Cover was previously removed
Dell Precision 210 Desktop Systems User’s Guide
Qvwdoolqjulyhv
Drive cage internal externally accessible drive bays
Ljxuh
Rqqhfwlqjulyhv
Ljxuhulyh interface
IQVWDOOLQJDULYHLQD,QFKULYH%D\
Ljxuh
Ljxuh
LJXUHforadditional$WWDFKLQJdrive
ALERT! Cover was previously removed
QVWDOOLQJDQ,+DUGLVNULYH
ULYH$GGUHVVLQJ
LJXUH1-inchdrive ,QVHUbackWLQJD ULYH,QWRscrewsWKH4 %UDFNHW
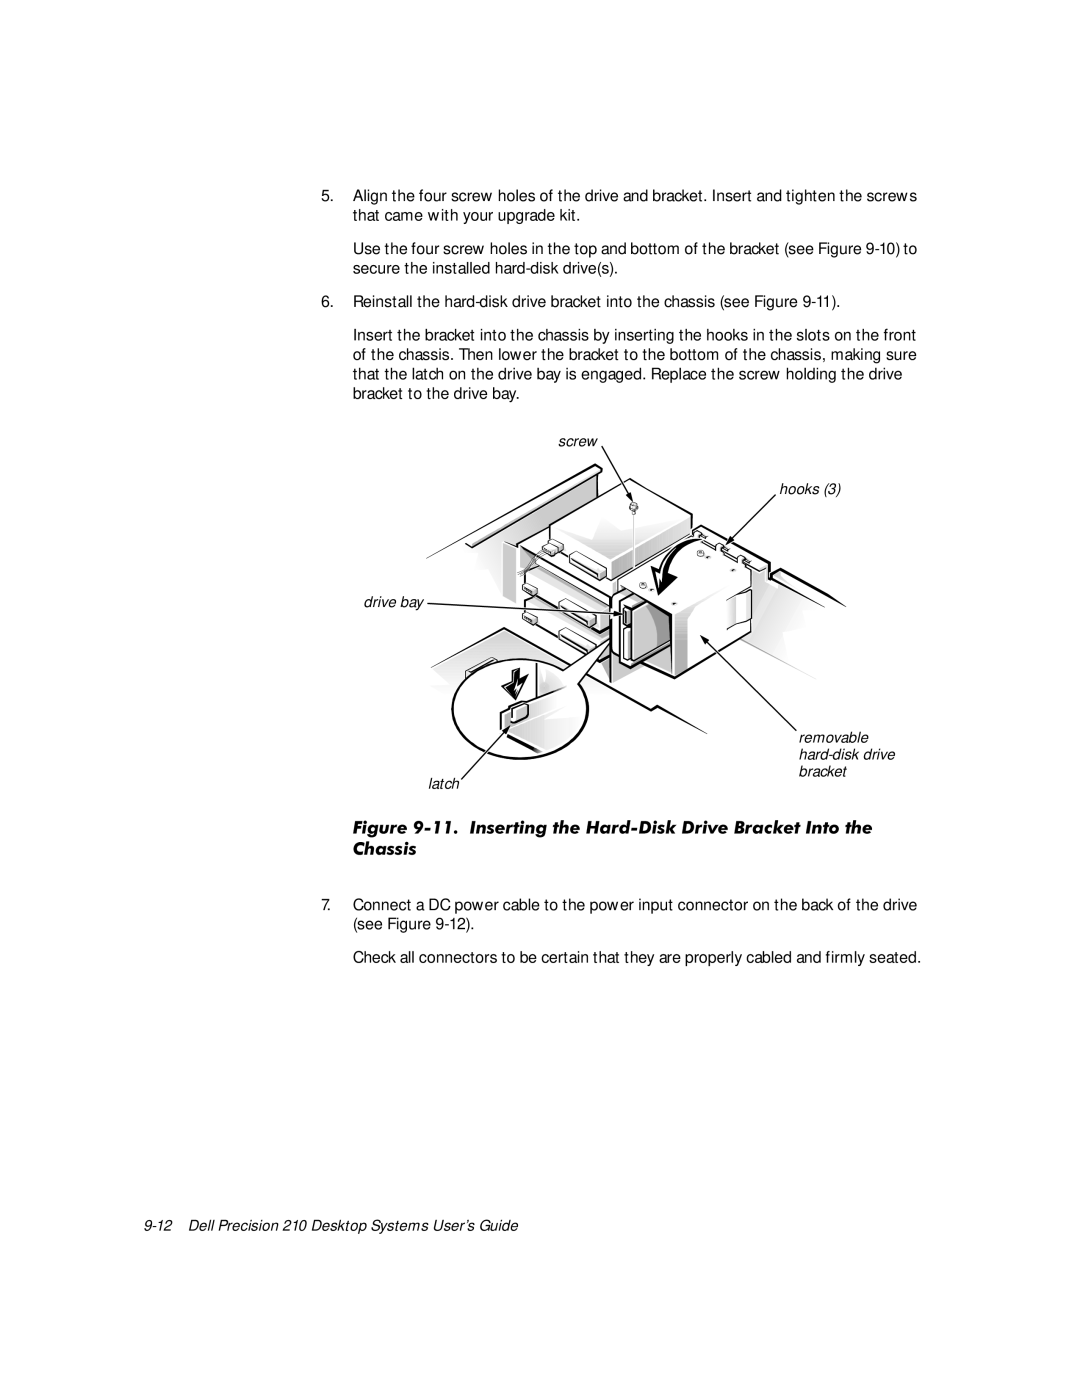
LJXUH&KDVVLV removableWKH
To locate the IDE1 connector, see Figure
See Drives Primary and Secondary in Chapter
Dell Precision 210 Desktop Systems User’s Guide
7HFKQLFDO6SHFLILFDWLRQV
7DEOH$7HFKQLFDO6SHFLILFDWLRQV0LFURSURFHVVRU
7DEOH$7HFKQLFDO6SHFLILFDWLRQV6\VWHP,QIRUPDWLRQFRQWLWLQXHGQ
NIC Com 3C905b-TX Wakeup On LAN- capable
Standard RAM 64 MB Maximum RAM 512 MB Bios address
Externally accessible Serial DTE
Sdram
Audio line Audio line out Audio microphone
\&RPELQDWLRQVspecifications
Hard-disk drive access indicator . . . . . . . . green LED
7HPSHUDWXUH
3K\VLFDO
7DEOH$7HFKQLFDO6SHFLILFDWLRQVQYLURQPHWDOFRLQXHGQW
XPSHUVDQG6ZLWFKHV³$*HQHUDO Sodqdwlrq
Xpshuv
6ZLWFKHV
LJXUH%
Tower Bios Pswd Niccfg
RSVD2 RSVD1
450MHZ 400MHZ 350MHZ 300MHZ
\VWHP%RDUG/DEHOV
23RUWVDQG&RQQHFWRUV
SERIAL1/2
SLOT1PRI
SLOT1SEC
Hardware Configuration Features B-7
DCD
SIN
Sout
DTR
6LJQDO
\ERDUGDQG0RXVH&RQQHFWRUV
Kbdata
Kbclk
IRUWKH0RXVH1
Mfdata
9LGHR&RQQHFWRU
Rqqhfwru
Rqqhfwruv
0LFURSKRQH-DFN
Rqqhfwruv
Data
+DATA
QWHUUXSW$VVLJQPHQWV
LQH2XW-DFN
LQH,Q-DFN
IRQ0
IRQ1
IRQ2
IRQ3
0HPRU\$OORFDWLRQV
FFFC0000-FFFFFFFF Bios ROM
0010FFF0-1FFFFFFF
Extended memory
Fffbffff Reserved
Dell Precision 210 Desktop Systems User’s Guide
$&RQILJXUDWLRQ8WLOLW\ 0HVVDJHV
8UURU0HVVDJHV
When you start the ICU if
ICU cannot find Make sure to switch to drive a before
Driver resides. The default is
Either of these messages
Configuration Manager You must reconfigure the conflicting
Or more cards Card marked with config err,
Settings. Click the Cancel button if
You cannot configure Perform the following procedure
No more values are avail
Able for the resource you
Are trying to add or modify
ISA Configuration Utility Messages C-5
Lowing procedure
This message appears Insert the original ISA Configura
When you modify a card
Its configuration file
RQILJXUDWLRQ0DQDJHU0HVVDJHV
0HVVDJHV&DXVH
Titled Running the Dell Diagnostics in your
Error, see the chapter titled Getting
Plug and Play expansion Use the following procedure
Then return to this procedure
ISA Configuration Utility Messages C-9
ICU
0DLQWDLQLQJWKH6\VWHP
DWD3UHVHUYDWLRQ
6FKHGXOLQJ%DFNXSV
Dfnxshylfhv
OHDQLQJ6\VWHP&RPSRQHQWV
5HFRYHULQJDWD
5HFRPPHQGHG7RROVDQG$FFHVVRULHV
OHDQLQJWKH6\VWHP0RQLWRUDQG.H\ERDUGWHULRUV
Page
+XPLGLW\
$OWLWXGH
XVWDQG3DUWLFOHV
Ruurvlrq
OHFWURPDJQHWLFDQG5DGLRUHTXHQF\,QWHUIHUHQFH
0DJQHWLVP
6KRFNDQG9LEUDWLRQ
3RZHU3URWHFWLRQHYLFHV
3RZHU6RXUFH,QWHUUXSWLRQV
6XUJH3URWHFWRUV
LQH&RQGLWLRQHUV
8QLQWHUUXSWLEOH3RZHU6XSSOLHV
Dell Precision 210 Desktop Systems User’s Guide
5HJXODWRU\1RWLFHV
1RWLFHV862QO\
ODVV$ ODVV%
1RWLFH&DQDGD2QO\
1RWLFHXURSHDQ8QLRQ
RPSOLDQFH&HFK5HSXEOLF
2QO\ Bvupnbujdlz
ODVV%,7
8ZNBHBOJB1PMTLJFHP$FOUSVN#BEBËJ
1PPTUBFJOTUSVLDKFCFQJFDFËTUXB
120,QIRUPDWLRQ0HLFR2QO\
Round Rock, TX
Importer Dell Computer de México De C.V
Col. Cuauhtemoc
~QLFDPHQWHSDUD0pLFR
Importador Dell Computer de México De C.V
Dell Precision 210 Desktop Systems User’s Guide
DUUDQW\5HWXUQ3ROLF\DQGHDU
LPLWHG7KUHHHDUDUUDQW\86DQG &DQDGD2QO\
RYHUDJHXULQJHDU2QH
RYHUDJHXULQJHDUV7ZRDQG7KUHH
HQHUDO3URYLVLRQV
´7RWDO6DWLVIDFWLRQµ5HWXUQ3ROLF\86DQG &DQDGD2QO\
HDU6WDWHPHQWRI&RPSOLDQFHIRU HOO%UDQGHG+DUGZDUH3URGXFWV
3UHYLRXV3URGXFWV
6RIWZDUH
$GGLWLRQDO,QIRUPDWLRQ
Dell Precision 210 Desktop Systems User’s Guide
ORVVDU\
Abbreviation for amperes
Abbreviation for Autodesk Device Interface
Acronym for application-specific integrat
EDFNXSing systemEDWWHU\
FRQWUROthe keyboardSDQHO
FRQYHQWLRQDOPHPRU\
Acronym for digital audio tape
Nvram
Abbreviation for Extended Capabilities
Technique for accessing RAM above
Abbreviation for Federal Communications
+36
Abbreviation for kilobytes per second
Abbreviation for pounds
Abbreviation for megabit
PHPRU\RAM. Pdqdjhu
Abbreviation for millimeters
Abbreviation for mean time between
Sdudoohosruw
Abbreviation for one-time programmable
3267
Uhdoprgh
System diskette is a synonym for bootable
‡ RAM
Mouse, and keyboard drivers are installed for Windows
Abbreviation for Underwriters
384 KB of RAM located between
Abbreviation for volts
ConnectorYLGHRDGDSWHU
YLUWXDOPHPRU\
+Abbreviation for watts
Glossary
Dell Precision 210 Desktop Systems User’s Guide
QGH
DMI
Index
Dell Precision 210 Desktop Systems User’s Guide
Jumpers about, 7-6, B-1 Bios jumper, B-4 location, B-3
Jacks
Mouse option
On-board speaker muting
About, 3-14assigning
Synchronous dynamic random-access memory. See Sdram
Pin assignments, B-13pin numbers, B-13
Dell Precision 210 Desktop Systems User’s Guide


 removableWKH