Manuals
/
Edimax Technology
/
Computer Equipment
/
Network Router
Edimax Technology
BR-6228NC V2
manual
119
Models:
BR-6228NC V2
1
123
139
139
Download
139 pages
16.51 Kb
120
121
122
123
124
125
126
127
Troubleshooting
Install
Password
Default Gateway
Login
III‐3‐9. Administration
III‐3‐5 .4GHz Wireless
Configuring your IP address
Reset
II‐2. Access Point Mode
Page 123
Image 123
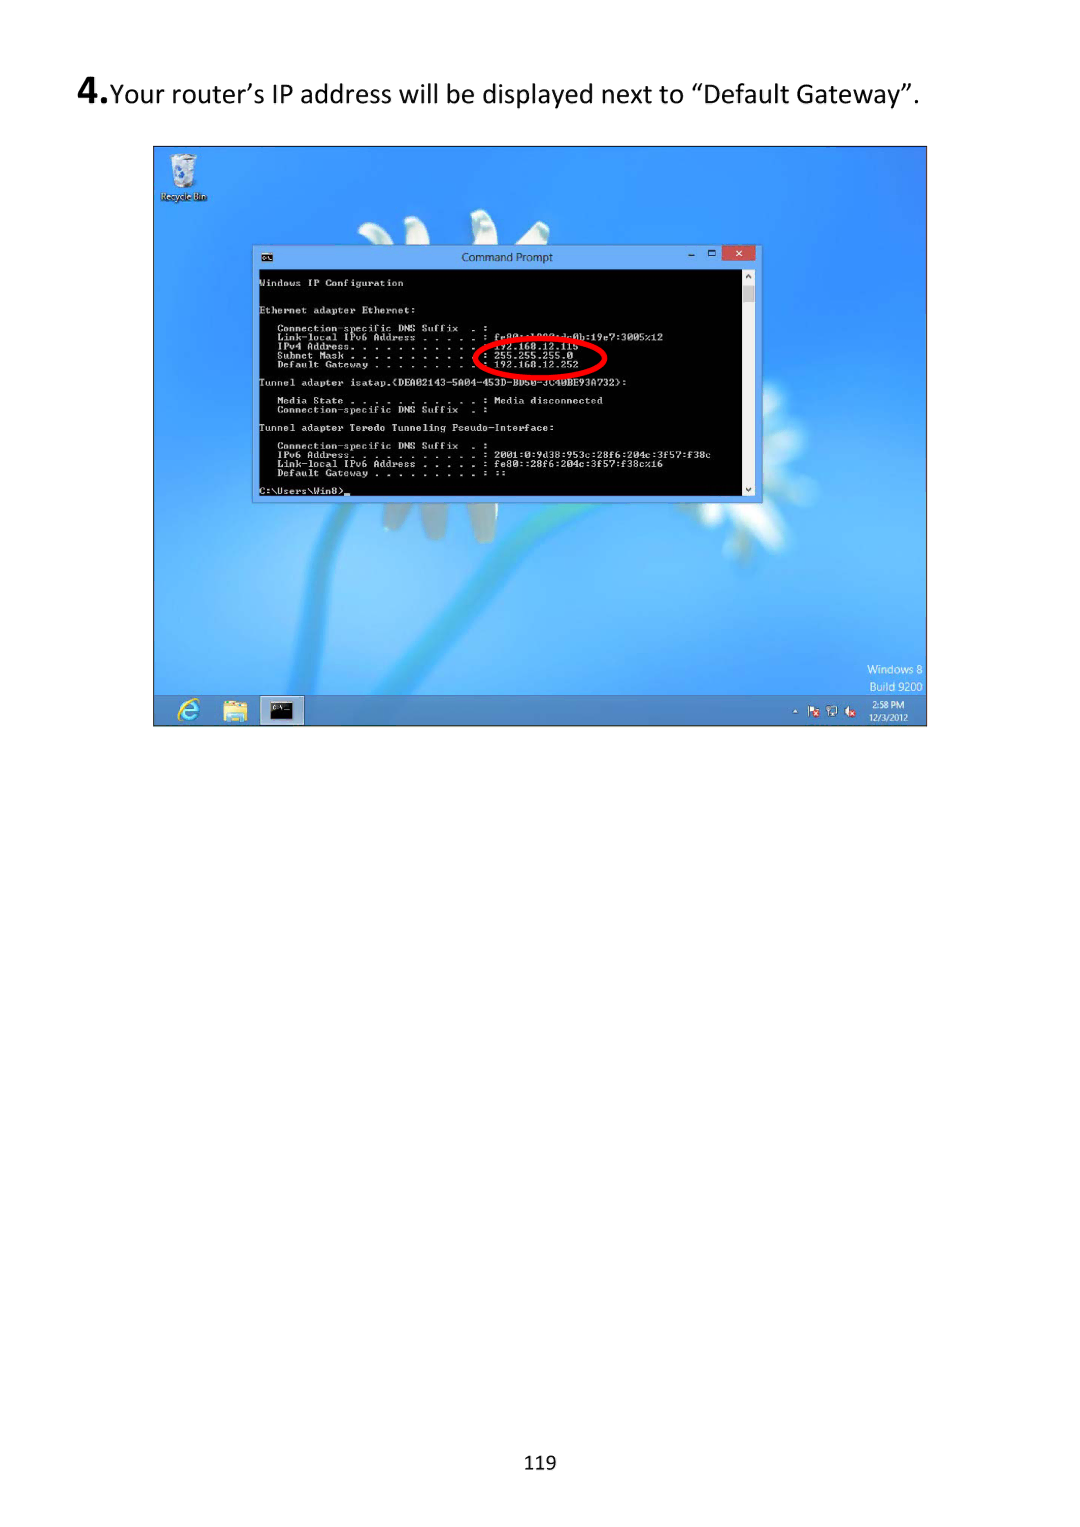
4.
Your router’s IP address will be displayed next to “Default Gateway”.
119
Page 122
Page 124
Page 123
Image 123
Page 122
Page 124
Contents
BR-6228nS V2 BR-6228nC
Contents
IV. Appendix
IV‐1‐3‐2
Product Information
‐1. Package Contents
LED Status Description
‐2. LED Status
‐3. Back Panel
‐4. Safety Information
II. Installation
Wi‐Fi Router
Range Extender
II‐1. Wi‐Fi Router Mode
Page
Page
Page
II‐2. Access Point Mode
Page
Page
Page
II‐3. Range Extender Mode
Page
Encryption
Device Ssid
Configuring your IP address
Page
Page
II‐5. Reset to Factory Default Settings
II‐4. WPS Setup
III‐1. Login
III. Browser Based Configuration Interface
Page
III‐2. Save Settings
III‐3. Main Menu
III‐3‐1. Status
Switch to Router/AP/Range Extender
III‐3‐2. Setup Wizard
Setup Wizard
Switch to
Page
III‐3‐3‐1. WAN Setup
III‐3‐3. Internet
III‐3‐3‐1‐1. Dynamic IP
DNS Address 1,2
Host Name
MAC Address
DNS Address
Address
Default Gateway
Fixed IP Address
Subnet Mask
Password
III‐3‐3‐1‐3. PPPoE
User Name
Connection Type
Service Name
Enable Dual‐WAN
Access
III‐3‐3‐1‐4. Pptp
Connection Type Idle Time Out
MTU BEZEQ‐ISRAEL
Host Name MAC Address
III‐3‐3‐1‐5. L2TP
MTU
Channel Number
Security Settings
III‐3‐3‐1‐6. Wisp
Select Site Survey
Provider
Enable/Disable
Password/Key
III‐3‐3‐2. Ddns
CyberGate http//cybergate.planex.co.jp/ddns
Tree
III‐3‐4. LAN
IP Address
802.1d Spanning
Leases MAC Address
Enable Static Dhcp
Start IP
End IP
Page
III‐3‐5‐1. Basic
III‐3‐5 .4GHz Wireless
Disable Wireless
Wireless Network
Wireless Clients
III‐3‐5‐1‐1. Disable
Broadcast Essid
Key Length
Enable
Authentication
III‐3‐5‐1‐2. WEP
Pre‐shared Key
III‐3‐5‐1‐3. WPA Pre‐Shared Key
WPA Unicast
Cipher Suite
Radius Server
III‐3‐5‐1‐4. WPA Radius
Radius Server IP
Radius Server Port
III‐3‐5‐2. Guest
Enable Guest Ssid
Wireless Guest
Enable Wireless
Encryption
III‐3‐5‐3. WPS
Enable WPS
Authentication Key
Configuration
Button
Configure via Push
Configure via Client
III‐3‐5‐4. Access Control
Delete Selected/ Delete All
Comment
III‐3‐5‐5. Schedule
Add Clear
III‐3‐6. Firewall
SPI firewall
III‐3‐6‐1. URL Blocking
Delete Selected / Delete All
III‐3‐6‐2. Access Control
Computer Name
Enable MAC
Filtering
Client PC MAC
Add PC
Enable IP Filtering
Port Range
Client PC
Client PC IP address
Protocol
Enable DMZ
III‐3‐6‐3. DMZ
Public
III‐3‐6‐4. DoS
Sync Flood
Ping of Death
Discard Ping from
Port Scan
Bandwidth
III‐3‐7. QoS
III‐3‐7‐1. QoS
Total Download
Local IP Address
Rule Name
Remote Port Range
Reset
Local Port Range
Remote IP Address
Page
III‐3‐8‐1. Static Routing
III‐3‐8. Advanced
Interface
Enable Static Routing
Destination LAN IP
Hop Count
Type
Private IP
III‐3‐8‐3. Virtual Server
Private Port
Public Port
Beacon Interval
III‐3‐8‐4 .4GHz Wireless
Fragment Threshold
RTS Threshold
Tx Power
CTS Protect
III‐3‐8‐5. ALG
III‐3‐8‐7. UPnP
III‐3‐8‐6. Igmp
Igmp Snooping
Igmp Proxy
Daylight Saving
III‐3‐9. Administration
III‐3‐9‐1. Time Zone Set Time Zone
Time Server Address
III‐3‐9‐2. Password
III‐3‐9‐3. Remote Access
Host IP Address
Port
Factory Default
III‐3‐9‐4. Backup/Restore Backup Settings
Restore Settings
Restore to
III‐3‐9‐7. Logs
III‐3‐9‐6. Restart
Refresh
III‐3‐9‐8. Active Dhcp Client
III‐3‐9‐9. Statistics
IV. Appendix
IV‐1. Configuring your IP address
IV‐1‐1‐1. Windows XP
Page
IV‐1‐1‐2. Windows Vista
Page
IV‐1‐1‐3. Windows
Page
Page
IV‐1‐1‐4. Windows
Page
Page
Page
IV‐1‐1‐5. Mac OS
Page
IV‐1‐2‐1. Windows XP
IV‐1‐2. How to modify the IP address of your computer
Preferred DNS Server
IV‐1‐2‐2. Windows Vista
IV‐1‐2‐3. Windows
Click Properties
102
IV‐1‐2‐4. Windows
104
105
106
IV‐1‐2‐5. Mac
108
Click Apply to save the changes
IV‐1‐3‐1. Windows 7 & Vista
IV‐1‐3. How to Find Your Network Security Key
111
IV‐1‐3‐2. Mac
113
114
IV‐1‐4‐1. Windows XP, Vista
IV‐1‐4. How to Find Your Router’s IP Address
116
IV‐1‐4‐2. Windows
118
119
IV‐1‐4‐3. Mac
121
IV‐2. Connecting to a Wi‐Fi network
123
Ssid
IV‐3. Troubleshooting
Can’t open the browser based configuration interface
Forgot my password
127
IV‐4. Glossary
129
TCP FTP Smtp POP3
Copyright
Federal Communication Commission Interference Statement
EU Declaration of Conformity
Declaration of Conformity
135
Top
Page
Image
Contents