MAINTENANCE

Air Filter

NOTE

Always clean the air filter before making anymixtureadjustmentsofthecarburetor.

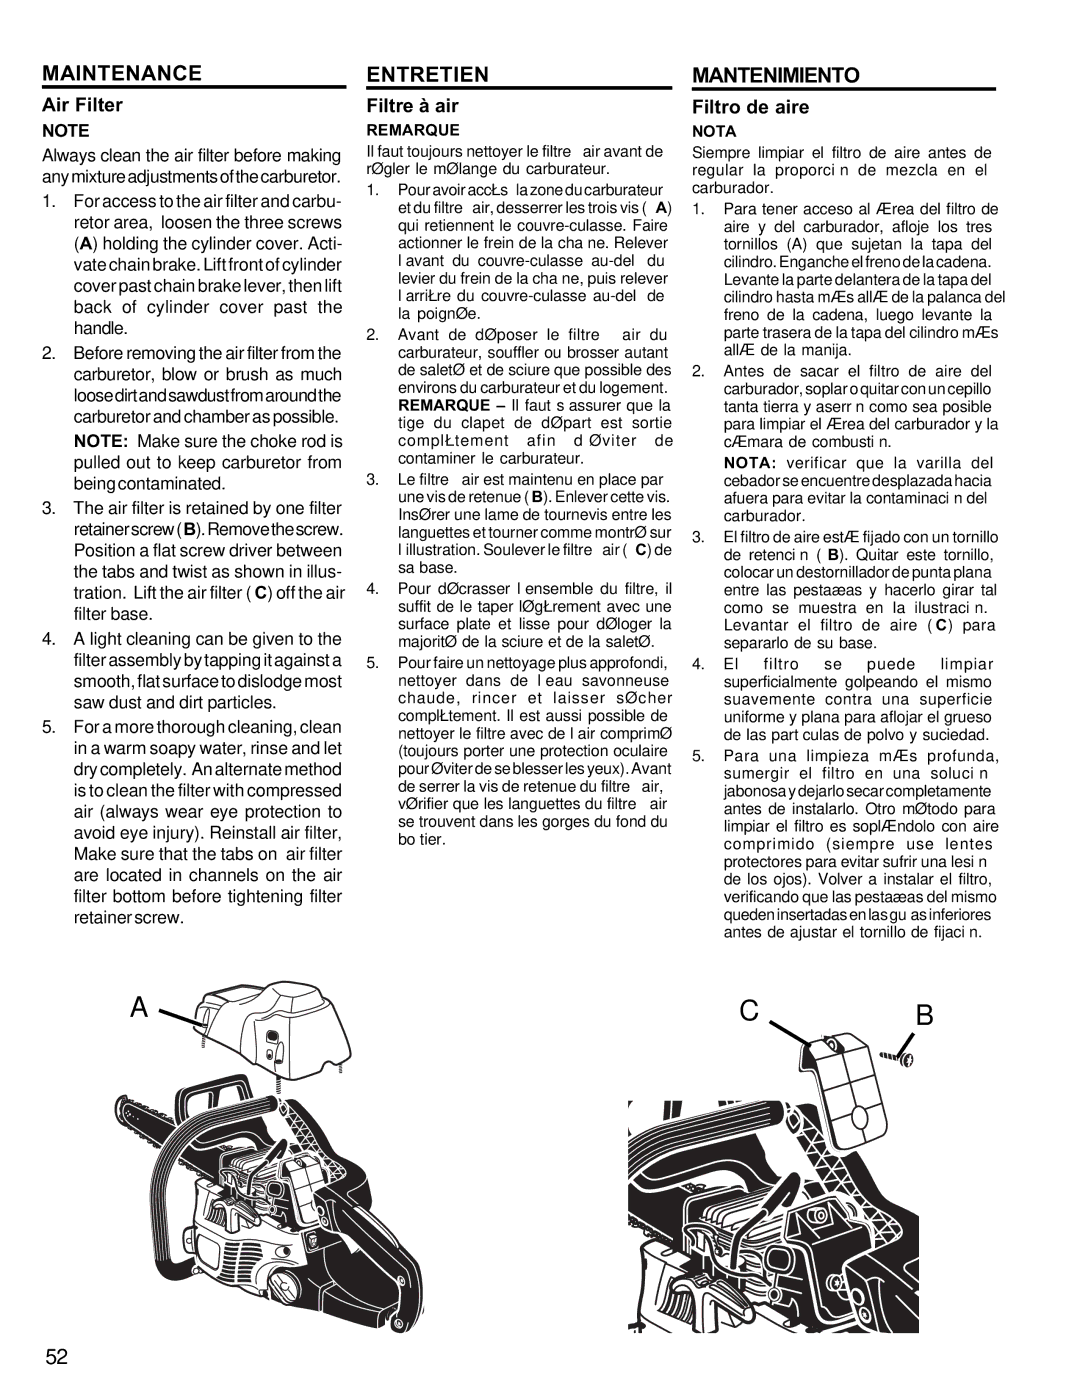
1.For access to the air filter and carbu- retor area, loosen the three screws (A) holding the cylinder cover. Acti- vatechainbrake.Liftfrontofcylinder coverpastchainbrakelever,thenlift back of cylinder cover past the handle.

2.Before removing the air filter from the carburetor, blow or brush as much loosedirtandsawdustfromaroundthe carburetorand chamber aspossible. NOTE: Make sure the choke rod is pulled out to keep carburetor from beingcontaminated.

3.The air filter is retained by one filter retainerscrew(B).Removethescrew. Position a flat screw driver between the tabs and twist as shown in illus- tration. Lift the air filter (C) off the air filter base.

4.A light cleaning can be given to the filterassemblybytappingitagainsta smooth,flatsurfacetodislodgemost saw dust and dirt particles.

5.For a more thorough cleaning, clean in a warm soapy water, rinse and let drycompletely. Analternatemethod is to clean the filter with compressed air (always wear eye protection to avoid eye injury). Reinstall air filter, Make sure that the tabs on air filter are located in channels on the air filter bottom before tightening filter retainerscrew.

ENTRETIEN

Filtre à air

REMARQUE

Il faut toujours nettoyer le filtre à air avant de régler le mélange du carburateur.

1.Pouravoiraccèsàlazoneducarburateur et du filtre à air, desserrer les trois vis (A) qui retiennent le couvre-culasse. Faire actionner le frein de la chaîne. Relever l’avant du couvre-culasse au-delà du levier du frein de la chaîne, puis relever l’arrière du couvre-culasse au-delà de la poignée.

2.Avant de déposer le filtre à air du carburateur, souffler ou brosser autant de saleté et de sciure que possible des environs du carburateur et du logement. REMARQUE – Il faut s’assurer que la tige du clapet de départ est sortie complètement afin d’éviter de contaminer le carburateur.

3.Le filtre à air est maintenu en place par une vis de retenue (B). Enlever cette vis. Insérer une lame de tournevis entre les languettes et tourner comme montré sur l’illustration. Soulever le filtre à air (C) de sa base.

4.Pour décrasser l’ensemble du filtre, il suffit de le taper légèrement avec une surface plate et lisse pour déloger la majorité de la sciure et de la saleté.

5.Pour faire un nettoyage plus approfondi, nettoyer dans de l’eau savonneuse chaude, rincer et laisser sécher complètement. Il est aussi possible de nettoyer le filtre avec de l’air comprimé (toujours porter une protection oculaire pouréviterdeseblesserlesyeux).Avant de serrer la vis de retenue du filtre à air, vérifier que les languettes du filtre à air se trouvent dans les gorges du fond du boîtier.

MANTENIMIENTO

Filtro de aire

NOTA

Siempre limpiar el filtro de aire antes de regular la proporción de mezcla en el carburador.

1.Para tener acceso al área del filtro de aire y del carburador, afloje los tres tornillos (A) que sujetan la tapa del cilindro.Engancheelfrenodelacadena. Levante la parte delantera de la tapa del cilindro hasta más allá de la palanca del freno de la cadena, luego levante la parte trasera de la tapa del cilindro más allá de la manija.

2.Antes de sacar el filtro de aire del carburador,soplaroquitarconuncepillo tanta tierra y aserrín como sea posible para limpiar el área del carburador y la cámara de combustión.

NOTA: verificar que la varilla del cebadorseencuentredesplazadahacia afuera para evitar la contaminación del carburador.

3.El filtro de aire está fijado con un tornillo de retención (B). Quitar este tornillo, colocar un destornillador de punta plana entre las pestañas y hacerlo girar tal como se muestra en la ilustración. Levantar el filtro de aire (C) para separarlo de su base.

4.El filtro se puede limpiar superficialmente golpeando el mismo suavemente contra una superficie uniforme y plana para aflojar el grueso de las partículas de polvo y suciedad.

5.Para una limpieza más profunda, sumergir el filtro en una solución jabonosaydejarlosecarcompletamente antes de instalarlo. Otro método para limpiar el filtro es soplándolo con aire comprimido (siempre use lentes protectores para evitar sufrir una lesión de los ojos). Volver a instalar el filtro, verificando que las pestañas del mismo quedeninsertadasenlasguíasinferiores antes de ajustar el tornillo de fijación.

A C B

52

Page 52
Image 52
Homelite UT10946 manual Air Filter, Filtre à air, Filtro de aire

UT10946 specifications

The Homelite UT10946 is a highly regarded tool in the outdoor power equipment market, particularly known for its efficiency and reliability. Designed for homeowners and gardening enthusiasts, this model combines power with ease of use, making it an ideal choice for various landscaping tasks.

One of the standout features of the UT10946 is its powerful 25cc 2-cycle engine. This engine provides ample power for tackling a range of tasks, from light trimming to heavier brush clearing. Its lightweight design enhances maneuverability, allowing users to navigate easily around gardens and landscapes without fatigue. This is particularly beneficial during extended periods of use.

The Homelite UT10946 is equipped with an automatic line advance system, which eliminates the need for manual adjustments. This feature ensures that users can work continuously without interruptions for line replacement, ultimately increasing productivity. The tool utilizes a .095-inch trimmer line, which strikes a balance between durability and efficiency, effectively coping with thick grass and tough weeds.

Ergonomics play a crucial role in the design of the UT10946. The trimmer features an adjustable handle, allowing users to customize their grip for better control and comfort. This ergonomic consideration reduces strain on the hands and arms, particularly during lengthy jobs. A padded shoulder strap is also included, which provides additional support and balance as users maneuver the trimmer across uneven terrain.

The unit's ease of starting is enhanced by the inclusion of a primer bulb and choke mechanism, allowing for a quicker ignition process. This is particularly advantageous for users who are not as experienced with starting gas-powered equipment.

In terms of construction, the Homelite UT10946 boasts a robust build designed to withstand the rigors of outdoor use. Its durable materials ensure that it can handle the challenges of various weather conditions, contributing to its longevity.

In summary, the Homelite UT10946 offers a blend of power, convenience, and user-friendliness. With features such as a powerful engine, automatic line advance, ergonomic design, and easy starting mechanisms, it stands out as a reliable choice for homeowners looking to maintain their gardens and landscapes efficiently.