751G Color Mobile Computer
Intermec Technologies Corporation Worldwide Headquarters
Revision Letter Date Description of Change
Document Change Record
751G Color Mobile Computer User’s Manual
Contents
Software Builds Where to Find Information
Customization and Lockdown
Viii
Contents
129
Before You Begin
Safety Information
Global Services and Support
Warranty Information
Telephone Support
Service Description Choose this option
Who Should Read This Document?
Related Documents
To download documents
Patent Information
Before You Begin Xiv
1Using the Computer
Ambient Light Sensor
Speaker
Audio System
Microphone
External Headset Jack
Battery
Insert your 751G into its single dock for charging
Installing and Charging the Battery
To remove the battery
Removing the Battery
Beeper
Maximizing Battery Life
Enabling the Registry Storage
Intermec representative for information
Adjusting the Beeper Volume
To enable the beeper
Enabling the Beeper
Disabling the Beeper
Intermec Settings Applet
To disable the beeper
Settings icon to access the applet
Orange Plane Keys
Keypad
Backlight for Keypad
Key Sequences
To Enter Press the Keys
Alpha Green Plane Keys
LED Color and Action Description
LEDs
LED Color/Action Description
Scanning Bar Codes
Resetting Your Computer
Scanning with the Area Imager
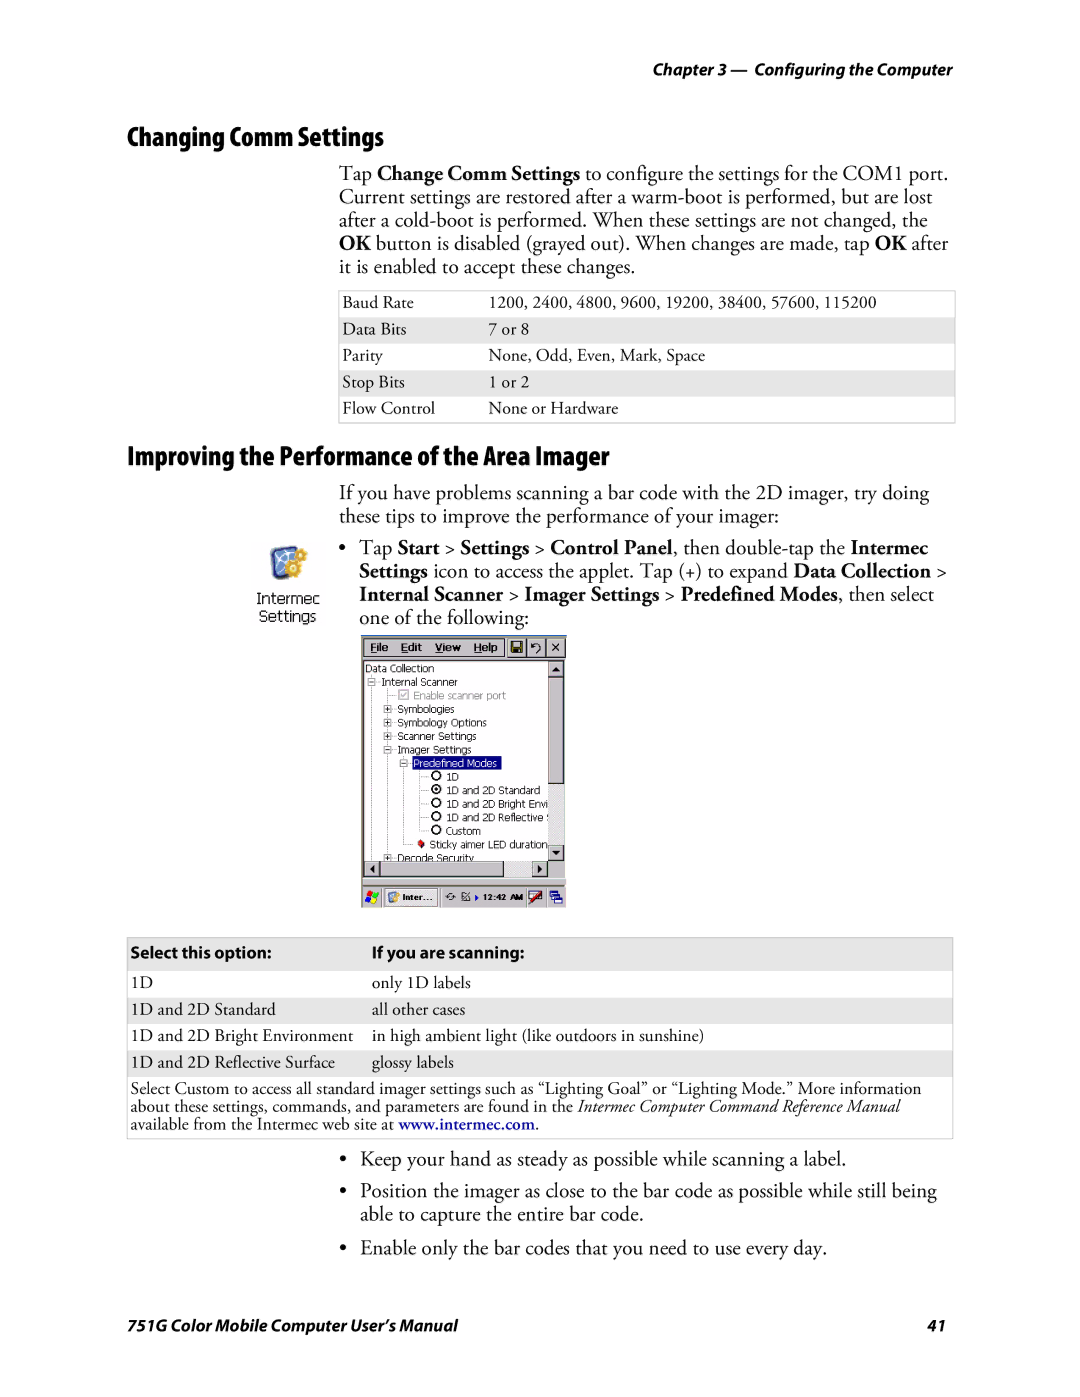
Improving the Performance of the Area Imager
Software Build Version
To use the area imager
Storage Media
Software Tools
SmartSystems Platform Bundles Sspb
Internal Card Slots and Connector
Accessing the Secure Digital Card Slot
Attaching a Tab to the Secure Digital Card
Accessing Files Stored on the Secure Digital Card
Wireless Network Support
Removing the Secure Digital Card
Physical and Environmental Specifications
Accessories
Memory and Storage
Physical Dimensions
Power
Keypad Option
Using the Computer
2Windows CE .NET
For information on See this source
Where to Find Information
Software Builds
Basic Skills
Programs
Desktop Screen
Start Menu and Task Bar
Entering Information
Notifications
Typing With the Onscreen Keyboard
Selecting Typed Text
Using Transcriber
To open Windows Explorer
Finding and Organizing Information
To start Task Manager
Customizing Your Computer
Adjusting Settings
Adding or Removing Programs
Adding Programs Using Microsoft ActiveSync
Adding a Program to the Start Menu
Using Windows Explorer on the Computer
Using Microsoft ActiveSync on the PC
Adding a Program Directly from the Internet
Microsoft WordPad
Microsoft ActiveSync
Creating a Document
Typing Mode
Synchronizing WordPad Documents
Writing Mode
Viewing Mobile Favorites and Channels
Internet Explorer
Browsing the Internet
Tap to bring down a list of addresses
3Configuring the Computer
Configuring the Computer With Intermec Settings
Configuring Parameters
Synchronizing the Computer System Time with a Time Server
Where
Configuring the Computer through the Network
Example
Configuring the Computer in a UDP Plus Network
Directly to a Generic Serial Port
Configuring the Printer
Using Configuration Parameters
Directly to a Port
MSI
Configuring the Scanner
Data Collection Configuration
Scanner Control and Data Transfer
Select this option If you are scanning
Changing Comm Settings
UPC
Symbology Density Near Distance Far Distance
Symbology Density Minimum Distance
Reading Distances
Using Microsoft ActiveSync
Installing Applications on the Computer
To use Microsoft ActiveSync
Using a Storage Card
Using Wavelink Avalanche
Using the SmartSystems Console
Developing Applications for the Computer
Installing Cabinet Files
Launching Your Application Automatically
Packaging Applications for the Computer
RunAutoRun
Usage
AutoExec
Examples of keyword usage are as follows
AutoCopy
AutoRun
Chain
AutoReg
AutoCab
Version
Creating Cab Files
Creating Device-Specific Cab Files
Creating an .inf File
Strings
CEStrings
Strings
CEDevice
CEDevice.SH3
CEDevice
SourceDiskNames
DefaultInstall
SourceDiskFiles
DestinationDirs
DestinationDirs
SourceDisksFiles.SH3
SourceDisksFiles.MIPS
AddReg
DefaultInstall.SH3
DefaultInstall.MIPS
CopyFiles
Shortcuts.All
RegSettings.All
CEShortCuts
Sample .INF File
SourceDisksFiles Required section
CEDevice ProcessorType =
DestinationDirsRequired section
Configuring the Computer
After the CAB File Extraction
Using Installation Functions in Setup.dll
Shows the functions that are exported by Setup.dll
Point to Setup.dll
Configuring the Computer
Configuring the Computer
Destdirectory
Creating Cab Files with CAB Wizard
Customization and Lockdown
Troubleshooting the CAB Wizard
Return Values
Kernel I/O Controls
Syntax
Parameters
ID Field Values
Usage
ID Field Values
#include oemioctl.h
Itcnvparmedbgsubnet
ITCNVPARM80211INSTALLED
Describes and enables the registry save location
#include pkfuncs.h #include deviceid.h
Id field of lpInBuf may be one of the following values
Returns the HAL version information of the Pocket PC image
Ioctlhalgetoalverinfo
Returns the HAL version information of the OS image
Ioctlhalgetbootloaderverinfo
None
Ioctlhalcoldboot
Sample
Ioctlhalgetbootdevice
#include pkfuncs.h
Returns processor information
Returns Xscale processor ID
Ioctlgetcpuid
Basic Connect/Disconnect Functions
Networking APIs
RadioConnect
GetAssociationStatus
Query Information Functions
RadioDisconnect
RadioDisassociate
Uint GetAuthenticationMode Ulong
GetAuthenticationMode
GetBSSID
Uint GetLinkSpeed int
GetDiversity
GetLinkSpeed
Uint GetDiversity Ushort
Uint GetNetworkMode Ulong
Call this function to get the current Network Mode Ssid for
GetMac
802.11b/g radio
GetSSID
GetNetworkType
Uint GetNetworkType Ulong
Uint GetPowerMode Ulong
GetPowerMode
GetRSSI
Uint GetWepStatus Ulong
GetTXPower
Uint GetTXPower Ulong
GetWepStatus
Uint GetCCXStatus Ulong
GetRadioIpAddress
GetCCXStatus
Uint GetRadioIpAddress Tchar
Set Information Functions
EnableWep
Enables or disables WEP encryption on the radio TRUE/FALSE
Uint EnableWep Bool
Call this function to set the desired encryption status
Uint EncryptionStatus Uint mode
EncryptionStatus
RemoveWep
SetChannel
SetAuthenticationMode
Call this function to set the desired authentication mode
Uint SetAuthenticationMode Ulong
SetNetworkMode
SetPowerMode
Call this function to set the desired Network Mode
Call this function to set the desired power mode
Uint SetCCXStatus Ulong
Call this function to set the desired mixed cell mode
SetCCXStatus
SetMixedCellMode
Uint EnableSuppLogging Ulong
ConfigureProfile
EnableSuppLogging
Uint ConfigureProfile Tchar
IsDHCPEnabled
EnableZeroConfig
GetCurrentDriverName
IsOrinoco
IsZeroConfigEnabled
IsSupplicantRunning
RenewDHCP
ResetRadioToSystemSave
StartScanList
StopSupplicant
SwitchPacketDriver
Call this function to stop the supplicant service
StartSupplicant
Deprecated Functions
Notifications
Function Syntax
NLEDSetDevice
Reboot Functions
This performs a warm-boot page 76. See note on the next
NLEDGetDeviceInfo
Reprogramming the 751G Keypad
Performs a system warm-boot, preserving the object store
Key Values
Alpha plane mapping is in the registry at
How Key Values Are Stored in Registry
Change Notification
Orange plane mapping is in the registry at
Scan Codes
Advanced Keypad Remapping
Press this Key Meaning ScanCode
Sample View of Registry Keys
4Maintaining the Computer
Updating the System Software
Using a Storage Card to Upgrade the Computer
Button, or you may damage the Reset button
Using the SmartSystems Console to Upgrade the Computer
Problem Solution
Troubleshooting Your Computer
Problems While Configuring the Computer
751G, authentication server
Problems While Configuring 802.1x Security
Cleaning the Scanner
Maintaining the Computer 110
5Network Support
Configure your radio settings, then tap File Save
To configure the radio
802.11b/g Communications
Connecting to an Internet Service Provider
Remote Access Modems
114
751G Color Mobile Computer User’s Manual 115
Connecting to Work
Enter the Host name or IP address field
Ending a Connection
Wireless Networks
Configuring Security
Loading Certificates
Leap
EAP-FAST
EAP-PEAP
EAP-TTLS
Configuring Funk Security
Choosing Between Microsoft and Funk Security
EAP-TLS
Configuring WPA Security With Funk Security
Using WPA Security
Use this procedure to set WPA security with Funk security
If you select TLS
If you select Ttls or Peap
If you select Leap or EAP-FAST
Configuring WPA-PSK Security With Funk Security
Using 802.1x Authentication
Load a user and root certificate on your 751G
Configuring 802.1x Security With Funk Security
Configuring Static WEP Security With Funk Security
Using Static WEP Security
Configuring Microsoft Security
SmartSystems Foundation
Network Support 128
Index
Numerics
Symbols
Vnclassasic VNCLASSBOOTSTRAP, 69 Vnclasskbd
HAL
Ioctlgetcpuid IOCTLHALCOLDBOOT, 74, 99 Ioctlhalgetbootdevice
IOCTLGETCPUID, 77 IOCTLHALCOLDBOOT, 74 Ioctlhalgetbootdevice
NDISENCRYPTION3KEYABSENT
Ndisradioscanning
PKFUNCS.H Ioctlhalgetdeviceid
System time, 36 SYSTEMINFO.dwProcessorType
Ioctlgetcpuid
Index 140
Page
961-054-036C