SR-VS20EK
Safety Precautions
Connection to the mains supply in the United Kingdom
Do not expose the apparatus to dripping or splashing
Do not place the recorder…
Do not block the recorder’s ventilation openings or holes
Some Dos And Donts On The Safe Use Of Equipment
Quick SET UP Guide
Back of Recorder
Connector Scart
Back of TV
Aerial connector
RF Cable provided
Step Auto SET UP
Before performing the following procedure, make sure that
Progress, this process will be interrupted
Or remote control until the display panel
Shows either the display as illustrated on
You will need to start again. See Notes below
C1If both auto channel set and auto clock set have failed
Turn on the Recorder
TV Auto Power On
Link Functions
NexTView Link
Satellite Receiver Control Setting
Check Result of Test
Select Satellite RECEIVER’S Channel for Testing
Enter Satellite RECEIVER’S Brand
Code
Playback
Activate HIGH-SPEED Search
Pause During Playback
Tape Position Indicator VHS Deck
Time Code DV Deck
Recording
Press SP/LP/EP
Select DV Deck
DV Deck
Mini DV
SET Recording Duration
Engage ITR Mode
Reset Counter
Display Remaining Time
Video Plus+ Timer Programming
Satellite Receiver Users
Timer Warning
PDC Recording
Start Time
Express Timer Programming
Enter Programme
Time
Return to Normal
SET PDC Mode
Timer Mode
Screen
Check, Cancel And Replace Programmes
Programme 4 overlap each other on the VHS deck
When programmes overlap each other
EX. Programme 1 you have just made
SP/LP/EP
Recording According To Tape Type
Super VHS S-VHS Super VHS ET S-VHS ET VHS Deck Only
Appears on the TV screen, press S-VHS ET again
Engage S-VHS ET Mode
Press S-VHS ET on the recorder. You can check
About 5 seconds to set it to on
Playback/ Recording According To Tape Charac- teristics
Access Main Menu Screen
Access VHS Mode SET
S.T. Picture System VHS Deck Only
Or press Record on the recorder
Recording
Playback
During B.E.S.T
Digital TBC/NR VHS Deck Only
Playback Picture Adjustment
Manual Tracking VHS Deck Only
Digital 3R VHS Deck Only
Video Stabilizer VHS Deck Only
Skip Over Unwanted
Looking For Scene You Want
Activate Index Search
Sections
Instant ReView
Activate Instant
Review
During Playback
Selecting Sound You Want
Soundtrack Selection VHS Deck
USE
12BIT Mode Sound YOU Hear
1Sound Mode Selection DV Deck
12BIT Mode Setting Audio-dubbed Mini DV Tape
Soundtrack Selection DV Deck
Receiving Nicam Stereo And Bilingual Programmes
Type of Broadcast On-screen Display Being Received
Return to Normal Screen
Select Picture Control SET Mode
Minimizing Picture Degradation While Editing
Picture Control VHS Deck Only
Select Dubbing
Tape Dubbing
Load Cassettes
Direction
Locate Start Point
Normal Dubbing
Select Dubbing Direction
Pause Dubbing
Random Assemble Editing
Program Editing Memory 8 programmes x 8 scenes
Pause
Scenes
Engage VHS Deck to
Press R.A.EDIT
Edit From
Camcorder
Recorder
Recorder If the camcorder has an S-VIDEO output connector
If the camcorder has a DV OUT/IN connector Recorder
Player
SET Recording DECK’S
Input Mode
Edit To Or From Another Video Recorder
Start Source Player
Recorder Player
TV Receiver AV mode
Your recorder
Pin Scart Cable Not provided Another recorder
VHS Audio Dubbing
SET Input Mode
Audio Dubbing
DV Audio Dubbing
END Audio Dubbing
Locate END Point
DV Insert Editing SP Mode Only
Insert Editing
VHS Insert Editing
END Insert Editing
Engage Insert Editing
Start Editing
For L-1 Output
OUTPUT/INPUT Setting
Select Setting
For L-1 Input
VHS F-1 Input Setting
VHS/AUDIO OUT Setting
SET Remote Controls Code
Remote Control Functions
Change Remote Controls Code
Display Code
TV PR +/-,TV/VCR, TV
TV Multi-Brand Remote Control
Control Your TV Using Additional Buttons
TV Brand Name Code
Operate Satellite Receiver
Satellite Receiver Multi Brand Remote Control
Brand Code
TV PR +/-,NUMBER keys
Other Functions
Access Mode SET Screen
ENABLE/DISABLE ON-SCREEN Display
On-Screen Display
OK or To set to on
Power Save Mode
Power SAVE, then press
Next Function Memory
Auto Timer
Auto SP→LP Timer VHS Deck Only
Retake VHS Deck Only
Resume Recording
Repeat Playback VHS Deck Only
Ntsc Playback VHS Deck Only
Satellite Receiver Unit
Connecting To Satellite Receiver
Back of TV
Back of Recorder
Connecting To Stereo System
Audio Cable not provided Mains outlet
Connecting To a Printer
Digital printer
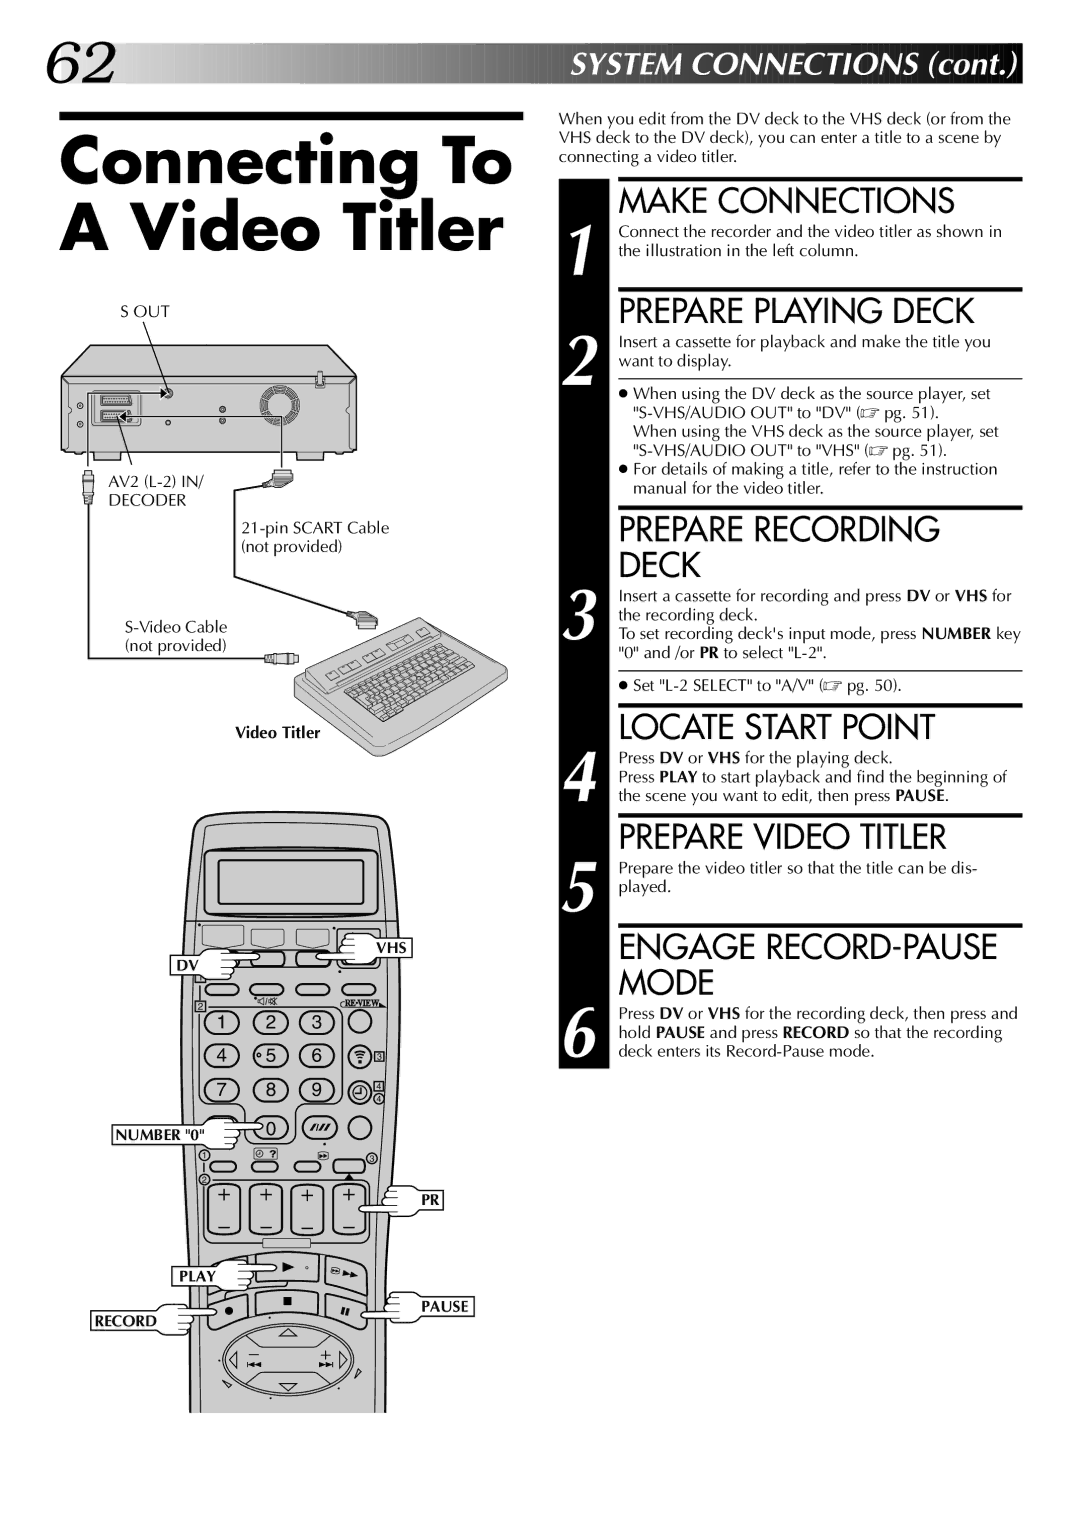
Connecting To a Video Titler
Enter Title
Press DV or VHS for the playing deck, then press Play
Auto Channel Set
Tuner Set
Perform Auto Channel SET
Pointer to Auto CH
After Scan Completed
Screen preset positions
Procedures
Is displayed on the screen
Storing Channels Manually
Delete a Channel
Change Station Preset Position
Fine-Tuning Channels Already Stored
Select Item
Access Manual
Switch Stations
Channel SET Screen
Set Stations B
+, space and stop when the desired character
Close Confirmation Screen
Station name begins Blinking
TV Station And ID List
Station Name
TV Station Channel Number Guide
Clock Set
Just Clock
Guide Program Number Set
Video Plus+ System Setup
Number
What happens if the tape runs out during recording?
Questions And Answers
‰ remain lit on the display panel. Is there Problem?
Not been turned on Turned on Input mode is not correct
Troubleshooting
Safety tab removed Removed
Recording cannot be started
Protection switch set to Save Protection switch to REC
Protection switch set to REC
Cassette with the Record Safety tab
Load a cassette with the erase
Other Problems
Copie
Index
Pediting. � pg
Antenna in Connector enables connection
Review
Rew
Remote Control LCD
How To Use
Provided accessories
PAL-type colour signal and Ccir
PAL-type colour signal, 625 lines