Sears, Roebuck and Co., Hoffman Estates, IL 60179 U.S.A
Maquina DE Coser
Important Safety Instructions
Conserve Estas Instrucciones
Consignes Importantes DE SI!CURITI
Master Protection Agreements
Sears Installation Service
U.S.A
En Estados Unidos
Caracteristiques De la machine
Specification
Especificaciones de la maquina
15616
De la machine 15218
Especificaciones de la maquina 15218
Caracteristiques
Disclaimer of implied warranties limitation of remedies
Kenmore Sewing Machine Warranty
Garantia de la mtquina de coser Kenmore
Sears, Roebuck and Co., D/817WA, Hoffman Estates, IL
Sears.C.an.a.dq!no..Toronto,. Ontario Cqnad. M.5B. .2.B8
Garantie pour machine coudre Kenmore
Contents
Vl. Puntadas
Indice
Xll
Identification des
Table DES Matiires
Xlll
Partie I. Identification DES PlleCES DE LA Machine
Foot control
Cabinets and Sewing Machine Tote Bag Rsos #
Names Parts
Screw @ Presser Foot Needle clamp screw
Partie I. Identification DES Piices DE LA Machine
Seccion I. Nombre DE LAS Partes
Available Accessories and Attachments
Accesorios y refacciones disponibles
Accessoires et pieces disponibles
Polarized Plug
Connecting Machine to Power Supply
Before Using Your Sewing Machine
For Your Safety
Para su seguridad
Seccion II. Preparacion DE LA Maquina Para Coser
Coser
Partie II. PRIPAREZ-VOUS .COUDRE
Thread Cutter
Setting Spool Pins
Accessory Box
Presser Foot Lifter
Releve-pied presseur
Bofte a accessoires
Ajuste de los porta-carretes Pose de La broche a bobine
Palanca de elevacion del prensatelas
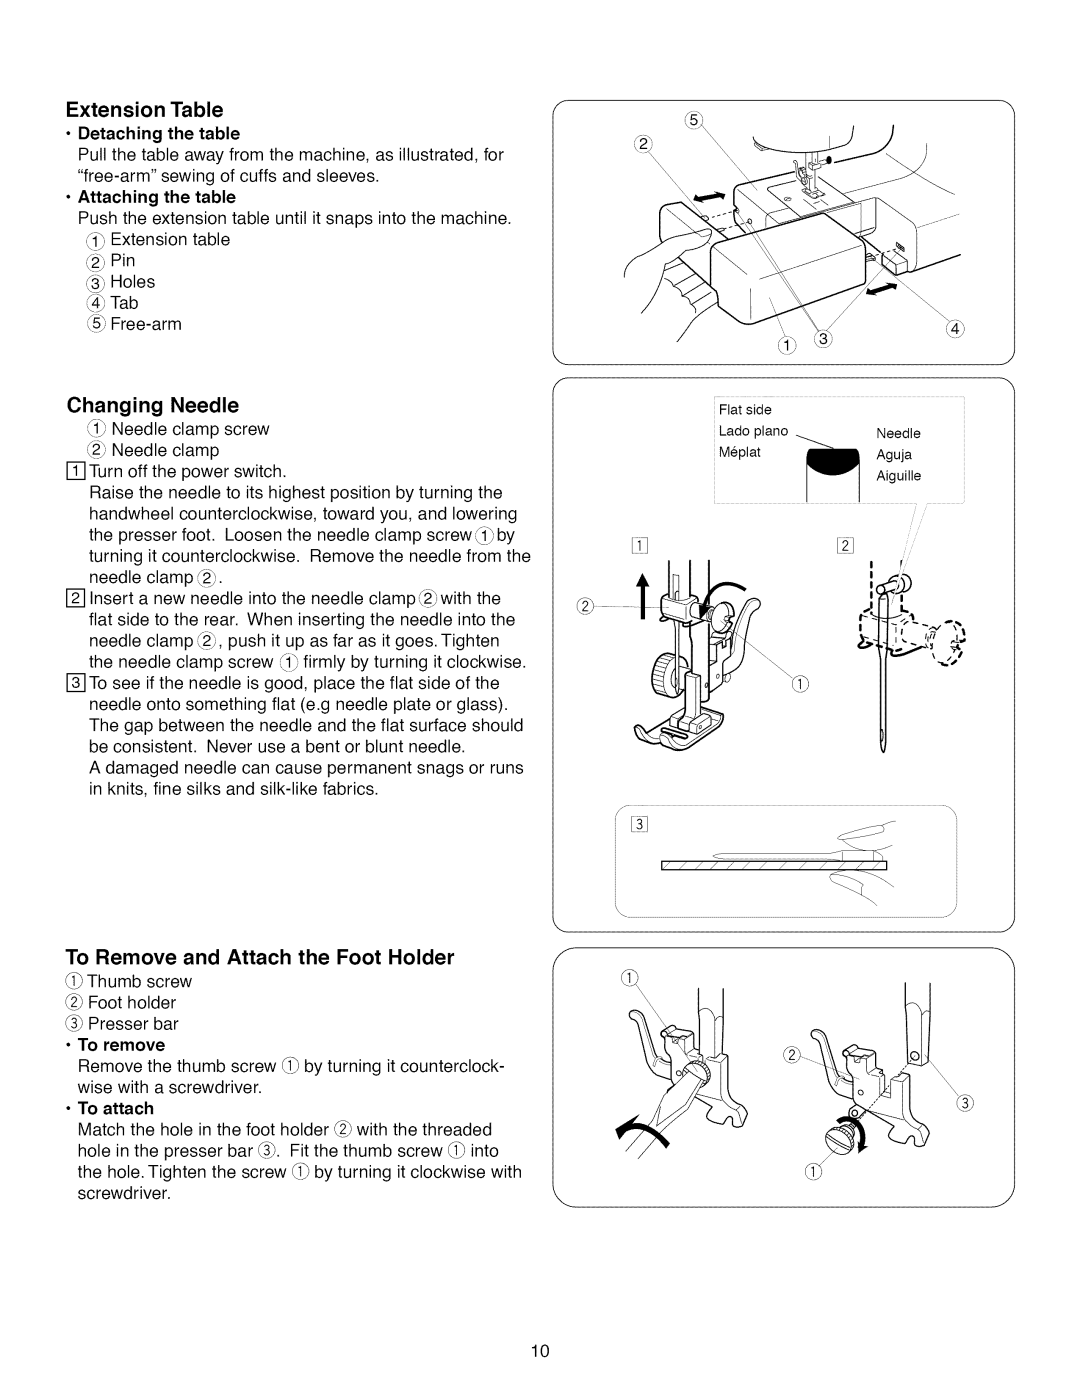
Detaching the table
Extension Table
Changing Needle
To Remove and Attach the Foot Holder
Cambio de aguja
Retrait et installation du support de pied
Ampliacion movil de la superficie de costura
Rallonge de plateau
Zigzag foot
Changing Presser Foot
Presser Foot Types
Tipos de prensatelas
Cambio de prensatelas
Palanca
Changement de pied presseur
Page
Prensatelas Para puntada Decorativa
Prensatelas Para puntada Recta
Chiffon Georgette
Selecting Needle and Fabric
Very Light Medium Heavy All
Peso Tipo DE Tela Tipo DE Aguja Tamano
Seleccion de hilo y tela
Daiguille
Choix de Iaiguille et tissu
Diametre
Poids
Blank Ptgina btanca Blanche
Bobbin winding
Bobbin Winding
Removing bobbin case
Remplir la canette
Embobinado de la canilla
Bobbin winding
Remplir la canette suite
Embobinado de la canilla Continuacion
Inserting bobbin
Insertion de la canette
Colocacibn de la canilla
Needle threader For Model 15218, 15616 and 15718 i Knob
Threading the Machine
Threading the machine
Enfilage de la machine
Enhebrado del hilo de la aguja
Enfilage de la machine
Enhebrado del hilo de la aguja
Drawing up bobbin thread
Reglage de la tension du fil de Iaiguille pour le
Ajuste de la tension del hilo de la aguja para
Point droit
Puntada recta
Too tight
Adjust the Needle Thread Tension for a Zigzag Stitch
Adjust bobbin tension i Adjusting screw
Tension is too loose
Si la tension est trop elevee 1Endroit du tissu
Ajuste de la tension del hilo de la aguja para
Puntada zig-zag
El hilo esta demasiado flojo
Press the reverse stitch control to sew in reverse
Stitch Pattern Selector
Reverse Stitch Control
2345
Cadran de reglage de la Iongueur du point
Selector de patron
Perilla de la Iongitud de puntada
Selecteur de point
Ell clip
Straight Stitch
Or2 Zigzag foot Straight stitch foot 2to6 C3 0 or
AU Point Droit
Seccion II1. Costura
DE Puntada Recta
Partie III. Couture
Stitch pattern selector Presser foot
Variable Needle Position
Topstitching
Zipper Sewing
Costura de cremalleras
Posicion variable de la aguja
Position variable de Iaiguille
Costura a la vista
Approx., 1.3 cm
To sew
La couture des fermetures & glissiere suite Pour coudre
Costura de cremalleras b cierres continuacibn Para coser
Darning
To Drop or Raise the Feed Dogs
Ou ci5
Como bajar / subir los dientes del transporte
Comment descendre ou monter les griffes dentrafnement
Zurcido
Satin Stitching
Basic Zigzag
Partie IV. Points ZIG-ZAG
Seccion IV. Puntadas
DE ZlG-ZAG
Applique
Monogramming
Appliques
Monogramas
Monogrammes
Aplicaciones
Button Sewing
BarTacking
Pose des Boutons
Puntada De refuerzo
Brides de renfort
Costura de botones
Overcasting Stitch
Surfilage
Puntada de sobrehilado o remate
Lace Work
Lightweight fabric
Blind Hem Stitch
Ourlet invisible
Seccion V. Puntadas Utiles Y Decorativas
Trabajos Con encajes
Dobladillo Invisible
Place the fabric under the presser foot in such a manner
Shell Stitch
Multiple Zigzag Stitch
Seam finishing
Point zig-zag multiple
Puntada en forma de concha
Point coquille
Puntada de multiple zig-zag
Decorative Stitch Patterns For model 15616
Box Stitch For model 15218, 15616
Points decoratifs Pour 15218, 15616 et
Puntada de caja Para modelo 15218, 15616 y
Point de creneau Pour 15616 et
Puntadas decorativas Para modelo 15218, 15616 y
Stitch selector For model
Twin Needle Stitches Option
1Stitch selector For model
Aiguilles jumelees
Puntadas de doble aguja Opcion
Stitch width control
Rick-rack Stretch
Zig-zag
Seccion Vl. Puntadas Elasticas
Partie VI. Points Extensibles
Droit
Starting to sew
Overcast Stretch Stitching
Smocking
Point de smocks
Puntada elastica de remate o sobrehilado
Surfilage Extensible
Puntada de pluma
Elastic Stretch Stitch For model 15218, 15616
Serging
Puntada Elastica de Extension Para modelo 15616 15718
Puntada de dobladillo
Point de surjet
Tension 4Stitch length control
Decorative Stretch Patterns For model 15218, 15616
1Stitch Pattern Selector 27Presser Foot Zigzag foot Needle
Motifs Decoratifs extensibles Pour 15218, 15616 y
Diseos decorativos elasticos Para modelo 15218, 15616 et
Preparation for sewing iGroove
Buttonhole
Preparation a la couture 1Rainure 2Broche
Ojales
Boutonniere
Preparacibn para coser 1Enclavadura
TTERNi
Page
Corded Buttonhole
To adjust buttonhole stitch density
Boutonnieres passepoilees
Costura de ojales con cordon
Replacing the Light Bulb
Cleaning the Feed Dogs
Partie VIII. Entretien DE Votre Machine
Seccion VIII. Mantenimiento DE LA Maquina
Replacing Shuttle assembly 2Levers
Cleaning the Shuttle Race
Cleaning the shuttle area 1Bobbin case
Remontage de la navette 2Patte de retenue
Limpieza de la corredera de la lanzadera
Nettoyage de la coursiere
Oil behind the face cover
Oiling the Machine
Unplug the machine before oiling
Lubrifiez derriere le couvercle de fagade
Lubricacion de la maquina
Lubrification de la machine
Aceite atras de la plancha cubierta frontal
Troubleshooting
Tejidos
Le fil de canette se
En cas de probleme Probleme
Le fil daiguille se casse
Reference
Canada Product Serviced By Sears
To purchase Protection Agreement Or maintenance