DISK REMOVE
The Disk Recorder will display the DISK MENU on the Multiscreen Monitor during the
•Hard disks were removed from the Disk Recorder or the extension unit.
•One or more of the hard disks installed in the Disk Recorder or the extension unit have failed.
The Disk Recorder and Extension Units will operate normal- ly by recomposing the system (disk remove) as shown below.
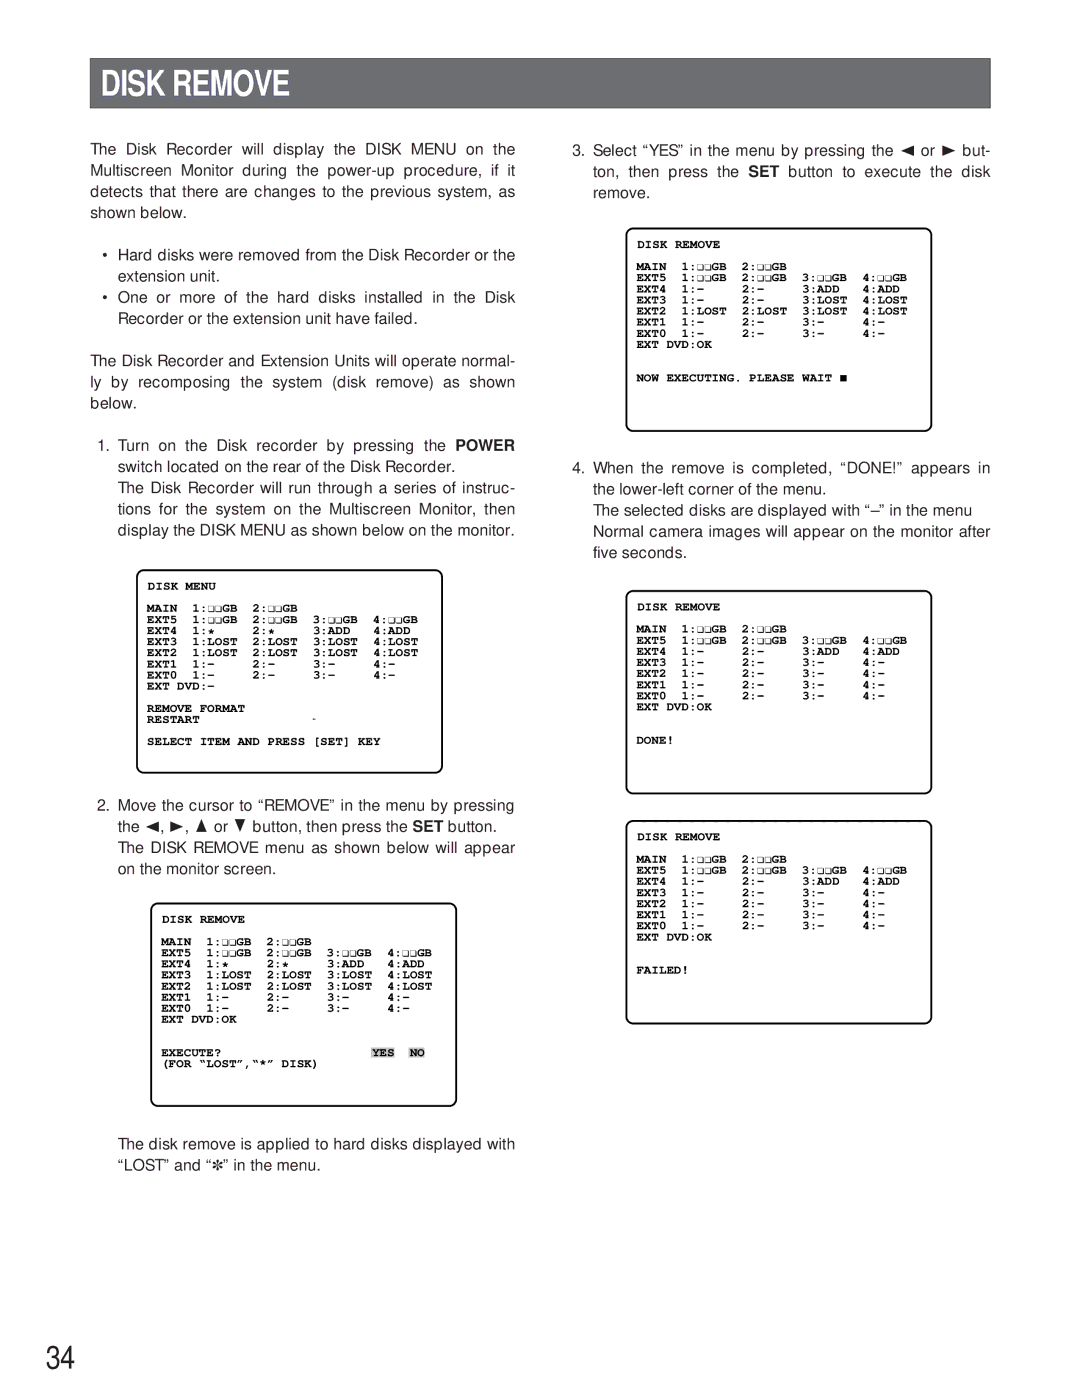
1.Turn on the Disk recorder by pressing the POWER switch located on the rear of the Disk Recorder.
The Disk Recorder will run through a series of instruc- tions for the system on the Multiscreen Monitor, then display the DISK MENU as shown below on the monitor.
DISK MENU |
|
|
| |
MAIN 1:¢¢GB 2:¢¢GB |
|
| ||
EXT5 1:¢¢GB 2:¢¢GB | 3:¢¢GB 4:¢¢GB | |||
EXT4 | 1:* | 2:* | 3:ADD | 4:ADD |
EXT3 | 1:LOST | 2:LOST | 3:LOST | 4:LOST |
EXT2 | 1:LOST | 2:LOST | 3:LOST | 4:LOST |
EXT1 | 1:- | 2:- | 3:- | 4:- |
EXT0 | 1:- | 2:- | 3:- | 4:- |
EXT DVD:-
REMOVE FORMAT
RESTART
SELECT ITEM AND PRESS [SET] KEY
2.Move the cursor to “REMOVE” in the menu by pressing the A, B, D or C button, then press the SET button. The DISK REMOVE menu as shown below will appear on the monitor screen.
DISK REMOVE |
|
|
|
|
|
| |
MAIN 1:¢¢GB 2:¢¢GB |
|
|
|
|
| ||
EXT5 1:¢¢GB 2:¢¢GB | 3:¢¢GB 4:¢¢GB | ||||||
EXT4 | 1:* | 2:* | 3:ADD | 4:ADD | |||
EXT3 | 1:LOST | 2:LOST | 3:LOST | 4:LOST | |||
EXT2 | 1:LOST | 2:LOST | 3:LOST | 4:LOST | |||
EXT1 | 1:- | 2:- | 3:- | 4:- |
| ||
EXT0 | 1:- | 2:- | 3:- | 4:- |
| ||
EXT DVD:OK |
|
|
|
|
|
| |
EXECUTE? |
|
|
|
|
|
| |
|
| YES | NO | ||||
(FOR “LOST”,“*” DISK) |
|
|
|
|
| ||
The disk remove is applied to hard disks displayed with “LOST” and “✽” in the menu.
3.Select “YES” in the menu by pressing the A or B but- ton, then press the SET button to execute the disk remove.
DISK REMOVE |
|
|
| |
MAIN 1:¢¢GB 2:¢¢GB |
|
| ||
EXT5 1:¢¢GB 2:¢¢GB | 3:¢¢GB 4:¢¢GB | |||
EXT4 | 1:- | 2:- | 3:ADD | 4:ADD |
EXT3 | 1:- | 2:- | 3:LOST | 4:LOST |
EXT2 | 1:LOST | 2:LOST | 3:LOST | 4:LOST |
EXT1 | 1:- | 2:- | 3:- | 4:- |
EXT0 | 1:- | 2:- | 3:- | 4:- |
EXT DVD:OK
NOW EXECUTING. PLEASE WAIT ■
4.When the remove is completed, “DONE!” appears in the
The selected disks are displayed with
DISK REMOVE |
|
|
| |
MAIN 1:¢¢GB 2:¢¢GB |
|
| ||
EXT5 1:¢¢GB 2:¢¢GB | 3:¢¢GB 4:¢¢GB | |||
EXT4 | 1:- | 2:- | 3:ADD | 4:ADD |
EXT3 | 1:- | 2:- | 3:- | 4:- |
EXT2 | 1:- | 2:- | 3:- | 4:- |
EXT1 | 1:- | 2:- | 3:- | 4:- |
EXT0 | 1:- | 2:- | 3:- | 4:- |
EXT DVD:OK
DONE!
DISK REMOVE |
|
|
| |
MAIN 1:¢¢GB 2:¢¢GB |
|
| ||
EXT5 1:¢¢GB 2:¢¢GB | 3:¢¢GB 4:¢¢GB | |||
EXT4 | 1:- | 2:- | 3:ADD | 4:ADD |
EXT3 | 1:- | 2:- | 3:- | 4:- |
EXT2 | 1:- | 2:- | 3:- | 4:- |
EXT1 | 1:- | 2:- | 3:- | 4:- |
EXT0 | 1:- | 2:- | 3:- | 4:- |
EXT DVD:OK
FAILED!
34