Recording
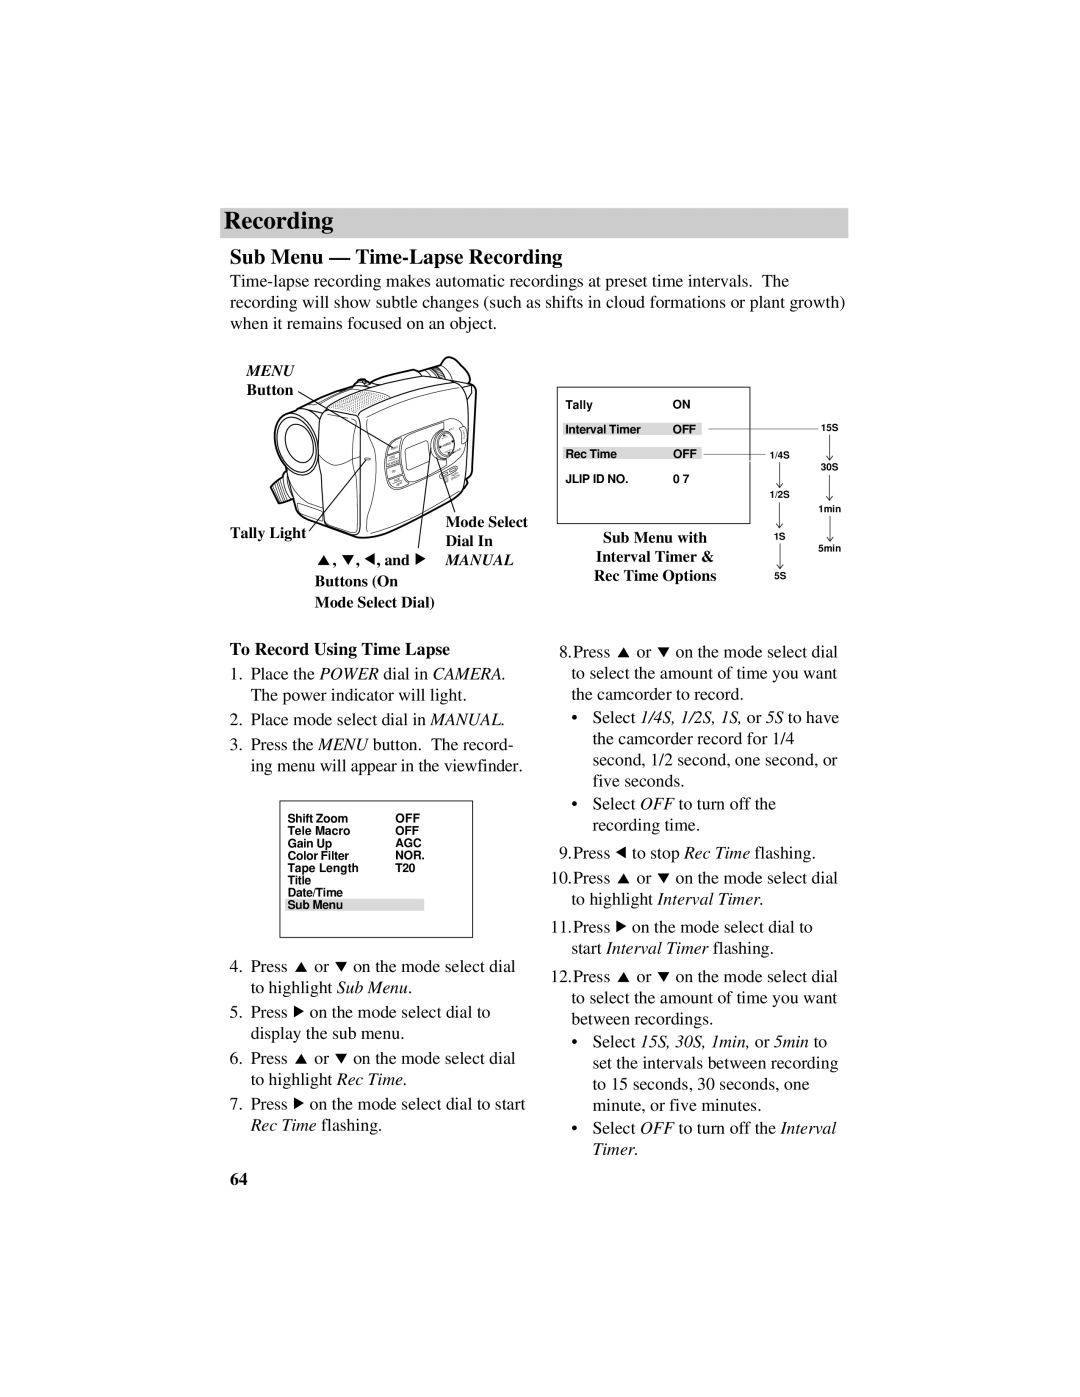
Sub Menu — Time-Lapse Recording
MENU |
|
|
| |
Button |
|
|
| |
|
| AUTO | H | |
|
|
| S | |
|
|
| U | |
|
|
| P | |
| US |
| ||
MENU | FOC |
|
| |
| MANUAL |
| ||
|
|
| ||
16X9 |
|
|
| |
AE MODES |
|
|
| |
EIS |
|
|
| |
|
| PHOTO |
| |
FADE | DATE/ | EFFECTS |
| |
WIPE | TIME |
|
| |
Tally Light | Mode Select | |||
Dial In | ||||
| ||||
4, 3, 5, and 6 | MANUAL | |||
Buttons (On |
|
|
| |
Mode Select Dial) |
|
|
| |
Tally | ON |
|
|
Interval Timer | OFF |
|
|
Rec Time | OFF |
JLIP ID NO. | 0 7 |
Sub Menu with
Interval Timer & Rec Time Options
15S
1/4S ![]() 30S
30S
1/2S
1min
1S ![]() 5min
5min
5S
To Record Using Time Lapse
1.Place the POWER dial in CAMERA. The power indicator will light.
2.Place mode select dial in MANUAL.
3.Press the MENU button. The record- ing menu will appear in the viewfinder.
Shift Zoom | OFF |
Tele Macro | OFF |
Gain Up | AGC |
Color Filter | NOR. |
Tape Length | T20 |
Title |
|
Date/Time |
|
Sub Menu |
|
4.Press 4 or 3 on the mode select dial to highlight Sub Menu.
5.Press 6 on the mode select dial to display the sub menu.
6.Press 4 or 3 on the mode select dial to highlight Rec Time.
7.Press 6 on the mode select dial to start Rec Time flashing.
8.Press 4 or 3 on the mode select dial to select the amount of time you want the camcorder to record.
•Select 1/4S, 1/2S, 1S, or 5S to have the camcorder record for 1/4 second, 1/2 second, one second, or five seconds.
•Select OFF to turn off the recording time.
9.Press 5 to stop Rec Time flashing. 10.Press 4 or 3 on the mode select dial
to highlight Interval Timer.
11.Press 6 on the mode select dial to start Interval Timer flashing.
12.Press 4 or 3 on the mode select dial to select the amount of time you want between recordings.
•Select 15S, 30S, 1min, or 5min to set the intervals between recording to 15 seconds, 30 seconds, one minute, or five minutes.
•Select OFF to turn off the Interval Timer.
64
