8CH All-In-One 19 LCD-DVR
Need
Svat Canada Svat USA
Product Warranty Information
Table of Contents
Recording Modes Playback Mode
Archive Menu
106
Introduction
Record up to 240 Days
What is Included Features
Optional Accessories
CV67KIT 4 Camera Expansion Pack
CVw62 60 ft. camera extension cable
Buttons & Connections
LCD DVR
CCD Color Camera
Camera Installation
Things to Consider Before Installation
Wiring
Mounting
Connecting Additional Devices to the DVR
Connecting USB Devices
Connecting a USB Mouse for Onscreen Navigation
Connecting Audio Equipped Cameras not Included
Connecting Additional Monitoring Devices
Connecting 6 PIN DIN Cameras not Included
Archiving Recorded Footage
Now you can see
Connecting AN Additional Monitor not Included
Using the Remote Control for Onscreen Navigation
Connecting and Powering on
Live Display
To Power OFF the DVR Recording Stops
Shutting Down
To Turn OFF the LCD Screen Recording Continues
Customize the MULTI- Screen Display
MULTI-SCREENS
Title Menu , pg.35
Digital Zoom Mode
KEY Lock Function
Using Zoom Mode
Recording Modes
To Play Back Footage
Playback Mode
Advanced Search
Accessing the Search Menu
Searching by Time
Click the Search icon
Searching by Event
When you reach the desired time, press Play
General Menu
Main Menu
Display Menu
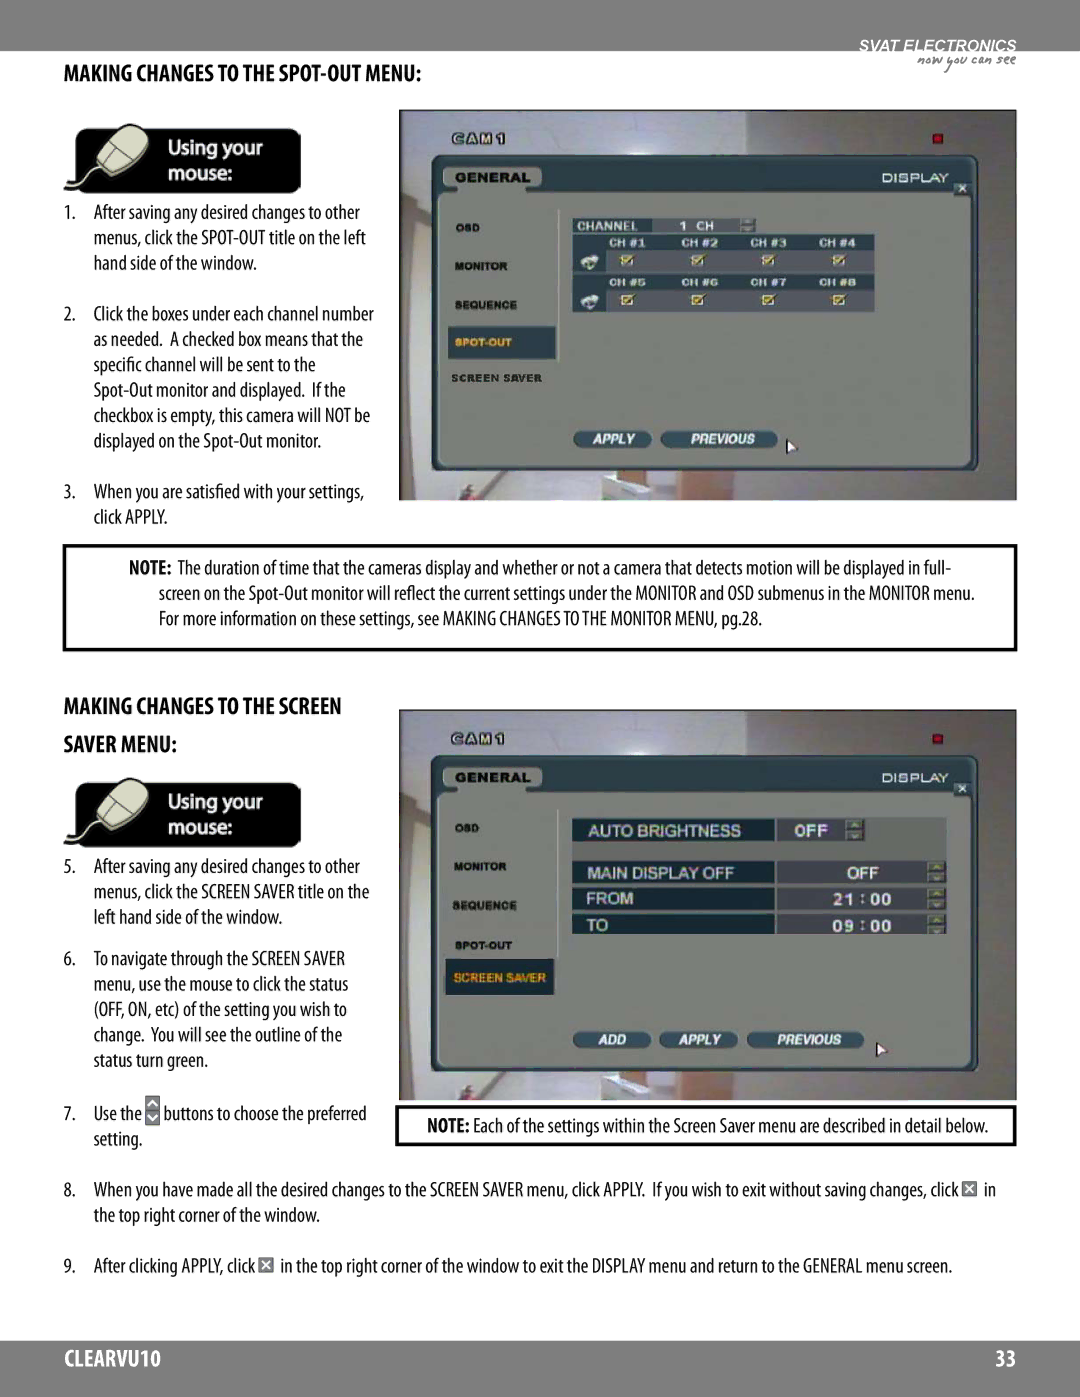
Use the buttons to choose the preferred setting
Making Changes to the OSD Onscreen Display Menu
Click the OSD title on the left hand side of the window
Making Changes to the Monitor Menu
Making Changes to the Sequence Menu
Button allows you to move
When you have finished making sequence
Between capital letters and lowercase,
Can be used to delete letters
Now you can see
Setting UP a SPOT-OUT TV/MONITOR not Included
Making Changes to the SPOT-OUT Menu
When you are satisfied with your settings, click Apply
Camera Menu
General menu, click the Camera button
Making Changes to the Camera Title Menu
Making Changes to the Color Setup Menu
When you have finished making sequence Title, click
Changing the Camera Title
Setting UP the PTZ Camera
Making Changes to the PTZ Setup Menu
Configuring the PTZ Menu Options
Click the Setup icon
Click the Camera button
Controlling the PTZ Camera Through the DVR
Making Changes to the Motion Sensor Menu
Adjusting Area Setup
Now you can see
Making Changes to the Audio Menu
Sound Menu
Making Changes to the Buzzer Menu
To turn the remote control beep off, click
Making Changes to the DATE/TIME Menu
System Menu
Click the System button
Changes, click in the top right corner of the window
Making Changes to the Network Menu
DATE/TIMEnow you can see
Making Changes to the User Management Menu
Making Changes to the Mail Menu
Use the buttons to turn e-mail notifications on or OFF
Adding a NEW User
Editing Existing Users
Now you can see
When you have completed entering your password, press OK
Deleting Users
Use the buttons to select your User ID
Changing the System Name
Updating the System Management Menu
Updating the SYSTEM’S Firmware
Press Start Press OK when prompted
After restarting, the new changes will take effect
Saving the System Data
Loading System Data
Making Changes to the Control Device Menu
EVENT/SENSOR Menu
Making Changes to the HDD Event Menu
Click the EVENT/SENSOR button
Making Changes to the Alarm Input Menu
Making Changes to the Alarm OUT Menu
Buttons to enable or disable each alarm
Making Changes to the Buzzer OUT Menu
Making Changes to the Email Notification Menu
Making Changes to the Disk Manage Menu
Disk Manage Menu
Click the Start button next to Format
Formatting the DVR’S Hard Drive
Now you can see
Click the Record button
Record Menu
Making Changes to the Recording Operations Menu
Making Changes to the TIMER/MOTION Setup Menu
Making Changes to the SIZE/FPS/QUALITY/AUDIO Settings
If you have chosen Weekly under
Now you can see
Making Changes to the Activation Menu
Now you can see
Making Changes to the Alarm Setup Menu
Archiving Video Footage to AN External USB Device
Archive Menu
Use the arrows to select the date and time
DVR Networking Guide
Preparing Your DVR
Once extracted, the footage is copied to CD or USB
Accessing the DVR’S IP Information
Connecting the DVR to Your Router
NET Client Port example WEB Server Port example
Configuring Settings
Preparing Your Computer
Installing the Remote Viewer Software on Your PC
Understanding the Remote DVR Viewer Software
Its camera is displayed on screen
Controls the alarm outputs
Button will be grey
Only one channel can be listened to at a time
Creating a Connection Group
Getting Started
Entering the DVR’S Information
Adjusting Your Display on Screen
New group is now created
DVR section you will see 16 drop down buttons with ‘x’
Additional Configuration
Additional Group Settings
Click ADD to save the DVR’s settings
Local setup window, click the Configuration tab
Setting UP & Connecting to the Internet
Connecting VIA a D-LINK Router Example
Under Schedule, select Always
Port forwarding is now complete
Testing Your External IP
Finding Your External IP
Press Enter
If YOU Cannot Connect
If Successful
Remote Viewing Software should pop up
Menu and click to connect to your DVR
Finding and Testing MY External IP
Troubleshooting Checklist Networking Requirements
Preparing the DVR
Networking Information
Forwarding Outside Your Network
Setting UP a Dynamic DNS Account
Now you can see
Finalizing Setup
Configuring the DVR’S Ddns Information
Click Apply and allow the DVR to restart
Setting UP Your DVR to Send Email Alerts
Understanding the Notification E-MAILS
Sending a Test Email
Entering Setup
Configuring Mail Settings
Making Changes to the Record Menu
Making Changes to the Camera Menu
Making Changes to the Sound Menu
Making Changes to the EVENT/SENSOR Menu
Making Changes to the System Menu
Referring to the Event Viewer for Events and Activity
100
101
Playing Back Previous Footage
Finding Previously Recorded Footage
Archiving Footage to Your PC
Footage
Archiving screen will pop up
Saving Still Shots Screen Caps to Your PC
Searching the LOG Viewer for Events
Sending a Still Image to Your Printer
Search Log will pop up
Press to play the video associated with the event
105
Troubleshooting Guide
Accessing the DVR at a later time
Information on adjusting color settings, refer to pg.36
Frame Message
But nothing is recorded
Check all your network connections Internet Connection
Verify batteries are installed correctly
As you complete it
Port
Ganz ZC-PT
FPS Fully Adjustable
CBCGanz
Win4net WSD 7425D Saeilo
Outdoor Camera CV67
Hi-Res Security Camera
What is Included
Installation
Make sure your camera is not aimed at direct sunlight
Identify this channel
Ambient light available
Backwards to let in more light
Drilling Template
116
117
118
Page
Visit US on the WEB