Operators Manual for Basic Functions
EPA Energy Star MFD
USE of Recycled Paper in the Copier
Regulatory Information
Lineup of Our Manuals
Filing Guide
Network Administration Guide
Scanning Guide
User Management Guide
Precautions in this manual
Before Reading This Manual
Description of original/paper direction
Trademarks
Contents
112
101
102
126
Monocolor copying 152 Hue 153 Saturation 154
Continuous feed mode 197
149
157
206
200
202
208
Call Service Symbol 326
Error Code 284
Replace Toner Bag Symbol 303 Jam Symbols 305
Confirming Scan Job Status 272 Log List 273
Check staple cartridge 336
Time for Slit glass and Main charger cleaning 332
Daily Inspection 368 Simple Troubleshooting 369
346
Specifications & Options
387
Contents
Toshiba Quality is Second to None
Supplies / Parts
Toner
General
Features of the e-STUDIO2500c/3500c/3510c
Features of the e-STUDIO2500c/3500c/3510c
Features of the e-STUDIO2500c/3500c/3510c
General Precautions
When installing or moving
General Precautions
When using the Multifunctional Digital Color Systems
Other points
General Precautions
Position of Certification label, etc
During maintenance or inspection
When handling supplies
Disclaimer Notice
Poration
Forgery Prevention Function/Storage of Color Copies
Forgery prevention function
Storage of color copies
Preparation 1- Turning Power On/Off
Preparation 2- Setting Copy Paper
Description of Each Component
Reversing Automatic Document Feeder Optional, MR-3018
Description of Each Component
Front / Right side
Bypass tray
Controller interface connector
Power switch
Connector for USB storage device
Paper feed cover optional
Original glass
Left side / Inner side
Platen sheet
Touch panel
Touch panel contrast adjustment dial
Charger cleaner
Slit glass cleaner
Toner bag
Configuration of options
Hole Punch Unit MJ-6004
Saddle Stitch Finisher MJ-1030
Hole Punch Unit MJ-6101
Work Table KK-3511
Control panel
Interrupt button
Access button
Error lamp
JOB Status button
When fixing the angle of the control panel
Hole of the position B
Fit the latches of the stopper
Touch panel
Message display
Touch-buttons
Description of Each Component
Adjusting the contrast of the touch panel
Clearing functions selected
Setting letters
Enter
Preparation 1- Turning Power On/Off
Turning power on
When Erasing Data appears
When department or user management is used
When copying is finished
Department management
User management
Preparation 1- Turning Power On/Off
Displaying the available number of copies
Black
Turning power off Shutdown
Press the User Functions button on the control panel
Energy Saving Mode
Sleep Mode
Automatic Energy Save
To cancel the energy saving mode
Preparation 2- Setting Copy Paper
Acceptable copy paper
Feeder Paper type Paper size Maximum sheet capacity
Paper type Toshiba recommendations/Manufacturer Mode
Recommended paper
Handling and storing paper
Side guide to unlock it
Setting copy paper size change
Placing paper in the drawer
Push the arrow part right side
Push the arrow part left side to lock the side guide
Place paper in the drawers
Preparation 2- Setting Copy Paper
59, press the paper type button
Changing the setting of paper size
Setting the drawer for special uses
Drawer for special uses
Paper type Purpose Indication Reference
Preparation 2- Setting Copy Paper
Clearing the drawer for special uses
Place paper in a and B
Placing paper in the Large Capacity Feeder optional
Pull out the Large Capacity Feeder carefully
Push the drawer of the Large Capacity Feeder straight into
Bypass Copying
Setting Originals
Making Copies
Proof Copy
Setting Originals
Acceptable originals
Maximum number of sheets for scanning
Placing originals on the glass Sheet originals
Book-type originals
Use types of original 9 and 10 shown below with extra care
Continuous feed mode
Place the originals straight along the side guides
Single feed mode
If there are more originals, set them in the same way
Setting Originals
Initial Default settings
Initial Default setting
Making Copies
Place the originals
Placing an original on the original glass
Press the Start button
Place the originals
Making Copies
Stopping the copying operation
Control panel during scanning
Press the Stop button on
Scanning the next originals during copying Auto job start
Confirming and canceling auto job
Confirming auto job and canceling job in waiting
Canceling auto job
Page
Paper size Procedure
Bypass Copying
Bypass copying
Place the originals
Paper you have set on the tray is other than plain paper
Bypass Copying
Press the Start button on the control panel
Bypass Copying
Bypass copying on standard size paper step
Bypass copying on non-standard size paper
Place the original on the original glass
Using the digital keys
Recalling dimensions registered in the memory
Registering non-standard size in the memory
Proof Copy
Change the settings as required
Page
Duplex Copying 126
Original Mode 135 Copy Density Adjustment 137
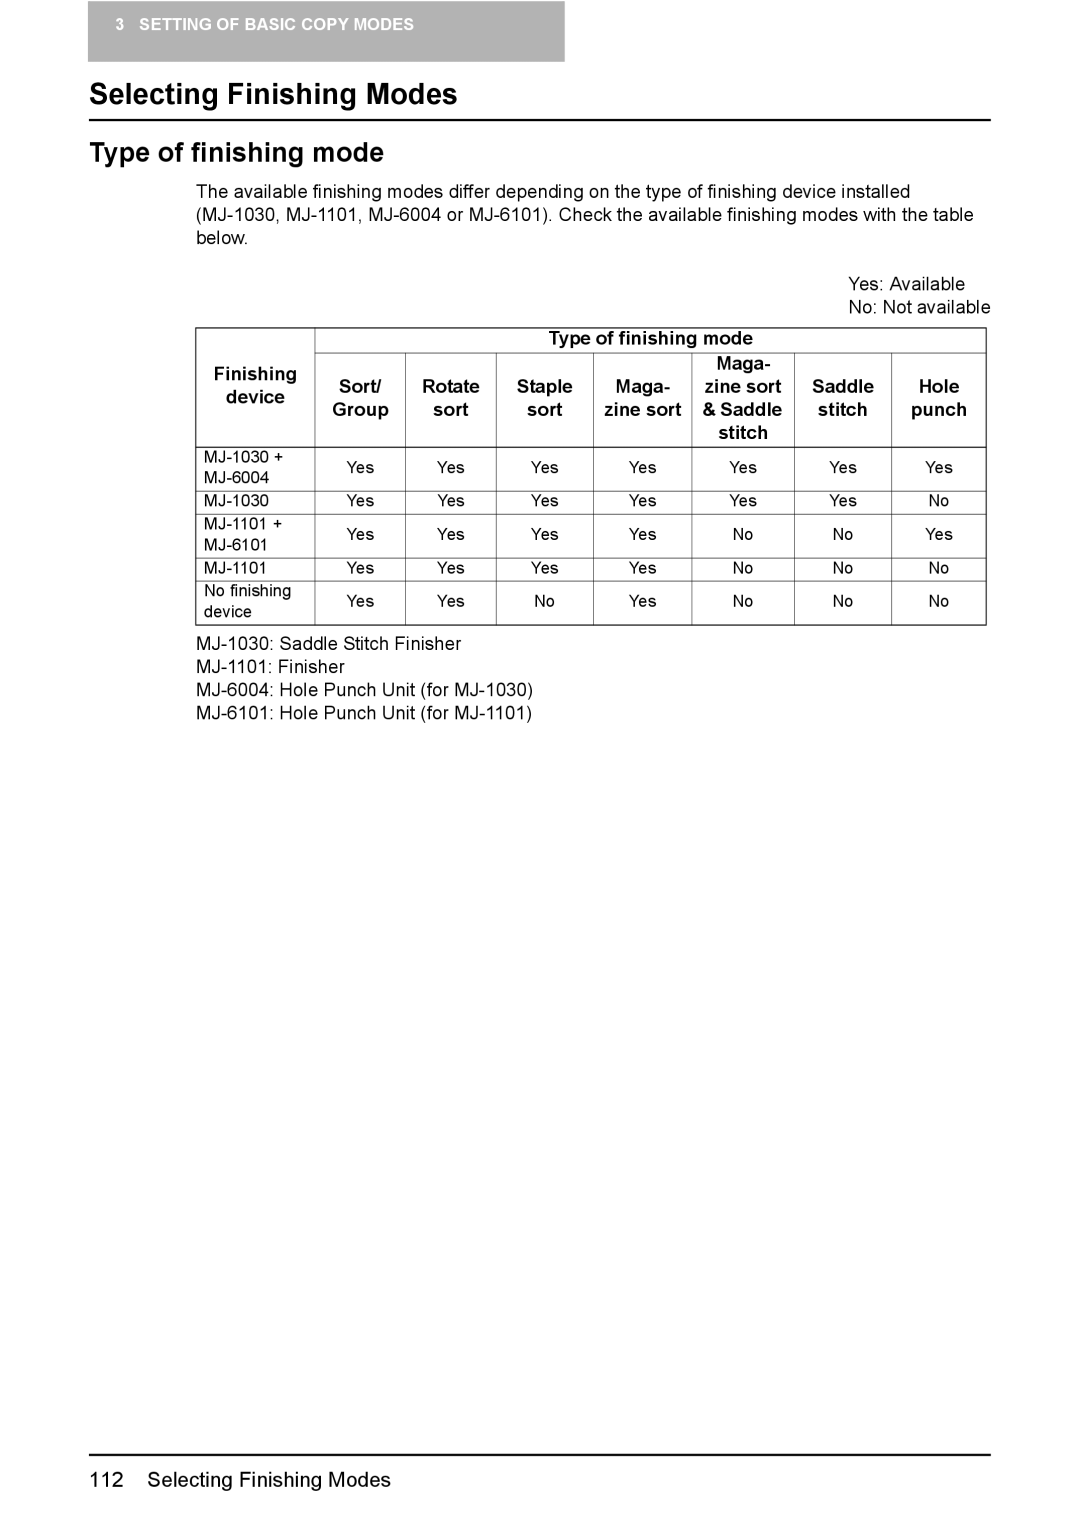
Selecting Finishing Modes 112
Paper Selection
Paper Selection
Automatic Paper Selection APS
Place paper in the drawers Place the originals
When automatic paper selection is not selected
Manual paper selection
Place the originals face up
Press the Start button
Switching Color Mode
Press the Full COLOR, Black or Auto Color button
Enlargement and Reduction Copying
Automatic Magnification Selection AMS
Press the AMS button Place the originals
Specifying both original size and copy size separately
Press the Other button
Using the zoom buttons or the one-touch zoom buttons
Zoom / buttons
One-touch zoom buttons
Press the Start button
Place the original in a landscape direction
Specify the original size
When placing photo originals in other sizes
Press the Custom button Key in the original size
Press the Enter button
Type of finishing mode
Selecting Finishing Modes
Stitch Punch
Name of each part in the Finisher optional
Sort/Group copying
Press the Sort or Group button
Rotate sort mode
Staple sort mode
Press the Rotate Sort button
Maximum number of sheets for stapling
Saddle Stitch Finisher MJ-1030/Finisher MJ-1101
Magazine sort & saddle stitch mode booklet mode
Image Direction
Place paper in the drawers Select the paper size
Paper weight Saddle stitch tray loading capacity
Available conditions for saddle stitching
Hole punch mode optional
Press the Hole Punch button
Number of punch holes and available paper sizes
Number of punch holes Available paper sizes Hole diameter
Manual stapling MJ-1101 only
Press the Manual-stapling button
Specification
Release the paper and press the Manual-stapling button
Duplex Copying
Sided original 1-sided copy default setting at installation
Sided original 2-sided copy
Press the simplex/duplex button on the basic menu
Press the 1 2 Duplex button
Press the 2 2 Duplex button
Sided original 1-sided copy
Book-type original 2-sided copy
Select the book copying type
Select LT copy size
Open and place the first pages on the original glass
Scanned pages will be copied For setting image shift, see
Black
Original Mode
Full color
Auto color
Full color Black Auto color
Copy Density Adjustment
Automatic copy density mode
Manual copy density mode
Monocolor copying 152 Hue 153 Saturation 154
146
149
Color Balance Ymck Adjustment
Canceling the color balance adjustment
Balance. Then press the Enter button
RGB Adjustment
Canceling RGB adjustment
Button of the color to obtain the desired color
One-Touch Adjustment
Background Adjustment
Canceling the background adjustment
Sharpness
Twin Color 2-Color Copy
Twin Color Selectable
Twin Color 2-Color Copy
Twin Color 2-Color Copy
Canceling color balance adjustment
RED & Black
Twin Color 2-Color Copy
Red color balance adjustment
Red/Black area adjustment
Monocolor copying
Canceling hue adjustment
Hue
Canceling saturation adjustment
Saturation
165
157
163
167
197
200
202
198
Image Shift
Creating a right or left margin
Image Shift button
Press the Left or Right button
Then press the Enter button
Creating a top or bottom margin
Press the TOP or Bottom button
Press the Enter button
Creating a bookbinding margin
Press the Enter button
Edge Erase
Press the Start button
Book Center Erase
Touch panel
Place a book original on the original glass
Dual
Dual
2IN1 / 4IN1
170 2IN1 / 4IN1
Press the 1 Side or 2 Side button
Example of copying a 12-page document
Magazine Sort
Select the paper type
Example of copying with the Saddle Stitch Finisher optional
Button
Editing
Trimming / Masking
Editing
Press the Start button
Mirror image
Editing button
Press the Mirror button
Negative/Positive reversal
Press the NEG/POS button
XY Zoom
Press the SET button. Then set the reproduction ratio for Y
Cover Sheet
Place the cover sheet
Place paper other than cover paper in the drawers
Sheet button
Press the Start button
Sheet Insertion
Place the special sheets of paper
Press the Copied or Blank button
Press the Start button
Time Stamp
Number
Press the Start button
JOB Build
Place the originals of the 1st job
Number of copies on the menu and change if needed
After all the originals have finished being scanned, confirm
Press the JOB Finish button on the basic menu
Image Direction
Press the Enter button
Book Tablet
ADF / Sadf
Press the ADF button
Press the Sadf button
Place the originals one by one
Full Image
Press the Start button
Image Repeat
Press the Edit button to enter the edit menu. Then press
Image Repeat
Turn over the original
Filing
Deleting Folders or Documents 226
Filing
Public box
User box
Filing
Creating User Boxes
Key in the password in Retype Password
Press the BOX Name button, and then enter the box name
User box is created
Changing Data of User Boxes
Enter the new box name
Box settings are updated
Deleting User Boxes
Box is deleted
Storing Documents in e-Filing
When the password entry menu is displayed
To store the document in the folder
Storing Documents in e-Filing
Press the Start button
Printing Stored Documents
Printing the whole document
Select the document to be printed
Press the Print button
To stop printing a stored document during the operation
Test printing
Key in the number of the first
Printing the stored document after changing the settings
Set the printing modes as required
Deleting Folders or Documents
Perform deletion
To delete a document in the folder
Page
246
Template 230
232
Recalling Templates 254
Template
Template in Useful Template
Template using the e-Filing function
Template using the copying function Button Function *1
Template using the scanning function Button Function *1
Button Function *1
Registering User Groups and Templates
Registering a template in the public template group
Set every function you want to include in the combination
Letter entry menu is displayed
Registering User Groups and Templates
Registering User Groups and Templates
Registering User Groups and Templates
Press the Save button
Registering the new user group
Press the Name button, and then enter the user group name
Regis
Registering a template in the user group
Press the Enter button
Registering User Groups and Templates
Registering User Groups and Templates
Press the Save button
Changing Data of User Groups and Templates
Changing the data of a user group
Press the Enter button
Data of the user group are changed
Changing the data of a template
When the user group is selected
Changing Data of User Groups and Templates
Changing Data of User Groups and Templates
Data of the template are changed
When recalling a template in a public group
Recalling Templates
Press the desired template button
When recalling a template in a user group
Press the Enter button
Press the Start button
Deleting User Groups or Templates
Deleting a user group
Deleting a template
Delete OK? appears. Press the Delete button
Deleting User Groups or Templates
When the user group is selected
Selected template is deleted
Page
Confirming Scan Job Status 272 Log List 273
Error Code 284
Job Status 266 Confirming Print Job Status 267
Print Status Display 281
Job Status
Displaying print job list
Confirming Print Job Status
Print jobs
Press the JOB Status but- ton on the control panel
Deleting print jobs
Delete button
When using department codes
Displaying invalid queues
Press the Invalid button
Keying in correct department code to print
Deleting invalid print jobs
Then press the Delete button
Confirming Scan Job Status
Deleting scan job
Log List
Confirming job history in log list Print log
Send log
Journal
Receive log
Scan log
Following information can be registered from the Send log
Registering into address book from log lists
Press the Send or Receive or Scan button on the log menu
Following information can be registered from the Scan log
Press the Entry button
First Name or Last NAME, and either of FAX NO. or E
Printing journals send/receive log list
Press the Send or Receive button on the log menu
Press the Journal button
Press the blinking JOB STA- TUS button
Releasing print job errors
Print Status Display
Start button
Printing by placing appropriate size of sheets in the drawer
Print Status Display
Error Code
Fax / Internet Fax Error code Problem What to do
Error code Problem What to do
300, or 400 x 400 dpi
Scan Job Error code Problem What to do
Save as File
Contact your service representative
RFC related Error code Problem What to do
Printer
Error Code
Page
Replace Toner Bag Symbol 303
Blinking Graphic Symbols 294
Replace Toner Cartridge Symbol 296
Jam Symbols 305
Blinking Graphic Symbols
Drawer Display on the Touch Panel
When the yellow, magenta or cyan toner runs out
Replace Toner Cartridge Symbol
When the black toner runs out
When more than one color of toner runs out
Recommendation for original toner
Replacing the toner cartridge
Cleaning the slit glasses
Slit glass cleaner is placed
Inside the front cover. Press
Remove the cap
Cleaning the chargers
Install the cap
Insert the charger cleaner straight until it stops
Replace Toner Bag Symbol
Open the front cover Pull the toner bag out care- fully
Remove lids from the side of the toner bag
Replace Toner Bag Symbol
Jam Symbols
Misfeed in the Reversing Automatic Document Feeder optional
Raise the lever, and then open the upper cover
Transport guide, and then
Remove the original under the guide plate
Raise the guide plate under
Document Feeder
Misfeed in drawer feeding area
Open the cover Remove any misfed paper
Misfeed in the Large Capacity Feeder optional
Close the cover
Misfeed in the Paper Feed Pedestal optional
Misfeed on the bypass tray
Pull out misfed paper on the bypass tray
Misfeed in the automatic duplexing unit
Misfeed in the jam releasing cover
Openunit. the automatic duplexing
Misfeed in the fuser unit
Open the jam releasing cover
Jam Symbols
Misfeed in the Bridge Unit optional
Close the Bridge unit cover
Paper misfeed at the upper tray
When installing the Hole Punch Unit optional MJ-6101
Close the cover of the Bridge Unit Close the upper tray
Paper misfeed at the lower tray
Jam Symbols
When installing the Hole Punch Unit optional MJ-6101
Open the front cover of the Hole Punch Unit
Raise the Hole Punch Unit,
Misfeed in the Saddle Stitch Unit optional
Jam Symbols
Jam Symbols
Call Service Symbol
332
Time for periodic maintenance 353
Toner near Empty 329
Check staple cartridge 336
Reboot the machine 365
364
Toner near Empty
Press the User Functions button
When this Message Appears
Replaced
Press the Finish button Press the YES button
Time for Slit glass and Main charger cleaning
Cleaning the slit glass
Open the front cover
Remove the cap
Install the cap
Cleaning the chargers
Check staple cartridge
Finisher optional MJ-1101
Install the staple cartridge onto
Stapler
Close the front cover of finisher
Finisher optional MJ-1030
Install a new staple case into the staple cartridge
Check staple cartridge in the Saddle Stitch Unit
Saddle Stitch Unit toward
Pull the handle of the stapler
Installtridge.the new staple car
Take out the empty staple car- tridge
Close the front cover of the finisher
Examine stapler
Do not touch the stapling area. The stapler could injure you
Remove any jammed staples
Close the front cover of the finisher
Ready Check Stapler
Examine stapler in the Saddle Stitch Unit
Its original position
Push the knob 2 to return it to
Close the front cover of the finisher
Dle Stitch Unit
Ready Check Saddle Stitch Stapler
Follow steps 1 to 6
Check the following 2 items to perform test stapling
Ready Hole Punch Dust BIN is Full
Hole Punch Unit optional MJ-6101, MJ-6004
Power Failure
Time for periodic maintenance
Check paper size setting on control panel for drawer N
During copying using a drawer
Message on the touch panel
Place the paper removed in in the drawer
Press the drawer button corresponding to the one mentioned
Check paper size setting on control panel for drawer N
Page
Check paper size setting on control panel for drawer N
Job is resumed
Check paper size setting on control panel for drawer N
Press the JOB Status but- ton on the control panel
Cannot print this paper size Select the other drawer
Cannot print this paper type Set the other paper type
Reboot the machine
Page
Maintenance
Daily Inspection 368 Simple Troubleshooting 369
Daily Inspection
Equipment does not start
Simple Troubleshooting
Display does not change when buttons or icons are pressed
Paper jamming occurs frequently
Image density is too high
Functions cannot be set
Image density is too low
Image trouble
Simple Troubleshooting
Page
Image Quality Adjustment Combination Matrix 384
Combination Matrix 1/2 382 Combination Matrix 2/2 383
Combination Matrix 1/2 384 Combination Matrix 2/2 385
STUDIO2500c/3500c/3510c Specifications
OPC
Paper size Feeder
Continuous copying speed e-STUDIO2500c
Media type
Black Color White
Full COLOR, Twin COLOR, Mono COLOR, Image Smoothing
Large Capacity Feeder
Specifications of Options
Reversing Automatic Document Feeder
Paper Feed Pedestal 1 drawer type
Upper Tray
Finisher MJ-1101
Tray loading capacity of Finisher MJ-1101
Lower Tray
MJ-1030 with mixed paper not loaded
Saddle Stitch Finisher MJ-1030
Tray loading capacity of Saddle Stitch Finisher MJ-1030
MJ-1030 with mixed paper loaded
Hole Punch Unit MJ-6101 Series
Hole Punch Unit MJ-6004 Series
Bridge Unit
Packing List
Copying Function Combination Matrix
Combination Matrix 1/2
Combination Matrix 2/2
Image Quality Adjustment Combination Matrix
Image Quality Adjustment Combination Matrix
Black Full color Auto color Smoothing Image Color
Page
Index
Numerics
32, 112, 338
276
240
FC-2500C/3500C/3510C/GA-1210 OME06014200
With GA-1210