Operators Manual for Copying Functions
Page
Preface
Preface
USE of Recycled Paper in the Copier
Regulatory Information
Lineup of our manuals
Before Reading This Manual
Basic functions
Facsimile functions
Scanning functions
TopAccess
Description of original/paper direction
How to read this manual Symbols in this manual
Trademarks
Screens
Page
Contents
101
Changing Copy Setting on Each Job JOB Build
103
Copying 2 or 4 Pages into 1 Page 2IN1/4IN1
155
Changing EQUIPMENT’S Settings
Cleaning charger 203 Cleaning transfer charger 204
When This Message Appears 176 Paper Jams 178
STUDIO167/207/237 Specifications 208
Daily Inspection 202
219
Combination Matrix 1/2 213 Combination Matrix 2/2 214
List Print Format 215
Contents
Toshiba Quality Is Second to None
Toshiba Quality Is Second to None
Co-packed toner cartridge
Toner remaining check function
Recommended toner cartridges
Cartridge detecting function
General
Supplies / Parts
Toner
Features of e-STUDIO167/207/237
Features of e-STUDIO167/207/237
Functions extended by various options
Ecological energy-saving design
General Precautions
General Precautions
When installing or moving
93.9 31.5
Other points
Safety stoppers
When using the equipment
Position of Certification label, etc
When handling supplies
During maintenance or inspection
Disclaimer Notice
Disclaimer Notice
Low power mode
Energy saving features
Sleep mode
Environmental Information
Preparation 2 Placing Copy Paper
Preparation 1 Turning Power on
Description of Each Component
Front / Right side
Description of Each Component
Description of Each Component
Platen Cover optional, KA-1640PC
Paper Feed Pedestal optional, KD-1022
Left side / Inner side
Paper Feed Unit optional, MY-1027
Drawer
Original glass
Power switch
Control panel
External Keyboard optional, GJ-1040
Configuration of options
Control panel
Edit
Ready
Zoom
Cancel button
Alarm lamp
Original mode button/lamps
Density adjustment buttons/lamps
Custom mode setting
Copy mode main screen
Message area
Copy quantity Reproduction ratio Selecting button display
Turning power on
Preparation 1 Turning Power on
Turning power OFF
Press the power switch to on side
Canceling the energy saving mode
Saving energy when not in use Energy saving mode
To turn the equipment into the energy saving mode manually
Acceptable media types
Preparation 2 Placing Copy Paper
Preparation 2 Placing Copy Paper
Feeder Media type Paper size Maximum sheet Capacity *1
Paper types not acceptable
Recommended paper
Storing paper
Media type Product name
Press down the paper plate
Placing paper in drawers
Place paper in the drawer
Adjust the side guides to the desired paper size
Register the paper size into the equipment
Do not let your fingers be caught when closing the drawer
Placing paper in the drawers of Paper Feed Pedestal optional
Adjust the side guides with both hands
Adjust the side guides
Push the drawer straight until it comes to a stop
Preparation 3 Registering Size of Paper Placed
Preparation 3 Registering Size of Paper Placed
Registering standard size LD, LT, LT-R, LG, ST-R
Registering other standard sizes
100% Nonsort
Press the Enter button
Making Copies
Using Bypass Tray
Placing Originals
Placing Originals
Setting position Type of origi
Acceptable originals
Maximum number of originals scanned in one go
Placing originals on the original glass
When the built-in memory has become full during scanning
Placing booklet-type originals such as books or catalogs
When copying highly transparent originals
Sheets acceptable
Media types Maximum size Maximum number Paper weight
When black streaks appear on the copied image
When placing a large amount of originals with a long width
Check if paper is placed in the drawer
Making Copies
Place the original
Select the copy modes as required
When the number of sheets exiting has exceeded
When Next original? appears
When the paper has run out
YES
Press the CLEAR/STOP button during scanning or copying
Stopping/Resuming copying
Press the Interrupt button
Interrupting copying and making another copy Interrupt copy
Media type Paper size Maximum sheet Capacity *1
Using Bypass Tray
Using Bypass Tray
Bypass copying
Nonsize
Check the menu
Set the paper size
Set the paper type
When bypass copying has finished
Before Making Copies
Selecting Image Mode Adjusting Density Level
Paper Selection
Zooming In/Out Copy Image
Before Making Copies
Default settings
Confirming set functions
Nonsort 2IN1 11 Simplex
Paper Selection
Paper Selection
Automatic paper selection APS
Place paper in the drawer Place the original
Manual paper selection
Selecting the drawer of the equipment
Copying Different Sizes in One Go MIXED-SIZE Copying
Copying Different Sizes in One Go MIXED-SIZE Copying
When Change direction ORG appears
Zooming In/Out Copy Image
Zooming In/Out Copy Image
Automatic magnification selection AMS
When Change direction ORG appears
Specifying both the sizes of the original and the copy paper
Specifying reproduction ratio manually
Selecting Image Mode
Selecting Image Mode
To adjust the density to the desired level
Adjusting Density Level
To return it to the automatic copy density mode
Adjusting Density Level
Page
111
101
109
Operating in copy menu
Copy Menu
Selecting buttons A, B and C
Zoom
Function Description
Copy function list
Select SORT, and then press the Enter button
Copying in Same Page Order as Originals Sort Copying
Finishing
Sort
Button
Sorting Alternately One Set by One Alternation
Select ALTERNATION, and then press the Enter button
Finishing Sort Nonsort
Finishing Nonsort Alternation
Sorting in Magazine Type Arrangement Magazine Sort
Magazine Sort
Sorting in Magazine Type Arrangement Magazine Sort
Magazine Sort
Enter button
Shifting Paper to Make Margin Image Shift
Image Shift Left Margin
Right Margin
Right Margin
Select ON, and then press the Enter button or button
Erasing Shadow on Edge Edge Erase
Edge Erase OFF
Erasing Shadow on Edge Edge Erase
Edge Erase
Simplex P.91 Split P.91 Duplex
Copying on Both Sides Duplex
Copying on Both Sides Duplex
Book 2 P.94
Copying on one side
Split
Duplex
When all the originals have been scanned
Copying on both sides
Book Type
Duplex Simplex
Tablet Type
Tablet Type Open to top
Press the Drawer button to select the paper source to use
Copying booklet on both sides
Selectton. Book 2, and then press the Enter button or but
Duplex Split
Book Margin
Right Right Right Left
Left Left
Yessingle
When copying the last
Copying Right and Left Pages Separately Dual
Copying Right and Left Pages Separately Dual
Place paper in the drawer Place an original
Dual OFF
When all the pages are scanned
Select the other copy modes as required, and then press
Start button
Printing Page Number, Date and Time Annotation
Printing Page Number, Date and Time Annotation
Number
Annotation
Changing Copy Setting on Each Job JOB Build
Changing Copy Setting on Each Job JOB Build
Ready JOB Build
JOB Build OFF
AMS
JOB Build
Copying 2 or 4 Pages into 1 Page 2IN1/4IN1
Copying 2 or 4 Pages into 1 Page 2IN1/4IN1
2IN1 4IN1 2IN1 Duplex a Side 1, b Side
4IN1 Duplex a Side 1, b Side
Simplex Duplex
Tablet Type
Duplex Book Type
Card
Copying Both Sides of Card into 1 Page ID Card
Select ON, and then press the Enter button
ID Card OFF
Turn over the card and place it on the original glass again
Place a card original on the original glass
100% Sort Zoom Finishing
Copying Both Sides of Card into 1 Page ID Card
XY Zoom
Press the Cancel button
Tion ratio
Changing Sizes in Horizontal and Vertical Directions XY Zoom
Registering combination of functions
Registering Functions Frequently Used JOB Memory
Set all functions you want to register
Select JOB Memory in the copy menu, and then press
MEMORY4
Recalling combination of functions
Select RECALL, and then press the Enter button or button
Recall
Recall MEMORY2 MEMORY3
Page
Weekly Timer Setting 132 Volume Adjustment 135
Before Changing the Settings 117
Date and Time 119
137
Page
Displaying the user functions mode main screen
Before Changing the Settings
Default Settings
Lists 03.INITIAL Setup
Button
Operating buttons for changing the settings
Returning to the copy mode main screen
Select Initial Setup with
Clock setting
Date and Time
Press the User Functions button
Key in the time
Key in the date
MON
Time display format
Date and time display
Date format
Month format
Initial Setup Date & Time
Display Language Setting
Select Language with
Language
Drawer Size
Paper Size Setting
General Setting
Drawer
Drawer Size Drawer 1 02.DRAWER
General Setting Drawer Size
Walkup Screen Setting
Timers
Walkup Screen Setting
FAX Scan
Walkup Screen
Copy
Time of automatic function clear
Timer Setting
Timer Setting
Timers
Time of automatic low power mode
Select Auto Clear with
Auto Clear
Auto Sleep
Timers Auto Clear
Auto Power Save
Save 1MIN
Time of automatic sleep mode
Timers Auto Power
Auto Sleep
Timers Auto Clear 2.AUTO Power Save
Timers AUTO240MIN
Weekly Timer Setting
Weekly Timer Setting
Sunday
Weekly Timer
Select on with and buttons, and then press the Enter button
Press the User Functions button or copy mode button
General Setting Timers 04.WEEKLY Timer
Volume Adjustment
Speaker Volume
Volume Adjustment
Alarm Volume
Speaker Volume
KEY Touch Volume 3.RINGER Volume
Alarm Volume
Touch KEY Tone
Touch Key Tone Setting
Touch Key Tone Setting
Touch KEY Tone OFF
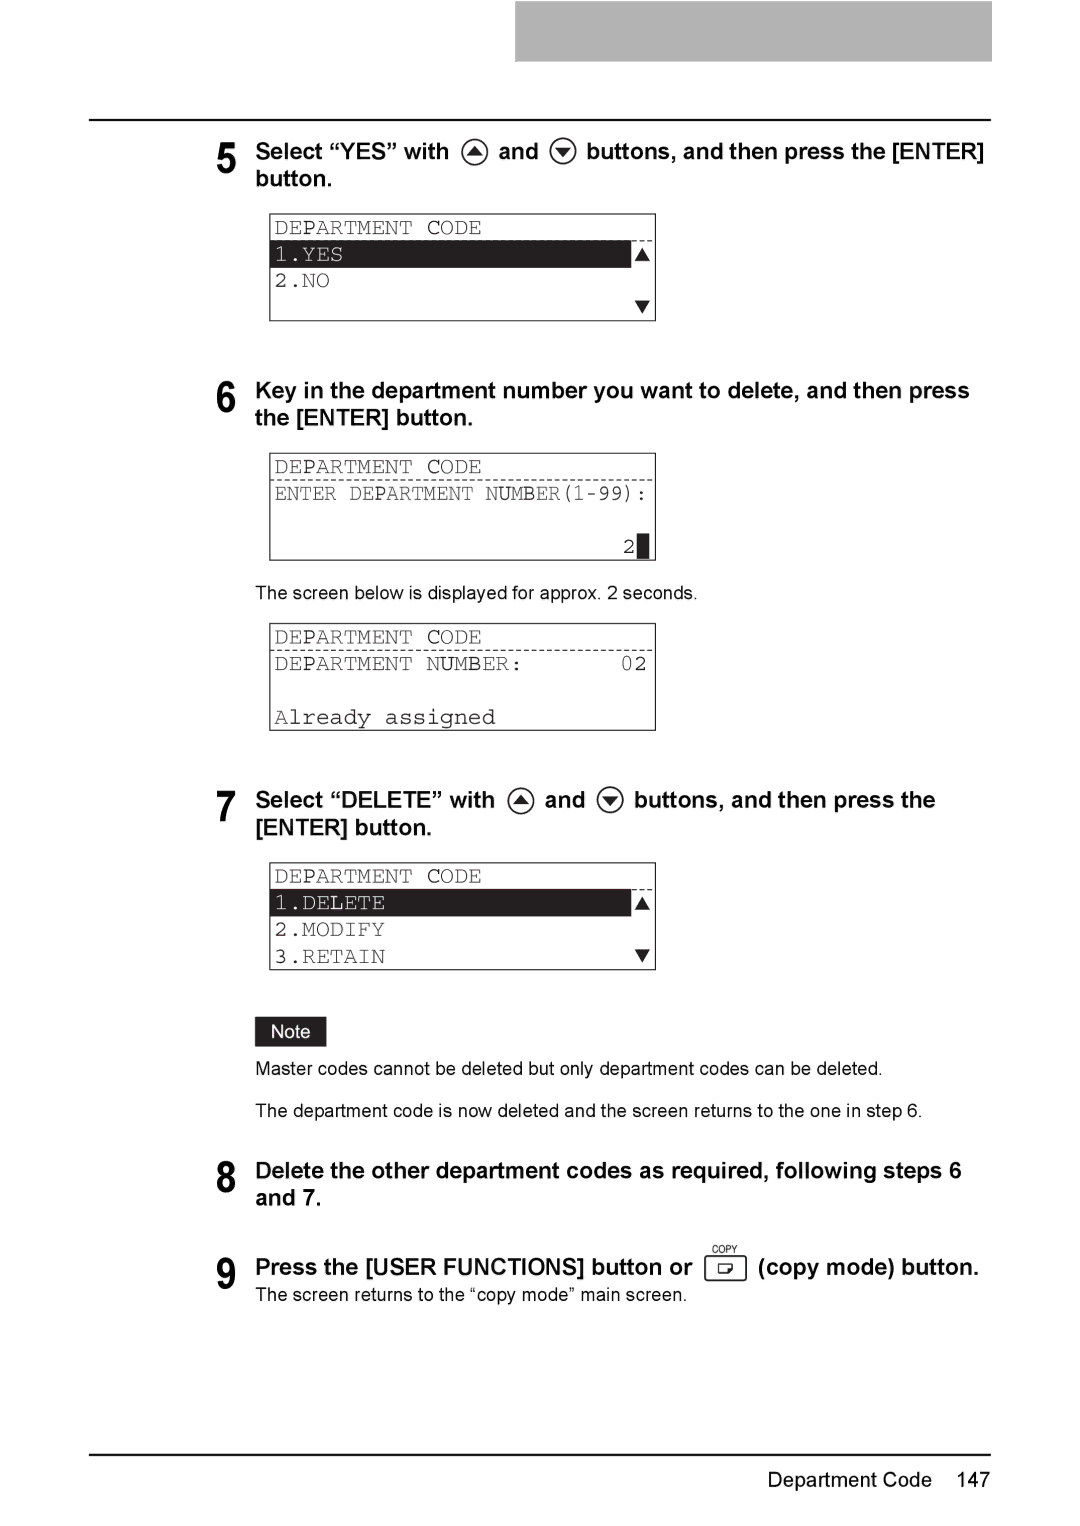
Department Code
Setting department codes
Department Code
Department Code Recover OLD Data
General Setting Weekly Timer 05.SPEAKER Volume
Department Code
Department Code
Master Code Code Number Enter Master Code NAMEMAX20
Enter the master code name, and then press the Enter button
Key in the master code, and then press the Enter button
Master Code Master Code Number Enter Master Code
Department Code Number Enter Department NAMEMAX20
Enter the department name, and then press the Enter button
Key in the department code, and then press the Enter button
Department Code Department Number
Changing department names or codes
Department Code Number
Department Code Enter Department NUMBER1-99
Department Code Delete
Modify
Enter a new department name, and then press the Enter button
Deleting department codes
Modify Retain
Delete
Clearing counter values
Count Clear
Department Code Modify Retain
Select Lists with
Printing out counter values
Lists
Function Supply Notice
Canceling department management
Department Code YES
Select no with and buttons, and then press the Enter button
Copy Setup
Select Copy Setup with
Menu Customize
Menu Customize
ID Card
Menu Customize Image Shift 5.DUAL
Image Mode
Copy Setup Menu Customize
02.APS/AMS
APS / AMS
APS
APS/AMS
Select Default Settings with
Image Mode
Select Copy Setup with Buttons, and then press Enter button
Select Image Mode with Buttons, and then press Enter button
Text
Select the image mode with
Image Mode TEXT/PHOTO Photo
Select LIGHT/DARK with Buttons, and then press Enter button
Density Adjustment
Density Adjustment
Auto
LIGHT/DARK
Manual
LIGHT3
Select Finishing with Buttons, and then press Enter button
Finishing Mode
Finishing Mode
Finishing NON Sort
Default Settings 02.LISTS
Pop-Up Display Setting
Initial Setup Date & Time 02.LANGUAGE
Drawer SET POP-UP
Did you change paper size?
Various List Printing
Various List Printing
Department Code
Select Menu List with
Menu List Printing
Menu List
Menu List Printing
ROM Version Display
Menu List 05.TEST Mode
Machine Revisions
ROM Version Display
Mail Settings
Service Notification
Service Notification
Sending an Email
Mail Settings
Send NOW
Mail Address
Mail Settings Send NOW
Setting Email addresses
Mail Address
Enter the Email address and then press the Enter button
Customer Name
Setting the customer information
Customer Information
User
Customer Name Enter NAMEMAX50
Page
196
When This Message Appears 176 Paper Jams 178
189
Message Meaning Countermeasure
When This Message Appears
When This Message Appears
Press Start KEY
Checking position of paper jams
Paper Jams
Paper Jams
Message Position of Paper Jam
When releasing jammed paper
When paper jams occur frequently
Do not tear jammed paper
Do not touch the photoconductive drum
Paper Jams
Open the Reversing Automatic Document Feeder
Paper Jams
Paper jams within Automatic Duplexing Unit optional
Paper jams on bypass tray
Lower the original feeding tray Close the upper cover
Pull out the paper jammed on the bypass tray
Open the side cover
Paper jam behind transfer unit
Close the transfer unit and the side cover
Open the transport guide while holding the knob
Paper jams within fuser unit
Paper jams within Paper Feed Unit optional
Close the paper feed cover of the unit
Paper jams within Paper Feed Pedestal optional
Never attempt to incinerate toner cartridges
Replacing Toner Cartridge
Replacing Toner Cartridge
Recommended toner cartridges
Pull out the toner cartridge
Open the front cover Hold down the green lever
Replacing Toner Cartridge
Insert the toner cartridge along the rail
Clean the charger
Replacing Toner Cartridge
With the transfer charger wire
Before Calling Service Technician
Before Calling Service Technician
General operation
Phenomenon Usual cause Countermeasure
Toner-related items
Original/Copy paper-related items
Image trouble
Image Shift
Daily Inspection 202
Maintenance and Inspection
Original glass Guides Platen sheet
Daily Inspection
Daily Inspection
Open the front cover Clean the charger
Cleaning charger
Cleaning transfer charger
Daily Inspection
Page
List Print Format 215
STUDIO167/207/237 Specifications 208
STUDIO167/207/237 Specifications
STUDIO167/207/237 Specifications
Paper size Feeder STUDIO167 STUDIO207 STUDIO237
Continuous copying speed
Reversing Automatic Document Feeder
Specifications of Options
Automatic Document Feeder
Automatic Duplexing Unit
Drawer Module
Paper Feed Pedestal
Packing List
Packing List
Copying Function Combination Matrix
Copying Function Combination Matrix
Combination Matrix 1/2
Combination Matrix 2/2
List Print Format
Department code list
Function list
List Print Format
Mailbox list
Supply notice list
NIC status page list
Configuration page list
Menu List Program
Menu list
Numerics
153
38, 55
167
176
XY Zoom
Index
Page
Multifunctional Digital Systems

 (copy mode) button.