GE Monogram ZISB42D Open freezer door to access case trim, Block Top View Refrigerator Cabinet

Page 19

Installation

42" Built-In Refrigerator
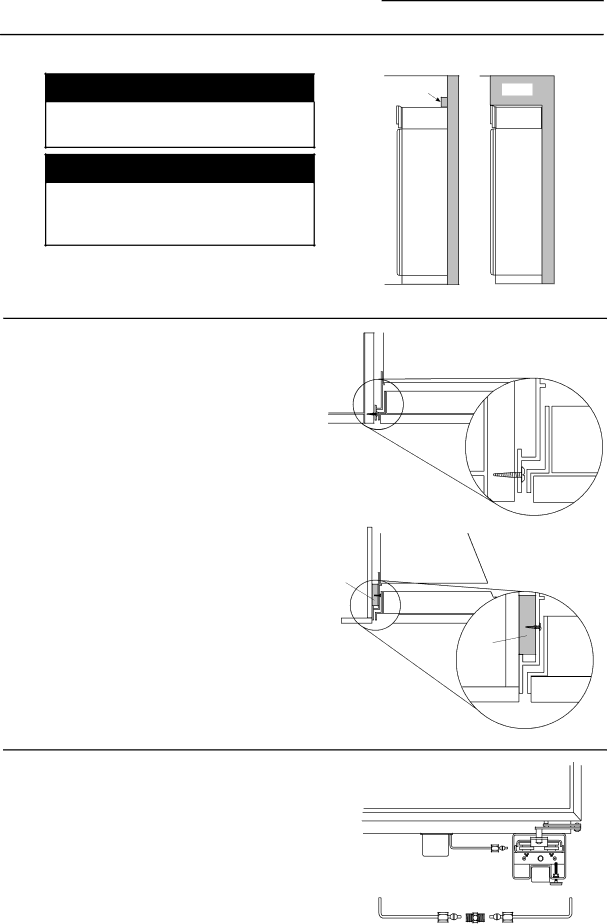
Step 7

OPTION 1 Secure refrigerator at the top

WARNING

ANTI-TIP PRECAUTIONS

The refrigerator is heavy at the top and must be secured to prevent the possibility of tipping forward.

ATTENTION

PRECAUTIONS CONTRE LES BASCULEMENTS

Le réfrigérateur est beaucoup plus lourd en haut et il faut le maintenir en place pour éviter la possibilité de son basculement vers l'avant.

To prevent the refrigerator from tipping over, you must:

Install a wood block, the full width of the refrigerator. Secure the block with wood screws penetrating at least 3/4" into wall studs.

Block

Side View

Soffit

Side View

INSTALLATION

PRODUCT


OPTION 2 Secure refrigerator at the sides

When using 1/2" to 3/4" side panels, the front flange of the case trim is attached to the side panel.

Open freezer door to access case trim.

Drill hole in case trim slightly below top hinge. Drive screw through the trim and into the side panel.

Follow the same procedure on the fresh food side.

OR

If refrigerator is installed between cabinets with no side panels or in a custom enclosure, install a spacer block as shown.

Open freezer door to access case trim.

Drill hole in case trim slightly below top hinge and drive screw through the trim and into the spacer block.

Follow the same procedure for fresh food side.

Side

Panel

Spacer

Block

Top View

Refrigerator Cabinet

Refrigerator

Door

Refrigerator Cabinet

Top View

Refrigerator Door


Spacer


Block


Step 8

Connect

Water

Supply

Check to be sure that refrigerator power cord is not plugged into the wall outlet.

Locate and bring copper tubing to the front of the cabinet.

Turn the water on to flush debris from line, run about a quart of water through tubing into a bucket, then shut-off water.

Slip a 1/4-1/4 union nut (provided) over both ends of the copper tubing at the right front leg of the refrigerator and couple the lines.

Turn on the water to check for leaks.

19

Image 19
Contents Models GE Monogram Built-In RefrigeratorsTrim Kits Custom Panel DimensionsConsulter « Mise à terre du réfrigérateur », Design InformationBuilt-In Refrigerator True Flush InstallationTo accomplish an attractive installation, you must Design InformationCabinet Built-In RefrigeratorsThick 41-1/2Thick custom panels-Without trim kits You shouldNon-dispenser Custom Panel DimensionsZIS42N non-dispenser 67 15/16 Using Trim Kit ZKT42 Thick panel with standard handleZKT42 trim kit provides for the installation of 3/4 Custom door and grille panels, using the standard fullMax Freezer PanelZISB42D black dispenser ZISW42D white dispenserZISW42D white dispenser ZISB42D black dispenser Custom Door Panel Dimensions Using Standard TrimGrille Panel height can vary to fill installation Length handle. Cut panels to size and installLower freezer panel to allow placement of support Dispenser Brackets and install see detail aDetail B 67 15/16 Detail a and installDetail B Freezer Rout panels to specification below on See detail B Standard CustomTrim For All Monogram Built-In Refrigerators23 9/16 24 3/4Use of Adapter plug InstallationUse of Extension Cords Washer Slide carton off top of cabinetShut off the main water supply Floor Copper TubingRotate Clockwise To Remove Filter Bypass Plug Side panels must be installed plumbFor Installations With a Reverse Osmosis System Only Step Install Side PanelsStep Level Refrigerator To install 1/4 door panelsStep Install Door Panels Step Roll Refrigerator Into OpeningBlock Top View Refrigerator Cabinet Open freezer door to access case trimRefrigerator Door Spacer Block To raise or lower case trim to other installation heights Installation height and must be adjustedTo insert decorative grille panel into the frame Tor door panels. Handles not included. The door Parts ListZKH1 Trim Kit For 1/4 Panels Support for Custom HandlesLocate position Option 1 Installation StepExtrusion Decorator Door Panel Handle Min 2 Max Door Handle Option 1 Installation Step Assemble panel Extrusion HandleStep Locate Position Handle Re-install dispenser trim, temporarilyTrim With Option 2 Installation Step Custom handleAssembled DispenserZG2 Trim Kit Grille Panel Frame AdjustmentTo change grille panel size Custom Panels ZKT42 Trim KitFreezer Door Top trim Side trim Bottom trim Fresh Food Door Trim ModelsDimension B Step Install1/16 Grille panel Option 1 Installation Step Adjust Grille panel HeightSecure 3/4 panel to grille panel support Back Side Freezer Panels Hinge Upper Lower Dimension a Dimension BInstall panel support brackets ZKT42-6-3/4Step Install Handles Step Install PanelsBack Side ZKHT1 Trim Kit For 3/4 PanelsFresh food door extrusion Freezer door extrusionStep Locate position of handles Step Temporarily Mount Door panelsMin 2 Max Screw Option 1 Installation Assemble panel, extrusion HandleStep Mount assembled panels Before Option 1 InstallationModel using For dispenserAssembled Tubular Stainless Steel Handles ZKHSS1 for 1/4 PanelsTools and materials required Step Match Handle Extrusions to Handle Extrusion Decorator Door PanelSee a for Stainless Steel panels For Stainless Reinstall original screws into the door extrusionTape extrusions to panels to prevent movement See aRaised Panel on 1/4 Thick Backing For Stainless PanelsTubulor Stainless Steel Handles ZKHTSS1 for 3/4 PanelsFreezer panels Step Install Assembled Panels Step Install Standoffs onto HandlesZKHTSS1 17 11/16 67 7/8 15 1/4 67 15/16 15 1/16 15 5/16 ZWCD1 Trim KitCustom Dispenser Collar Collar trimSelect the door panel size for your application Monogram