GE Monogram ZISB42D, ZIS42N Tape extrusions to panels to prevent movement, See a, For Stainless

Page 40

ZKHSS1 for 1/4" Panels

Tubular Stainless Steel Handles

Step 2A:

FOR

STAINLESS

STEEL

PANELS

If you are installing these handles onto Stainless Steel panels:

Use extreme caution if you are drilling through stainless steel panels. Stainless panels must be handled gently. Do not kneel on stainless steel panels. It will leave a permanent dent. Do not remove protec- tive plastic covering until final installation.

Place supplied filler panel (corrugated) on floor to use as a pad.

On the back side of the panel–at the handle side, measure and mark 1/4" below the top edge of the panel.

For models with full width dispenser trim and 2-piece freezer panels:

Measure and mark 1/4" below the top edge of the upper panel.

Measure and mark 1/4" above bottom edge of lower panel.

Slip panels into the new extrusion, flush against inner edge, on the handle side.

Align extrusion to pencil mark(s) as shown in Step 2. Mark each screw hole location with pencil.

Tape extrusions to panels to prevent movement.

Place panel on plywood section, appearance side down. Be sure plywood is clean without nicks and burrs. Center punch at each screw hole location.

Drill 1/8" pilot hole. Use 9/32" bit to enlarge clearance hole.

Measure and cut a 2" wide strip, top to bottom off the corrugated panels. This will allow room for spacer rings between the stainless panel and extrusion.
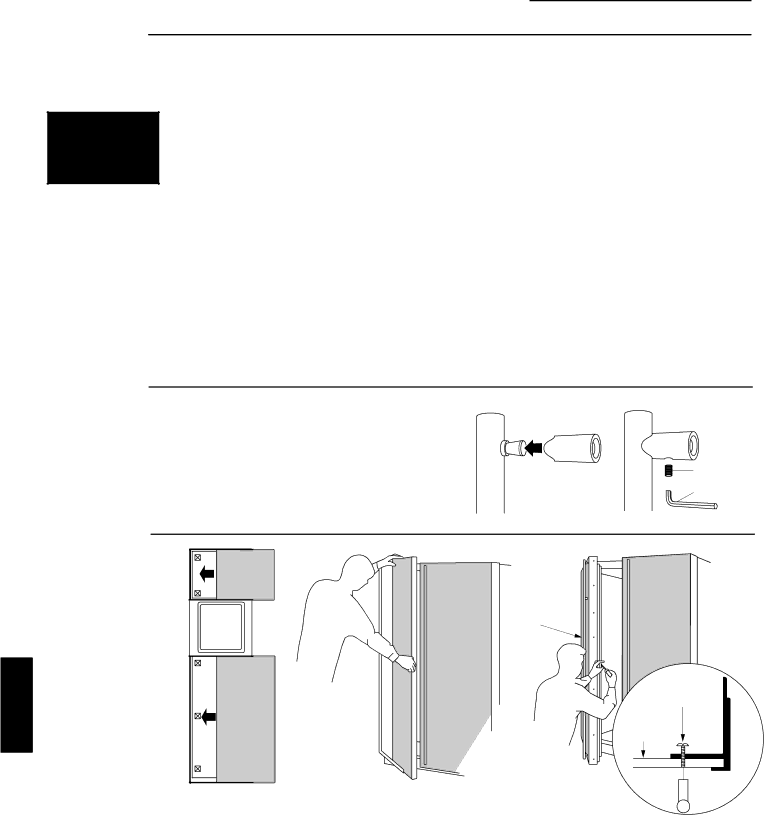
Step 3:

Install Standoffs onto Handles

Step 4: Install Handles and Panels

ZKHSS1 INSTALLATION


FOR CUSTOM


WOOD


PANELS


See Step 4A


for Stainless


Steel panels

Place a handle standoff on each attachment post along the handle. Position the set screw hole on each standoff to point to the floor.

Install set screws into the bottom of each standoff,

using the Allen wrench provided. The standoff should

Screw

be tight against the handle.

Allen Wrench


Door

Handle

Screw

Decorator

Door Panel

Handle

Press foam pads against steel doors to temporarily reduce thickness.

Slide panels into the door trim. Leave about 4" of the panel exposed to allow room to install the handle extrusion.

Place extrusion onto back side of panel, install mounting screws through the extrusion and the custom panel.

Screw handle to panel, starting at the top. Moving down the handle, drive each screw partially into the standoff, alternating back to the top until the handle is tight against the panel.

Slide the assembly into the door frame until the extrusion fits firmly against the steel door.

Reinstall original screws into the door extrusion.

40

Image 40
Contents GE Monogram Built-In Refrigerators ModelsCustom Panel Dimensions Consulter « Mise à terre du réfrigérateur »,Design Information Trim KitsTrue Flush Installation To accomplish an attractive installation, you mustDesign Information Built-In RefrigeratorBuilt-In Refrigerators Thick41-1/2 CabinetYou should Thick custom panels-Without trim kitsCustom Panel Dimensions Non-dispenserZIS42N non-dispenser Using Trim Kit ZKT42 Thick panel with standard handle ZKT42 trim kit provides for the installation of 3/4Custom door and grille panels, using the standard full 67 15/16Freezer Panel MaxZISW42D white dispenser ZISB42D black dispenserCustom Door Panel Dimensions Using Standard Trim ZISW42D white dispenser ZISB42D black dispenserLength handle. Cut panels to size and install Lower freezer panel to allow placement of supportDispenser Brackets and install see detail a Grille Panel height can vary to fill installation67 15/16 Detail a and install Detail B Freezer Rout panels to specification below onSee detail B Standard Custom Detail BFor All Monogram Built-In Refrigerators 23 9/1624 3/4 TrimUse of Adapter plug InstallationUse of Extension Cords Slide carton off top of cabinet Shut off the main water supplyFloor Copper Tubing WasherSide panels must be installed plumb For Installations With a Reverse Osmosis System OnlyStep Install Side Panels Rotate Clockwise To Remove Filter Bypass PlugTo install 1/4 door panels Step Install Door PanelsStep Roll Refrigerator Into Opening Step Level RefrigeratorBlock Top View Refrigerator Cabinet Open freezer door to access case trimRefrigerator Door Spacer Block To raise or lower case trim to other installation heights Installation height and must be adjustedTo insert decorative grille panel into the frame Parts List ZKH1 Trim Kit For 1/4 PanelsSupport for Custom Handles Tor door panels. Handles not included. The doorOption 1 Installation Step Locate positionOption 1 Installation Step Assemble panel Extrusion Handle Extrusion Decorator Door Panel Handle Min 2 Max Door HandleRe-install dispenser trim, temporarily Step Locate Position HandleOption 2 Installation Step Custom handle AssembledDispenser Trim WithZG2 Trim Kit Grille Panel Frame AdjustmentTo change grille panel size Custom Panels ZKT42 Trim KitFreezer Door Top trim Side trim Bottom trim Fresh Food Door Models TrimDimension B Step Install1/16 Grille panel Option 1 Installation Step Adjust Grille panel HeightSecure 3/4 panel to grille panel support Dimension a Dimension B Install panel support bracketsZKT42-6-3/4 Back Side Freezer Panels Hinge Upper LowerStep Install Panels Step Install HandlesZKHT1 Trim Kit For 3/4 Panels Fresh food door extrusionFreezer door extrusion Back SideStep Temporarily Mount Door panels Step Locate position of handlesMin 2 Max Screw Option 1 Installation Assemble panel, extrusion HandleStep Mount assembled panels Option 1 Installation Model usingFor dispenser BeforeAssembled Tubular Stainless Steel Handles ZKHSS1 for 1/4 PanelsTools and materials required Step Match Handle Extrusions to Handle Extrusion Decorator Door PanelSee a for Stainless Steel panels Reinstall original screws into the door extrusion Tape extrusions to panels to prevent movementSee a For StainlessFor Stainless Panels Raised Panel on 1/4 Thick BackingZKHTSS1 for 3/4 Panels Tubulor Stainless Steel HandlesFreezer panels Step Install Standoffs onto Handles Step Install Assembled PanelsZKHTSS1 ZWCD1 Trim Kit Custom Dispenser CollarCollar trim 17 11/16 67 7/8 15 1/4 67 15/16 15 1/16 15 5/16Select the door panel size for your application Monogram