GE Monogram ZISB42D, ZIS42N, ZISW42D installation instructions Freezer panels

Page 43

Step 1:

Remove

Handles

ZKHTSS1 for 3/4" Panels

Tubulor Stainless Steel Handles

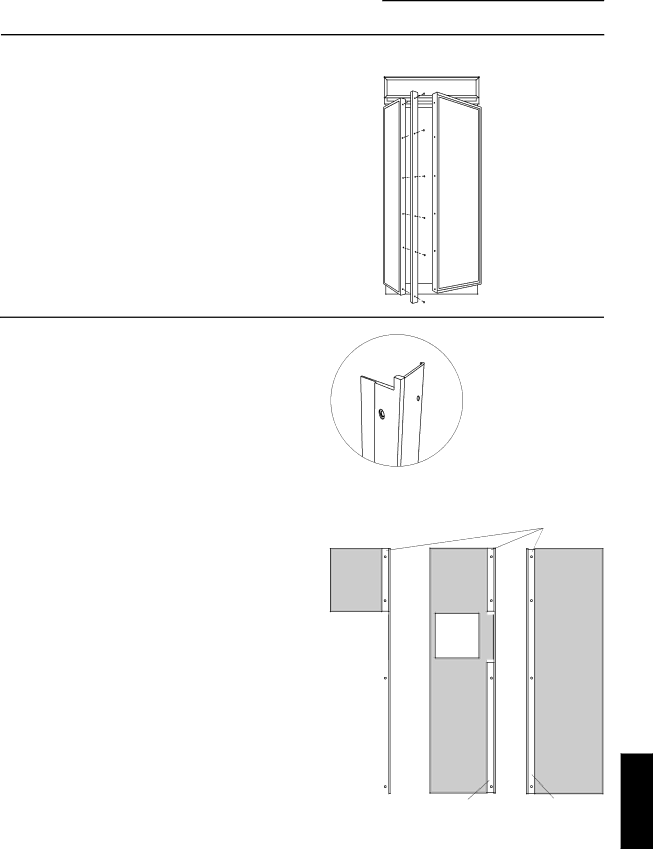
• Open doors to 90°. Remove the screws from the full-length handles of both doors.

• Retain screws, discard handles.

Note: If a custom collar is to be used, order ZWCD1 Trim Kit for 36" and 42" wide models. Order ZWCD2 for 48" wide models.

Step 2:

Match

Handle Extrusions to Panels

Cut a piece of corrugated to use as a pad to protect the panel finish. Use 1/2" thick section of plywood to protect flooring when drilling.

Place custom panels on the pad, appearance side down.

Note: If panels are wood, be sure to note which end is the top so that wood grain is in the correct direction on both (or all 3) panels.

Place new extrusion against the handle side of the panels.

Align the extrusion evenly with the top and bottom of the panel.

Follow the same procedure on the opposite panel.

• Tape the extrusions to the panels to prevent

Freezer

movement.

Upper

• Center punch and drill 1/8" pilot holes through the

Panel

holes in the extrusion and into the panel.


Turn panel over. On the appearance side, use 9/32" bit to enlarge clearance hole.

IMPORTANT: Hole locations must be exact to accept handle


standoff and handle assembly.


For models with full width dispenser trim and 2 piece

Back


freezer panels:


Side


• Carefully, align the top of the upper panel and the


Freezer


bottom of the lower panel with extrusion ends.

Lower


Panel


Models


With Full Width


Dispenser Trim

Top

Note: Be sure to orient

End

extrusions and handles


correctly. The top ends of


the extrusions are cutout to fit


the shape of the top of the


door.

Align Extrusion

Even With

Panel

Back

Side

Fresh

Food

Panel

Back

Side

Freezer

Panel

Freezer

Fresh Food

ZKHTSS1 INSTALLATION

Extrusion

Extrusion


43

Image 43
Contents Models GE Monogram Built-In RefrigeratorsTrim Kits Custom Panel DimensionsConsulter « Mise à terre du réfrigérateur », Design InformationBuilt-In Refrigerator True Flush InstallationTo accomplish an attractive installation, you must Design InformationCabinet Built-In RefrigeratorsThick 41-1/2Thick custom panels-Without trim kits You shouldNon-dispenser Custom Panel DimensionsZIS42N non-dispenser 67 15/16 Using Trim Kit ZKT42 Thick panel with standard handleZKT42 trim kit provides for the installation of 3/4 Custom door and grille panels, using the standard fullMax Freezer PanelZISB42D black dispenser ZISW42D white dispenserZISW42D white dispenser ZISB42D black dispenser Custom Door Panel Dimensions Using Standard TrimGrille Panel height can vary to fill installation Length handle. Cut panels to size and installLower freezer panel to allow placement of support Dispenser Brackets and install see detail aDetail B 67 15/16 Detail a and installDetail B Freezer Rout panels to specification below on See detail B Standard CustomTrim For All Monogram Built-In Refrigerators23 9/16 24 3/4Use of Adapter plug InstallationUse of Extension Cords Washer Slide carton off top of cabinetShut off the main water supply Floor Copper TubingRotate Clockwise To Remove Filter Bypass Plug Side panels must be installed plumbFor Installations With a Reverse Osmosis System Only Step Install Side PanelsStep Level Refrigerator To install 1/4 door panelsStep Install Door Panels Step Roll Refrigerator Into OpeningBlock Top View Refrigerator Cabinet Open freezer door to access case trimRefrigerator Door Spacer Block To raise or lower case trim to other installation heights Installation height and must be adjustedTo insert decorative grille panel into the frame Tor door panels. Handles not included. The door Parts ListZKH1 Trim Kit For 1/4 Panels Support for Custom HandlesLocate position Option 1 Installation StepExtrusion Decorator Door Panel Handle Min 2 Max Door Handle Option 1 Installation Step Assemble panel Extrusion HandleStep Locate Position Handle Re-install dispenser trim, temporarilyTrim With Option 2 Installation Step Custom handleAssembled DispenserZG2 Trim Kit Grille Panel Frame AdjustmentTo change grille panel size Custom Panels ZKT42 Trim KitFreezer Door Top trim Side trim Bottom trim Fresh Food Door Trim ModelsDimension B Step Install1/16 Grille panel Option 1 Installation Step Adjust Grille panel HeightSecure 3/4 panel to grille panel support Back Side Freezer Panels Hinge Upper Lower Dimension a Dimension BInstall panel support brackets ZKT42-6-3/4Step Install Handles Step Install PanelsBack Side ZKHT1 Trim Kit For 3/4 PanelsFresh food door extrusion Freezer door extrusionStep Locate position of handles Step Temporarily Mount Door panelsMin 2 Max Screw Option 1 Installation Assemble panel, extrusion HandleStep Mount assembled panels Before Option 1 InstallationModel using For dispenserAssembled Tubular Stainless Steel Handles ZKHSS1 for 1/4 PanelsTools and materials required Step Match Handle Extrusions to Handle Extrusion Decorator Door PanelSee a for Stainless Steel panels For Stainless Reinstall original screws into the door extrusionTape extrusions to panels to prevent movement See aRaised Panel on 1/4 Thick Backing For Stainless PanelsTubulor Stainless Steel Handles ZKHTSS1 for 3/4 PanelsFreezer panels Step Install Assembled Panels Step Install Standoffs onto HandlesZKHTSS1 17 11/16 67 7/8 15 1/4 67 15/16 15 1/16 15 5/16 ZWCD1 Trim KitCustom Dispenser Collar Collar trimSelect the door panel size for your application Monogram