Manuals
/
CBM America
/
Computer Equipment
/
Printer
CBM America
CBM-262
user manual
Drive Circuit
Models:
CBM-262
1
53
131
131
Download
131 pages
23.34 Kb
50
51
52
53
54
55
56
57
Specifications
Electrical Characteristics
Error messages
Timing Chart
Explanation of Signal Names
Power LED Error LED
Connecting the Interface Cable
Maintenance
Entering Configuration Mode
Reset by DSR
Page 53
Image 53
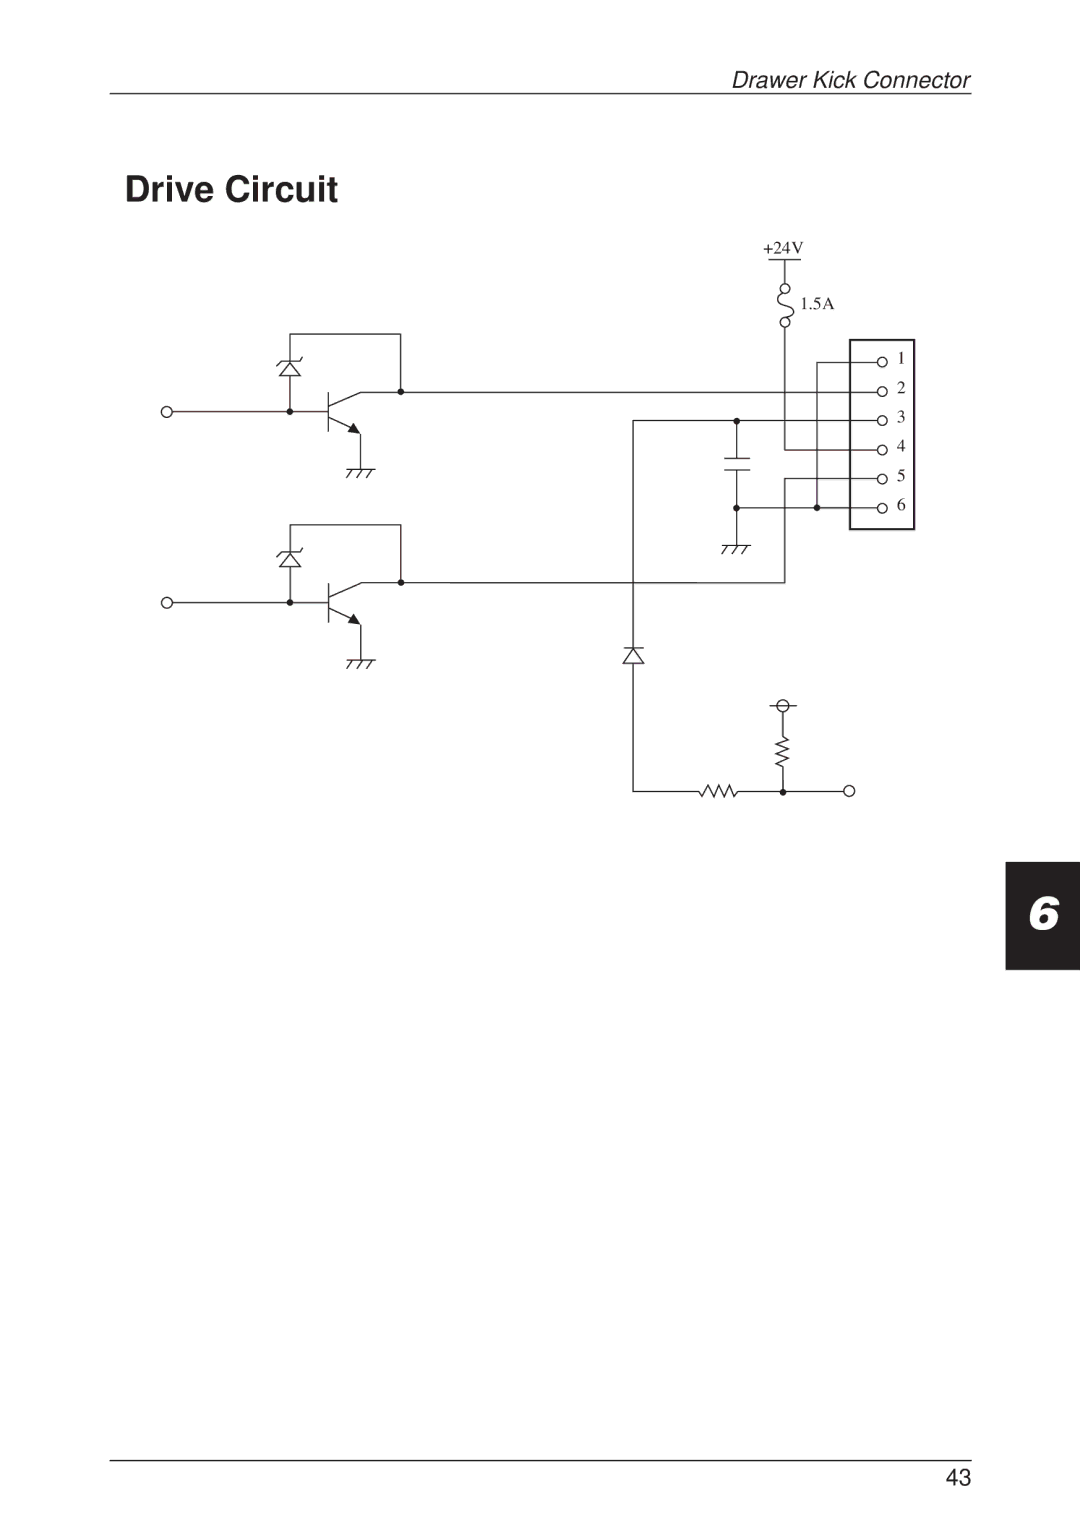
Drawer Kick Connector
Drive Circuit
+24V
1.5A
1
2
3
4
5
6
6
43
Page 52
Page 54
Page 53
Image 53
Page 52
Page 54
Contents
UsersManual
Declaration of Conformity
FCC Compliance Statement For America Users
EMI Compliance Statement for Canadian Users
Important Safety Instructions
Page
Page
Daily Maintenance
Contents
Print Control Codes
Outline
Features Accessories Names and Functions of Parts
Accessories
Features
Standard Specifications without Journal Protection Key
Optional Specifications with Journal Protection Key
Rear Cover
Names and Functions of Parts
Printer Unit
Error Indicator Orange
Power Indicator Green
Operation Panel
Receipt Key
Bottom View
Connectors
DIP Switch Above switches are shown in the OFF position
Factory DIP Switch Settings
Getting Started
Insert the cables connector into the interface connector
Connecting the Interface Cable
Connecting the Cable to the Computer Terminal
Fastening the Cable Terminals
Connect the drawer kick cable to the drawer kick con- nector
Connecting the Drawer Kick Cable
Connecting the Power Supply
Paper Handling
Press the I side of the power switch to turn the power on
Setting the Receipt Roll Paper
Setting the Receipt Roll Paper
Open the rear cover
Setting the Journal Roll Paper
About 30 cm
Lower the head up lever in the arrow direction
Spool Partner
Setting the Journal Roll Paper
Replacing the Roll Paper
Replace the cover
Set a new roll of roll paper
Printing Area
Specified Paper and Printing Area
Specified Paper
Using Printer
Print Density Level Paper Condition
Operation Panel Keys
Turn the power off, then turn it on again
Entering Configuration Mode
Test Printing
DIP Switch
DIP Switches
Content
SW1-5 SW1-6 SW1-7 SW1-8 International Character Set
SW2-4 SW2-3 Parity Setting
SW2-2 SW2-1 Baud Rate Setting
Sensors Error Indications
Sensors Error Indications
Printer Cover Open Sensor
Sensors
Sensor Lever
Setting Method
Adjustment Scale
Power LED Error LED
Error Indications
Interfaces
Serial Interface Parallel Interface Drawer Kick Connector
Pin No
Specifications
Serial Interface
Input/Output Circuits
Explanation of Signal Names
Reset by Init
Reset by DSR
Protocols
Parallel Interface
Timing Chart
When Receiving the Init Signal
Init
Function
Signal Lines and Pin Arrangement
Chapter Interfaces
Electrical Characteristics
Drawer Kick Connector
Drawer Kick Drive Signal
Signal Name Function
Connector Connection Diagram
Drive Circuit
Interfaces
List of Control Codes Input Data Format
Print Control Codes
List of Control Codes
Character Command
List of Control Codes
Print Control Codes
Input Data Format
Print command CR
Horizontal tab HT
Line feed LF
Canceling of print data in the page mode
Printing in the page mode and return FF
Journal tab RS
Sending the status in real time DLE EOT n
Distinguishing the Sending Status
Command and Function Status
Bit Function Value
Bit Function
Error Factor Status when n = 3 is specified
Real time enquiry to printer DLE ENQ n
Printing of data in the page mode ESC FF
Setting the space between characters ESC SP n
Specifying the print mode all at once ESC ! n
Specifying/Clearing the download character set ESC % n
Specifying the absolute print position ESC $ n1 n2
Defining download characters ESC & s n m a D1 D2~Dn
Example
Case of Font B
Specifying a bit image ESC * m n1 n2 D1~Dn
MHex Mode Vertical Direction Horizontal Direction
Relationship between bit image data and printed dots
Specifying the 1/6 inch line feed amount ESC
Specifying/Clearing underline ESC n
Specifying the line feed amount ESC 3 n
Erasing download characters ESC ? n
Controlling data input ESC = n
Specifying/Clearing bold characters ESC E n
Setting the horizontal tab position ESC D n NUL
Printer initialization ESC @
Printing and paper feeding ESC J n
Specifying/Clearing double strike characters ESC G n
ESC SP, FS S
Selecting the page mode ESC L
NHex Character Set
Selecting international characters ESC R n
Selecting the standard mode ESC S
Starting Point → → → → Left to Right Top Left
Setting the printing area in the page mode ESC W
Input Data Format
Specifying the relative printing position ESC \ n1 n2
Selecting the printing sheet ESC c 0 n
Arranging the printing position ESC a n
Selecting the setting sheet ESC c 1 n
Enabling/Disabling the panel switch ESC c 5 n
Print and feed paper n lines ESC d n
Generates a specification pulse ESC p m n1 n2
Full cut ESC l
Partial cut ESC m
Character Type
Selecting the character code table ESC t n
Peripheral sevice status signal ESC u n
Sending the printer status ESC
Specifying/Clearing inverted characters ESC n
Bits Value
Specifying the character size GS ! n
Print Control Codes
Defining a downloaded bit image GS * n1 n2 Dn
Printing a downloaded bit image GS / m
Mode Name Vertical Dot Density
Starting and ending a macro definition GS
Hex Print Position
Specifying/Clearing Black/White reverse printing GS B n
Selecting the HRI character print position GS H n
Printable Range Left Margin Width of Print Area
Setting the left margin GS L n1 n2
Specifying/Clearing reduced character printing GS M n
Setting the basic calculation pitch GS P x y
Cutting of paper GS V m, GS V m n
Printable Area Left Margin Print Area Width
Setting the print area width GS W n1 n2
Is erased Print area width
Printable Area Left Margin Left margin
Input Data Format
Execution of a macro GS n1 n2 n3
Bit Status that is Object of ASB Value
Enabling/Disabling automatic sending of the status GS a n
LOW High
Bit Status Value
Third Byte Paper Sensor Information
Selecting the bar code height GS h n
Selecting the font of HRI characters GS f n
NHex Font
100
101
Printing bar codes. GS kn 1 Dn NUL
Definition Range
102
103
Sending of the status GS r n
Bit Printer Status Value
104
105
Selecting the horizontal size of a bar code GS w n
106
107
Code Japanese Code Table International Character Code Table
108
Code
109
110
111
Japanese Code Table
112
International Character Code Table
113
Appendices
114
Journal Protection Key
115
Maintenance, Cautions
Removing Paper Jams
Operating Temperature and Humidity
117
Specifications
Model Classification
118
Basic Specifications
Specified Paper
119
120
External View
PC74903-10
Top
Page
Image
Contents