Corporate Headquarters
Page
Copyright 2001-2006, Cisco Systems, Inc. All rights reserved
Page
Cisco.com
Definitions of Service Request Severity
Purpose
Air Filters
Power-Up/Down Control
Code Download Diagnostics
Line Cards
Site Requirement Guidelines
Site Wiring
Cisco IOS Software Images
If You Need More Information
Specify a Boot Image
Problem Solving with Subsystems
Troubleshooting the Cooling Subsystem
Series Router
Upgrading the RP and Line Card Memory
Xii
Purpose
Audience
Organization
Document Conventions
Cisco.com
Obtaining Documentation
Ordering Documentation
Product Documentation DVD
Cisco Product Security Overview
Documentation Feedback
Psirt
Reporting Security Problems in Cisco Products
Link on this page has the current PGP key ID in use
Obtaining Technical Assistance
Cisco Technical Support and Documentation Website
Definitions of Service Request Severity
Submitting a Service Request
Obtaining Additional Publications and Information
Xxiii
Xxiv
Introduction
Product Overview
Product Description
Cisco 12006 and Cisco 12406 router Front View
Product Overview Product Description
Product Overview Product Description
Cisco 12006 and Cisco 12406 router Rear View
RP and Line Card Slots
Physical and Functional Description
Chassis
Chassis Backplane
Switch Fabric Card Slots
Alarm Card Slots
Cooling
Power
Switch Fabric Card Types
Multigigabit Crossbar Switch Fabric
Nonredundant and Redundant System Configurations
Switch Fabric Redundancy
Switch Fabric Switching Capacity and Router Type
Device Discovery
Maintenance Bus
Power-Up/Down Control
Code Download
Diagnostics
Environmental Monitoring and Alarms
Route Processor Functions
Route Processors
Gigabit Route Processor
Route Processor Types
Product Overview Route Processors
GRP Layout
Type Size Quantity Description Location
GRP Memory Components
Total Dram Product Numbers Dram Sockets Number of DIMMs
Sram
System Status LEDs
Reset AUX Coll RX Link MII
GRP Alphanumeric LED Displays Partial Faceplate
Soft Reset Switch
Type I or Empty
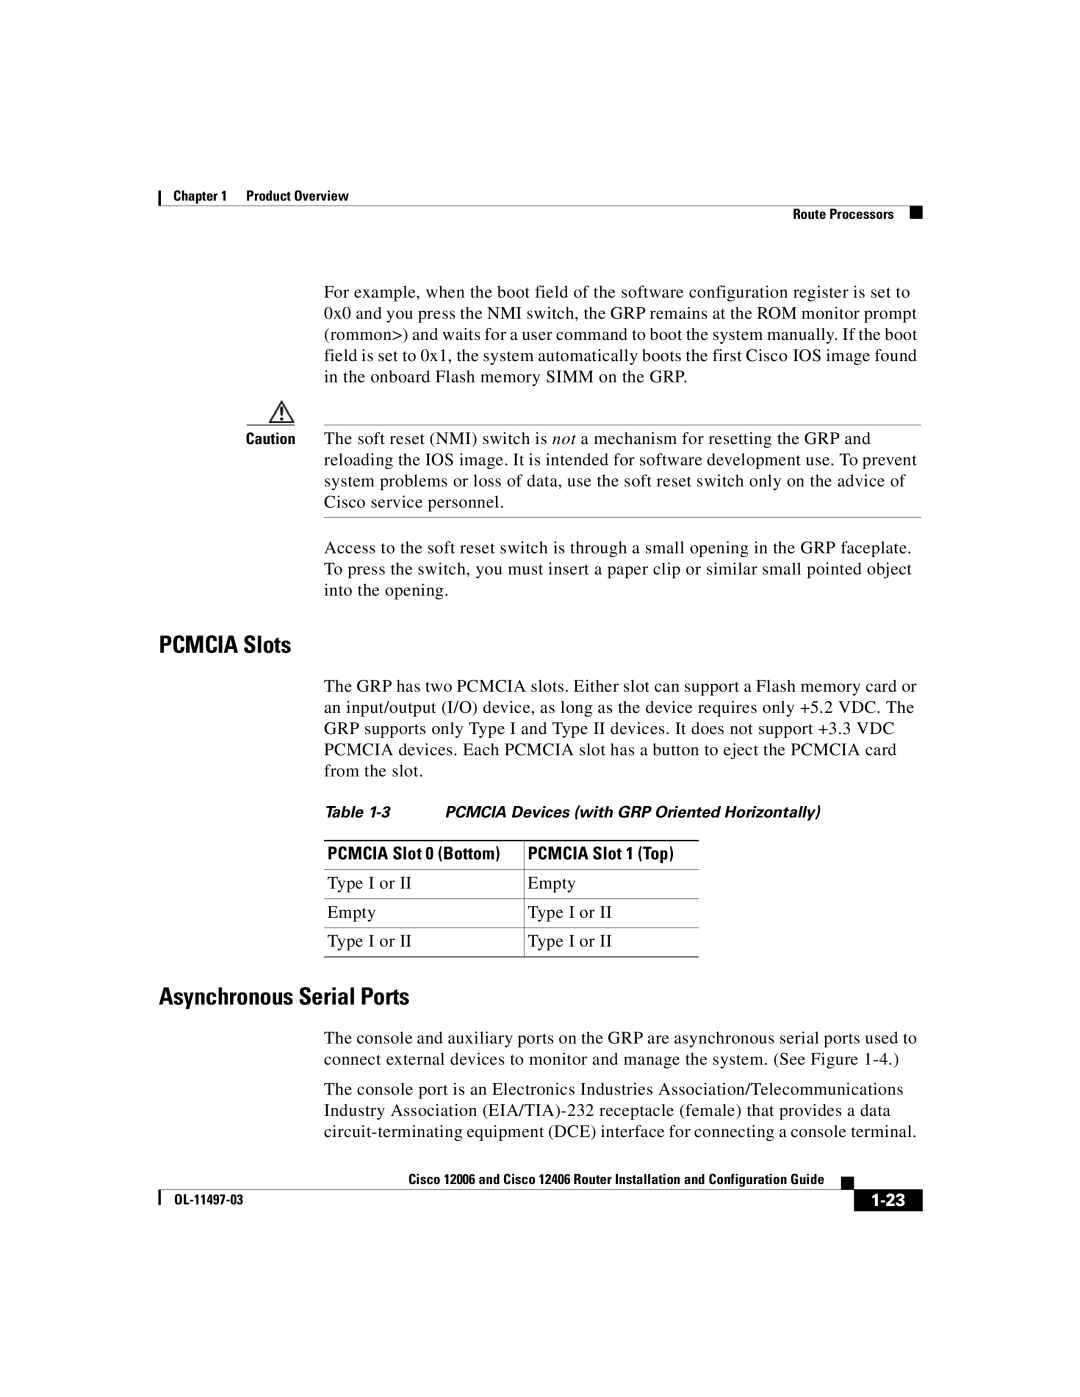
Pcmcia Slots
Asynchronous Serial Ports
Pcmcia Slot 0 Bottom Pcmcia Slot 1 Top
Ethernet Port
Performance Route Processor Front View
Performance Route Processor
Product Overview Route Processors
PRP Horizontal Orientation
Simm
PRP Memory Components
Sdram
Sdram
MEM-12KRP-FD1G=
Flash Disk Size Product Number
64 MB MEM-12KRP-FD64= 128 MB MEM-12KRP-FD128=
Soft Reset Switch
Ethernet Ports
Flash Disk Slots
Line Cards
10 Sample Line Cards
Alarm
Alarm Cards
Alarm Card Status
Alarm Output Function
Clock and Scheduler Card and Switch Fabric Card Status
Alarm Relay Contact Connector
Power Subsystems
Power Source Monitoring
AC PDU
AC Power Subsystem
12 AC Power Distribution Unit
13 AC-Input Power Supply
AC-Input Power Supply
Product Overview Power Subsystems
LED Label Function State Description
DC Power Subsystem
14 DC Power Distribution Unit
DC-Input Power Entry Module
Power a
16 DC-Input Power Entry Module
Output OK
Green PEM is operating normally in a powered-on Condition
Miswire
LED Label Color Function
Blower Module
Power Distribution
Top view
18 Air Filter Locations
Air Filters
Cable-Management System
19 Chassis Cable-Management System
Field-Replaceable Units
Technical Specifications
Preparing for Installation
Tools and Equipment
Safety and Compliance
General Safety Guidelines
Preparing for Installation Safety and Compliance
Lifting Guidelines
Compliance and Safety Information
Laser Safety
Preventing Electrostatic Discharge Damage
Attaching an ESD-Preventive Strap
Safety with Electricity
Airflow
Site Requirement Guidelines
Environmental Guidelines
Types of Equipment Racks
Temperature and Humidity
Rack-Mounting Guidelines
17.234 23.137 30.877 740 18.950
Equipment Dimensions and Site Layout
Preparing for Installation Site Requirement Guidelines
Ventilation
Power Connection Guidelines for AC-Powered Routers
Power Connection Guidelines
Label Description Cisco Product Number
Grounding Connections
Power Connection Guidelines for DC-Powered Routers
Supplemental Bonding and Grounding Port for Nebs Compliance
Cable Lug
Crimping the Lug
Place ground wire in the lug Crimp the lug
Distance Limitations
Site Wiring
Electromagnetic Interference
Unpacking and Repacking the Router
Site Preparation Checklist
Initials
Date
OL-11497-03
Installing the Router
Installing a Router
Tools and Equipment Required
Installing the Rack-Mount Brackets Optional
Installing the Optional Rack-Mount Brackets
Installing the Optional Rack-Mount Brackets
Lower and Upper Center-Mount Brackets
Installing Center-Mount Brackets Optional
Repeat through for both upper center-mount brackets
Installing the Optional Center-Mount Brackets
That it is at the same height as the lower right bracket
Rails
Power supply
Installing the Chassis in a Rack
OL-11497-03
Supplemental Bonding and Grounding Connections
Installing the Chassis on a Tabletop or Flat Surface
Gigabit Route PR Ocessor
Connecting RP and Line Card Cables
Chassis Cable-Management Bracket
Connecting Alarm Card Cables
GRP Console and Auxiliary Ports
Connecting to the Console and Auxiliary Ports
GRP Console DCE and Auxiliary DTE Port Connections
Pin Signal Input/Output Description
GRP Console Port Signals
GRP Auxiliary Port Signals
Ring
RTS
CTS
PRP Console and Auxiliary Port Connections
PRP Console and Auxiliary Ports
RxD Input Receive Data
PRP Console Port Signals
Console Port Pin Signal Input/Output Description
Output Data Terminal Ready TxD Transmit Data
Output Request To Send
Installing a Flash Memory Card
PRP Auxiliary Port Signals
Auxiliary Port Pin Signal
10 Flash Memory Card Slot Opening
11 RJ-45 and MII Ethernet Connections
Connecting the GRP to an Ethernet Network
Yes Receive Data RxD
Pin1 Out Input/Output Description Code
MDC
Mdio
Pin Out Input/Output Description Code
COL
CRS
Termination Network
Connecting the PRP to an Ethernet Network
Pin Signal
14 Using the Ethernet Port on the PRP
RJ-45 receptacle Category 5 UTP cable with plug
Ethernet Port Pin Signal Description
PRP Ethernet Connections
Crossover Cable Pinout for Connecting Two PRPs
Parameter
Connecting to an AC Power Source
Lists Ieee 802.3u physical characteristics for 100BASE-TX
Parameter RJ-45
Router Power Combination
18 AC Power Distribution Unit
Connecting to a DC Power Source
DC PDU
Captive screws four
+ GND
Power On the Router
Alarm
Cisco IOS Software Images
IOS Software Configuration for the Router
Conditions to Check Before System Startup
Starting the Router and Observing Initial Conditions
Overview of the Boot Process
OL-11497-03
Display Meaning Source
RP Alphanumeric LED
SEC
RP Interfaces Using the RP LEDs
RP IOS
PRI
Coll
Link
PRP Interfaces Using the PRP LEDs
Cisco IOS software that the system is running
Indicates the port is enabled
External Network Interface
System Configuration Dialogue
Locating a Valid Cisco IOS Software Image
Manually Booting the System
Command Description
Booting from the Cisco IOS Software Image
Before You Begin
Router Configuration
Setup Command
Cisco IOS User Interface
User Interface Command Modes
Global Configuration Mode
Privileged Exec Mode
User Exec Mode
ROM Monitor Mode
Interface Configuration Mode
Subinterface Configuration Mode
Configuration Changes
Setup Command Interactive Script Example
SDCC1/0
Configuring interface POS1/0 Is this interface in use?yes
Host Name
Configuring Global Parameters
Passwords
Protocols
Configuring Network Interfaces
PRP Ethernet Interfaces
GRP Ethernet Interfaces
Line Card Interfaces
Checking the Software Version
Show version Command
Show running Config Command Example
Verifying the Running Configuration Settings
No service tcp-small-servers Hostname Router
Show startup-config Command
Saving the Running Configuration Settings to Nvram
Reviewing the Running Configuration Settings
No logging trap
Installing the Flash Memory Card in a RP
Using Flash Memory Cards in the RP
Formatting a Flash Memory Card
Removing the Flash Memory Card from an RP
Router# format slot0
Specify a Boot Image
Router# cd slot1
Flash Memory Console Commands
Router# cd bootflash
14 Squeeze Command Functions Example
Copying Files
Booting from Flash Memory
Copied
Where
Specifies the source and name of the file to be
Router# copy tftpnew.image slot0new.image
Copying a Cisco IOS Software Image
Reboot the system
Copying Cisco IOS Software Updates
Router# copy slot1image.new slot0image.new
Copying Files Between RP Memory and a Flash Memory Card
Specifies the source of the file to be copied Nvram
Startup-config
Router# copy startup-config slot0myfile2
Copy running-config slot0slot1filename
Specifies the destination Nvram of the file to be
Router# copy startup-config running-config
Locked Blocks in Flash Memory Cards
If You Need More Information
Installing the Router If You Need More Information
OL-11497-03
Configuring the Software Configuration Register
Performing Other Configuration Tasks
Value Definition/Function
Bit Number1
Bit Number
Boot Field Definition
Boot Field Settings
Boot slot # imagename command
Configuration Register Settings
Configuration register is 0x141 will be 0x102 at next reload
Bits in the Software Configuration Register
Action/Filename Bit
9600 4800 1200 2400
Bit Address net host
Data Transmission Rate bps
Recovering a Lost Password
Rommon 1 config-register
Press Return
Problem Solving with Subsystems
Identifying Startup Problems
Using LEDs to Gather Information
Shows the location of the LEDs on the power supply faceplate
AC-Input Power Supply LEDs
Summarizes the function of these indicators
Amber Indicates input is wired backward at the PDU input
DC-Input Power Entry Module LEDs
Shows the location of the LEDs on the blower module
Blower Module LEDs
Alarm Card LEDs
RP Alphanumeric LED Displays Partial Faceplate View
RP Alphanumeric LED Displays
Troubleshooting the AC-Input Power Subsystem
Troubleshooting the Power Subsystem
OL-11497-03
OL-11497-03
Troubleshooting the DC-Input Power Entry Module
OL-11497-03
Troubleshooting the RP
Troubleshooting the Processor Subsystem
OL-11497-03
LED Display Indications
LED Display1 Indications2
Troubleshooting the Line Cards
GET Fabl
Init MEM
Init Lrom
RDY Romi
Monitoring Switch Fabric Status
Troubleshooting by Using the Alarm Cards
Monitoring Alarm Card Status
Monitoring Critical, Major, and Minor Alarm Status
Troubleshooting the Cooling Subsystem
OL-11497-03
Field Diagnostics for Cisco 12000 Series Router
Diagnostics Overview
Fpga Overview
Router# diag 0 verbose update-fpgas
Mbus
Obtain and Place the Diagnostics Image
Using Diagnostics
Diag slot-numberupdate-fpga source tftp flash source-path
Upgrade the Fpga Image on a Line Card
Cisco 12000 Series Router Line Cards
Using the diag Command
For Tftp boot servers, the source path would typically be
Cisco 12000 Series Router SFCs and CSCs
Diag Command Reference
Lists the diag command options and their descriptions
Cisco 12000 Series Router RPs
Line card testing only
Specifies that the source of the diagnostic image is a Tftp
Also see the dl-timeout-plus option
Path to the diagnostic image. The name of the image file is
Power it up in the slot so that the RP recognizes the line
Field diagnostic testing. If you use this keyword, you
Must use the microcode reload slot global configuration
Command, or manually remove and insert the line card to
Flash memory on the line card. No other testing is
Optional Updates flash memory with field-programmable
Diagnostics download image. This option limits the field
Diagnostics session to one task updating the Fpga images
OL-11497-03
Output Examples
Evadminfdiag
Test types
FDIAGSTATDONE7
Router # diag 7 prev
FDIAGSTATDONE3
OL-11497-03
OL-11497-03
Maintaining the Router
Powering Down the Router
Maintaining the Router
Removing and Installing the Front Door on
Opening the Front Door
Front Door Latch
Removing or Installing Hinge Pins
Removing the Bumpers and Pivot Blocks
Bumpers Pivot blocks
Cleaning or Replacing the Air Filters
Removing the Air Filters
Air filter door Air filters
Removing and Replacing the Blower Module
Removing the Blower Module
Carrying handle Captive screws 2 on each side
OL-11497-03
Carrying handle Guide pins Captive screws 2 on each side
Troubleshooting the Blower Installation
Removing and Replacing AC and DC Power Subsystem Components
Power Supply and PDU Compatibility
Installation Guidelines
AC Power Supply PWR-GSR6-AC= AC Power Supply 12000/6-AC-PEM=
DC PDU 12000/6-DC-PDU=
DC PDU GSR6-DC-PDU=
Installing Upgrade Kits
Captive screws/release levers
Removing and Replacing an AC PEM
AC PEM
Maintaining the Router Removing and Replacing an AC PEM
Releasing the AC Power Supply
Seating the AC Power Supply
Troubleshooting the AC Power Supply Installation
Maintaining the Router Removing and Replacing an AC PEM
10 identifies the components of the AC PDU
Removing and Replacing an AC PDU
Maintaining the Router Removing and Replacing an AC PDU
11 Unseating the AC Power Supply
12 Removing the Blower Module
13 Removing the AC PDU
14 Installing the Blower Module
15 Seating the AC Power Supply
DC PEM
Removing and Replacing a DC PEM
Maintaining the Router Removing and Replacing a DC PEM
17 Releasing the DC Power Supply
18 Seating the DC Power Supply
Troubleshooting the DC Power Supply Installation
Maintaining the Router Removing and Replacing a DC PEM
19 identifies the components of the DC PDU
Removing and Replacing a DC PDU
Maintaining the Router Removing and Replacing a DC PDU
20 Unseating the DC Power Supply
21 Removing the Blower Module
Negative -, b positive +, c ground
22 Disconnecting the DC Power Leads
23 Removing the DC PDU
24 Installing the Blower Module
25 Disconnecting the DC Power Leads
26 Seating a DC Power Supply
Maintaining the Router Removing and Replacing a DC PDU
Removing and Installing an RP or a Line Card
Removing an RP or Line Card
Tools and Equipment
28 Removing an RP or Line Card from the Card Cage
Installing an RP or Line Card
Remove the blank faceplate covering the card slot
Adding an RP or Line Card
Or to another grounded, bare metal surface
Identify the card slot for the new line card
For fiber-optic or Copper cable Line cards
Installing a Line Card Cable-Management Bracket
OL-11497-03
30 Line Card Cable-Management Brackets with Velcro Straps
Reconnecting Cables to a Line Card
OL-11497-03
31 CSC, SFC, and Alarm Card Slot Locations
Removing and Installing a Clock and Scheduler Card
CSC
Removing a Clock and Scheduler Card
Installing a Clock and Scheduler Card
Verifying the Installation of the Clock and Scheduler Card
33 Alarm Card LEDs On/Off Conditions
Removing and Installing a Switch Fabric Card
Slide the SFC halfway out of the slot, then stop
Removing a Switch Fabric Card
SFC
Loosen the captive screw on each side of the SFC faceplate
Installing a Switch Fabric Card
Tighten the captive screw on each side of the SFC faceplate
Verifying the Installation of the Switch Fabric Card
35 Removing and Installing an Alarm Card
Removing and Installing an Alarm Card
Installing an Alarm Card
Removing an Alarm Card
Verifying the Installation of the Alarm Card
Removing and Installing the Chassis
Before You Begin
Preparing the Replacement Chassis
Preparing the Defective Chassis
Disconnecting Power from the Power Distribution Unit
Disconnecting RP Cables
PDU
Disconnecting Line Card Interface Cables
Disconnecting Alarm Card Cables
Transferring System Components
Transferring RP and Line Cards
Transferring the Blower Module
Transferring the Power Modules
Transferring the Power Distribution Unit
Removing the Chassis from the Equipment Rack
Removing the Chassis
Removing the Chassis from a Tabletop or Flat Surface
Installing the Chassis on a Tabletop or Flat Surface
Installing the Replacement Chassis
Reconnecting Alarm Cards Cables
Reconnecting Cables to the Replacement Chassis
Installing the Chassis in the Equipment Rack
Reconnecting RP Cables
Upgrading the RP and Line Card Memory
Reconnecting Power to the Router
Installing the Blower Module
Reconnecting Line Card Network Interface Cables
OL-11497-03
Specifications
Technical Specifications
Description Value
Table A-2 AC-Input Power Supply Electrical Specifications
Table A-3 DC Power Entry Module Electrical Specifications
Table A-4 Environmental Specifications
Pin Name Definition
Alarm Card Alarm Relay Connector Specifications
Router Performance Upgrades and Model Identification
Gbps SFC and CSC
Switch Fabric Identification
Model Chassis Slots
OL-11497-03
Numerics
PRP
GRP
Auxiliary port 3-14,3-16console port 3-14Ethernet port
IN-3
IN-4
Connecting devices to 3-14description Pinout table
Blank card filler panel caution
Dimm installation caution 1-20,1-29
Attribute summary -19configurations 1-19description
EMC
IN-6
Attribute summary -19description
IN-7
Pcmcia
IN-8
Nvram GRP
IN-9
Alphanumeric LED displays description 3-41function
IN-10
Sdram PRP
Selv circuit connections 3-19saving the configuration file
IN-12
Auxiliary port Console port Ethernet port connections
IN-14