Manuals
/
D-Link
/
Computer Equipment
/
Server
D-Link
2000
user manual
112
Models:
2000
1
116
265
265
Download
265 pages
40.05 Kb
113
114
115
116
117
118
119
120
Page 116
Image 116
Section 4 - Configuration
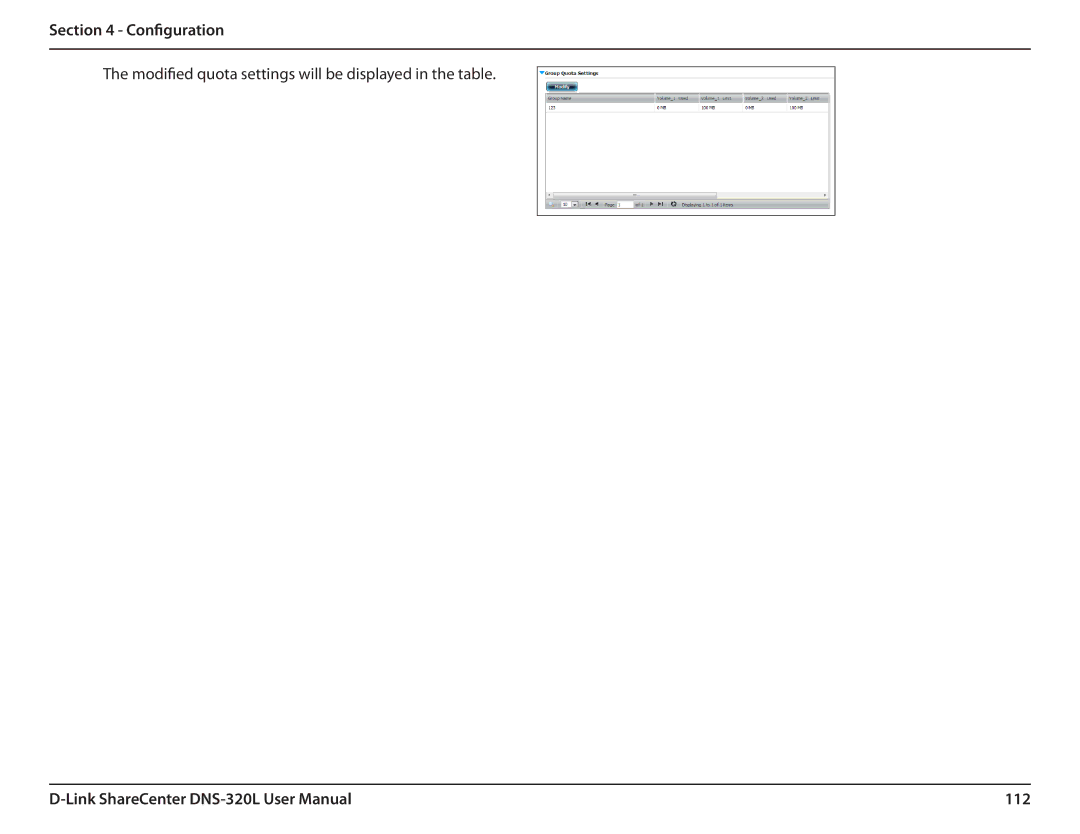
The modified quota settings will be displayed in the table.
D-Link
ShareCenter
DNS-320L
User Manual
112
Page 115
Page 117
Page 116
Image 116
Page 115
Page 117
Contents
ShareCenter 2-Bay Cloud Storage
Table of Contents
Adding an SMS Service Provider
Warranty
Knowledge Base
Registration
Iii
Product Overview
System Requirements
Features
MTP/PTP
Table of Contents
Checking the Hardware Requirements
Hardware Overview
Power On/Off
LED Description
USB On/Off
HDD On/Off
Rear Panel Connections
Bottom Panel
Getting Started
Getting Started
Getting Started
Link Storage Utility
Getting Started
Installation
Install the Hard Drives
Installation
Connect to your Network
Power and Device Selection
Admin Password
Networking Setup
Device Information and Dynamic DNS
Dynamic DNS Account Setup
Ddns Account and System Time
Email Settings and Volume Information
RAID Configuration
Mapping a Drive and Checking Volume Summary
Formatting Volumes
Formatting Hard Drives
Connecting to the mydlink
Installation
Installation
Installation
Wizard Complete
Mapping a Drive
Installation
After selecting your volume, click Finish to proceed
Configuration
Home Applications Management
Web UI Login
Web UI General Layout
Home
Applications
Management
Setup Wizard Web UI
Management
Configuration
Configuration
Configuration
Hard Drive Configuration
Disk Management
Hard Drive Configuration Wizard
Click Set RAID Type and Re-Format
Configuration
Configuration
Click Yes to continue
Configuration
Configuration
Jbod
Configuration
Configuration
Configuration
RAID
Click Yes to continue
Configuration
Configuration
Configuration
RAID
Configuration
Click Yes to continue
Configuration
Configuration
Migrating Data from Standard Mode to RAID
Configuration
Configuration
Configuration
Configuration
Configuration
A.R.T. Test
Configuration
Creating a Schedule
Click Scan Disk
Scan Disk
Click Management, Disk Management, and then Scan Disk
Configuration
Click Management Account Management
Account Management
Creating a Single User
Configuration
Configuration
Configuration
Configuration
Creating Multiple Users
Configuration
Configuration
Configuration
Modify Users
Configuration
Configuration
Configuration
Deleting Users
Importing Users
Click Account Management Users/Groups Import Users
Configuration
Configuration
Creating a Group
Click Account Management Users/Groups
Configuration
Configuration
100
101
Modifying a Group
102
103
104
105
106
Deleting a Group
107
Quotas
108
109
110
111
112
Network Shares
113
Add/Modify Network Shares Wizard
114
115
116
117
118
119
120
Deleting a Network Share
121
122
123
Resetting the Network Shares
Click the Reset Network Shares button
ISO Shares Setup Wizard
124
125
126
127
Creating an ISO Image
128
ISO image Creation Wizard
129
ISO Name and File Path Settings
130
131
132
ISO Tree Editing
133
Verifying the ISO image
134
Type the original Password Enter a New Password
135
LAN Setup
Go to Network Management and then LAN Setup
Network Management
136
137
138
IPv6 Settings
139
IPv6 Setup
140
141
142
Go to Network Management and then Dynamic DNS
143
144
Port Forwarding
Log in and click Network Management Port Forwarding
145
146
147
148
Application Management
FTP server
149
150
151
152
UPnP AV Server
Click Application Management, then UPnP AV Server
153
154
ITunes Server
155
AFP Service
NFS Service
157
System Management
Language
158
Settings
Time and Date
Device
159
System Settings
160
161
Power Management
Click Enable or Disable
Scheduling
162
Email Settings
163
SMS Settings
164
Adding an SMS Service Provider
165
Event Settings
166
Logs
167
Firmware Upgrade
168
169
UPS Settings
USB Storage Information
Printer Information
170
System Status
System Info
Click System Status and then System Info
Click System Status and then Hard Drive Info
172
Home
173
My Photos
174
Creating an Album
Click Upload from my computer 175
Photo Album Wizard
176
177
178
179
Editing the Photo Album
180
Moving a Photo
181
Deleting the Albums
182
Sharing your Photos
183
184
185
Refresh your Photos
186
Configuring an Album
187
188
189
Sharing Photos on Google+
190
191
192
Slideshow
193
Slideshow Toolbar
194
Cooliris
195
Photo Album Upload from NAS
196
197
198
Photo Gallery
199
200
My Files
Click My Files
Upload
201
202
Download
203
My Favorites Application
204
Adding Applications
205
FTP/HTTP Downloads
206
207
Remote Backups
208
Create Wizard
209
210
Schedule Scheduled Mode
211
212
Local Backups
213
Time Machine
214
USB Backups
215
MTP Backups
216
MTP Backup Process
217
218
USB Backup Process
219
220
221
P2P Downloads Settings
P2P Select Enable or Disable
Downloads
222
My Files
223
Amazon S3
224
225
Access Key ID Secret Access Key
Creating an AWS Account
226
Configuration Create Button
Job Name Settings
227
Configuration Remote Settings
Server Type
228
Configuration Local Settings
Schedule Settings
Modify Button
229
Mydlink
230
Mydlink Verification
231
232
Mydlink Java Runtime Machine
233
234
235
236
237
Creating/ Deleting/ Renaming Folder
238
Mydlink Settings Details
239
Deleting the device from mydlink account
240
ShareCenter NAS Status
241
Knowledge Base
242
243
RAID Options
244
245
Standalone and Network Master Mode
246
Standalone and Master
247
248
249
Under Management System Management USB Devices
250
251
USB Print Server
252
Windows Add Printer Wizard will launch
253
254
Contacting Technical Support
255
Warranty
256
Submitting a Claim
257
Disclaimer of Other Warranties
258
Limitation of Liability
259
FCC Statement
260
Registration
261
Top
Page
Image
Contents