Dell 968 All-In-One Printer Users Guide
United States Government Restricted Rights
Page
Finding Information
Click Help and Support
Click Start Help and Support
Faxing
Connecting Directly to a Telephone Wall Jack
Setting Up the Printer With External Devices
Connecting to a Telephone
Connecting to an Answering Machine
What if I have a Digital Subscriber Line DSL?
Sending a Fax
Connecting to a Computer Modem
Sending a Quick Fax
Setting Up the Printer With External Devices
Entering a Fax Number
Search , Phone Number Search , or Group Search ,
Click → Programs Click Dell Printers
Sending Advanced Faxes
Sending a Fax Through an Automated Answering System
Receiving a Fax
Receiving a Fax Automatically
Printing a Long Fax
Receiving a Fax Manually
Changing the Pickup Code
Turn Auto Answer off
Printing a Fax on Both Sides
Changing the Fax Setup
Using the Operator Panel
Using the Computer
Using Speed Dial
Creating a Speed or Group Dial List
Dell Fax Setup Utility dialog box opens
Using a Speed or Group Dial List
Click Add to or change list
Blocking Faxes
Creating a Blocked Fax List
Turning on Fax Blocking
Click Manage Blocked Faxes
Blocking Faxes Without Caller ID
Select Enable fax blocking
Select button
Creating Fax Activity Report
Page
Understanding the Printer Parts
About Your Printer
Information, see Understanding the Operator Panel
Manager
FAX
Understanding the Operator Panel
Page
Understanding the Software
Using the Dell All-In-One Center
Dell All-In-One Center allows you to
To access the Dell All-In-One Center
Using the Dell Fax Solutions Software
Dell Fax Solutions Software allows you to
Using Printing Preferences
Click Printing Preferences
Click File Print
Black Printing
Normal , or Print Last Page First
Using Memory Card Manager
Automatic , Manual , or Print Duplex
Dell Ink Management System
Installing the Optional XPS Driver
Removing and Reinstalling Software
Windows XP, click Start My Computer
Click → Computer
Click Add a network, wireless or Bluetooth printer
Click Have disk
Page
Copy Mode
Understanding the Operator Panel Menus
Handling Menu
Page
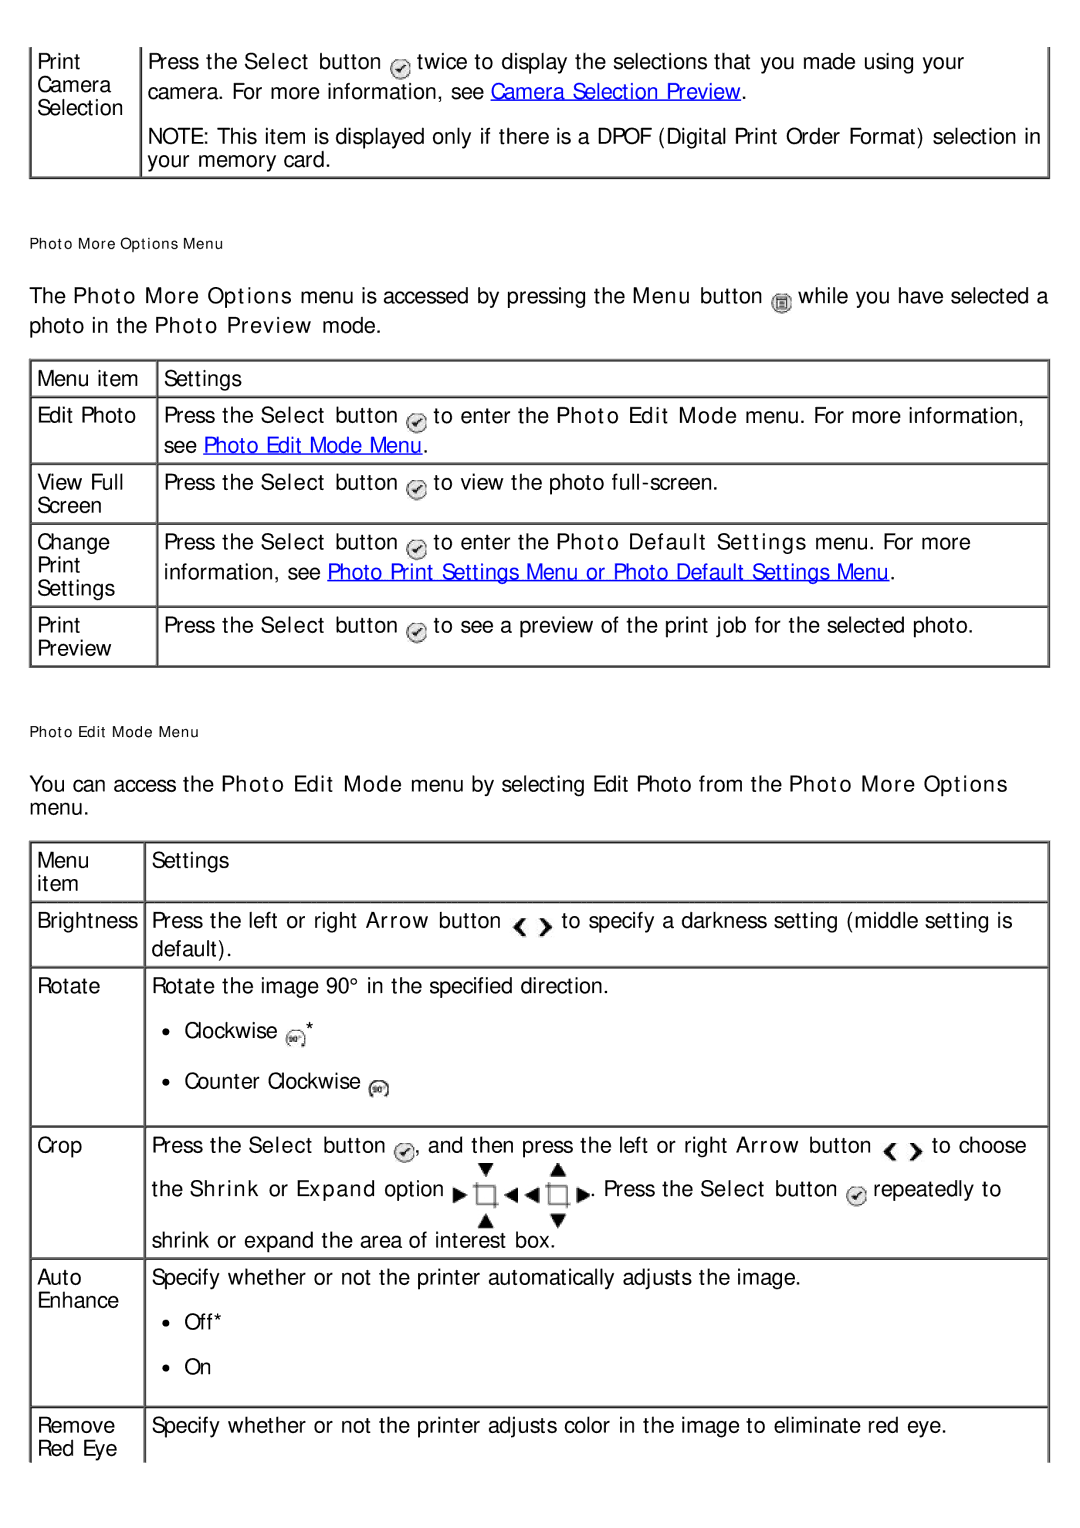
Photo Mode
Information, see Copy Default Settings Menu
Information, see Photo Proof Sheet Menu
See Photo Edit Mode Menu
Shrink or Expand option
Yes Factory default setting
Photo Proof Sheet Menu
Print Files Mode
Selections menu
Fax Mode
Phone Book Menu
See Edit Fax Settings Menu
Setup Menu
See Name Search Menu
See Group Search Menu
Information, see Phone Book Add Entry Menu
Information, see Phone Book Add Group Menu
Group Search Menu
Auto Answer Schedule Menu
FYI
Information, see Ringing and Answering Menu
See Phone Book Menu
Information, see History and Reports Menu
See Fax Printing Menu
Fax History More Options Menu
Information, see Auto Answer Schedule Menu
Paper Handling
Minutes
24,000 bps
To enter the Blocked Fax Number Search menu. For
To enter the Blocked Fax Name Search menu. For
To enter the Blocked Fax Add Entry menu. For
Scan Mode
Information, see Scan Default Settings Menu
To enter the Printer Default Settings menu. For
Setup Mode
Information, see Paper Handling Menu
To enter the PictBridge Default Settings menu
Page
Paper Handling Menu
Copy Default Settings Menu
Page
See Paper Handling Menu
Scan Default Settings Menu
TCP/IP Menu
To enter Network Time Menu
Dhcp
Maintenance Mode
Arrow button
PictBridge Mode
Bluetooth Mode
To view or change Bluetooth Default Settings
Page
Wireless Encryption
Minimum Requirements for Setup
Wireless Network Settings
Networking
Installing and Configuring the Dell Internal Network Adapter
Installing the Adapter
Page
Configuring the Adapter for a Wireless Connection
Configuring the Adapter for an Ethernet Connection
Configure Network Printers dialog box opens
Connecting the Printer to Another Network Computer
Configuring the Adapter Using the Wireless Setup Utility
Removing and Reinstalling the Adapter
Configuration Overview
Using an Available Wireless Network Configuration
Entering a Different Wireless Network Configuration
Manually Configuring the Adapter in Infrastructure Mode
Manually Configuring the Adapter in Ad-Hoc Mode
Verifying Network Communication
Loading Paper Into Trays
Loading Paper and Originals
Loading Paper
Page
Page
Loading Banner Paper
Understanding Tray Linking
To scroll to Auto Press the Back button
Understanding the Automatic Paper Type Sensor
Right-click the printer icon
Loading Original Documents
Into the ADF
On the Scanner Glass
Close the top cover
Maintenance
Replacing Ink Cartridges
Page
Aligning Ink Cartridges
Cleaning the Ink Cartridge Nozzles
Click Align Ink Cartridges
Cleaning the Exterior of the Printer
Click Clean Ink Cartridges. The cleaning page prints
Restoring Factory Default Settings
Restoring Language to Factory Default
Printing Documents
Printing
Printing Photos
Printing Envelopes
Printing From a Bluetooth-Enabled Device
Printing from a Bluetooth-Enabled Device
Setting the Bluetooth Security Level
Printing Photos From a PictBridge-Enabled Camera
Set Bluetooth Enabled and Discovery Mode to On
Printing More Than One Page on a Sheet of Paper
Printing an Image as a Multi-Page Poster
Printing a Banner
Printing Collated Copies of Your Document
Printing a Booklet
Automatic Duplex
Assembling a Booklet
Duplexing a Print Job Two-Sided Printing
Click Options Layout Options
Canceling a Print Job
Manual Duplex
Sent From a Bluetooth-Enabled Device
Sent From a Local Computer
Sent From a Computer Over a Wireless Network
Changing Printing Preferences Defaults
Select Printing Preferences
From the Advanced tab, you can
Computer Problems
Troubleshooting
Setup Problems
Windows XP , click Start My Computer
Select Set as Default Printer
Printer Problems
Click Set as Default Printer
Error Messages
Replacing Ink Cartridges
With External Devices
Turn Auto Fax Conversion on
Page
Page
Page
Paper Problems
Avoiding Jams and Misfeeds
For more information, see Print Media Guidelines
Page
Printing Problems
Click → Control Panel
Copying Problems
From the 2-Sided Printing area, select Extend dry time
Scanning Problems
Click Scan Now
Click Scan Now
Faxing Problems
Networking Problems
Memory Card Problems
Improving Print Quality
General Guidelines for Selecting or Loading Print Media
Printing From a Memory Card or USB Key
Viewing or Printing Photos
Viewing a Slide Show
Saving Photos to Your Computer
Photo Print Preview menu opens
Printing All Photos
Printing Photos Using a Proof Sheet
Printing a Dpof Selection
More information, see Loading Original Documents
Printing Microsoft Office Files
Altering Photos Before Printing
Photo Menu opens
Page
Power Consumption and Requirements
Specifications
Environmental Specifications
Overview
Memory Specifications and Requirements
Fax Mode Capabilities
Print and Scan Mode Capabilities
Operating System Support
Media Types and Sizes
Cables
Copying
Using Your Computer
Copying Documents
Collating Copies
Click Dell Printers Click Dell 968 AIO Printer
Advanced Copy Settings dialog box opens
Copying Photos
Using Your Computer
Copying a Two-Sided Document
Making a Duplex Copy
Changing Copy Settings
Click See More Copy Settings to
Select borderless printing options
Contacting Dell
Appendix
Dell Technical Support Policy
Ftp.dell.com
Warranty and Return Policy
Scanning Single-Page Documents or Photos
Scanning
Scanning Multiple Photos Into a Single File
Scanning Multiple-Page Documents
Scanning Across a Network
Setting the Computer Name and PIN
Click Control Panel Click Hardware and Sound
Editing Scanned Text Using Optical Character Recognition OCR
Advanced Scan Settings dialog box opens
Editing Scanned Images
Saving an Image on Your Computer
Mailing a Scanned Image or Document
Resizing Images or Documents
Cleaning up Scanned Copies of Newspaper Items
Converting Your Photo Collection to Electronic Format
Click Preview the image required
Changing Scan Settings
Click See More Scan Settings to
Page
BSD License and Warranty statements GNU License
BSD License and Warranty statements
Licensing Notice
GNU License
Page
Page
GNU Lesser General Public License
Page
Page
Page
Page