B5

B5

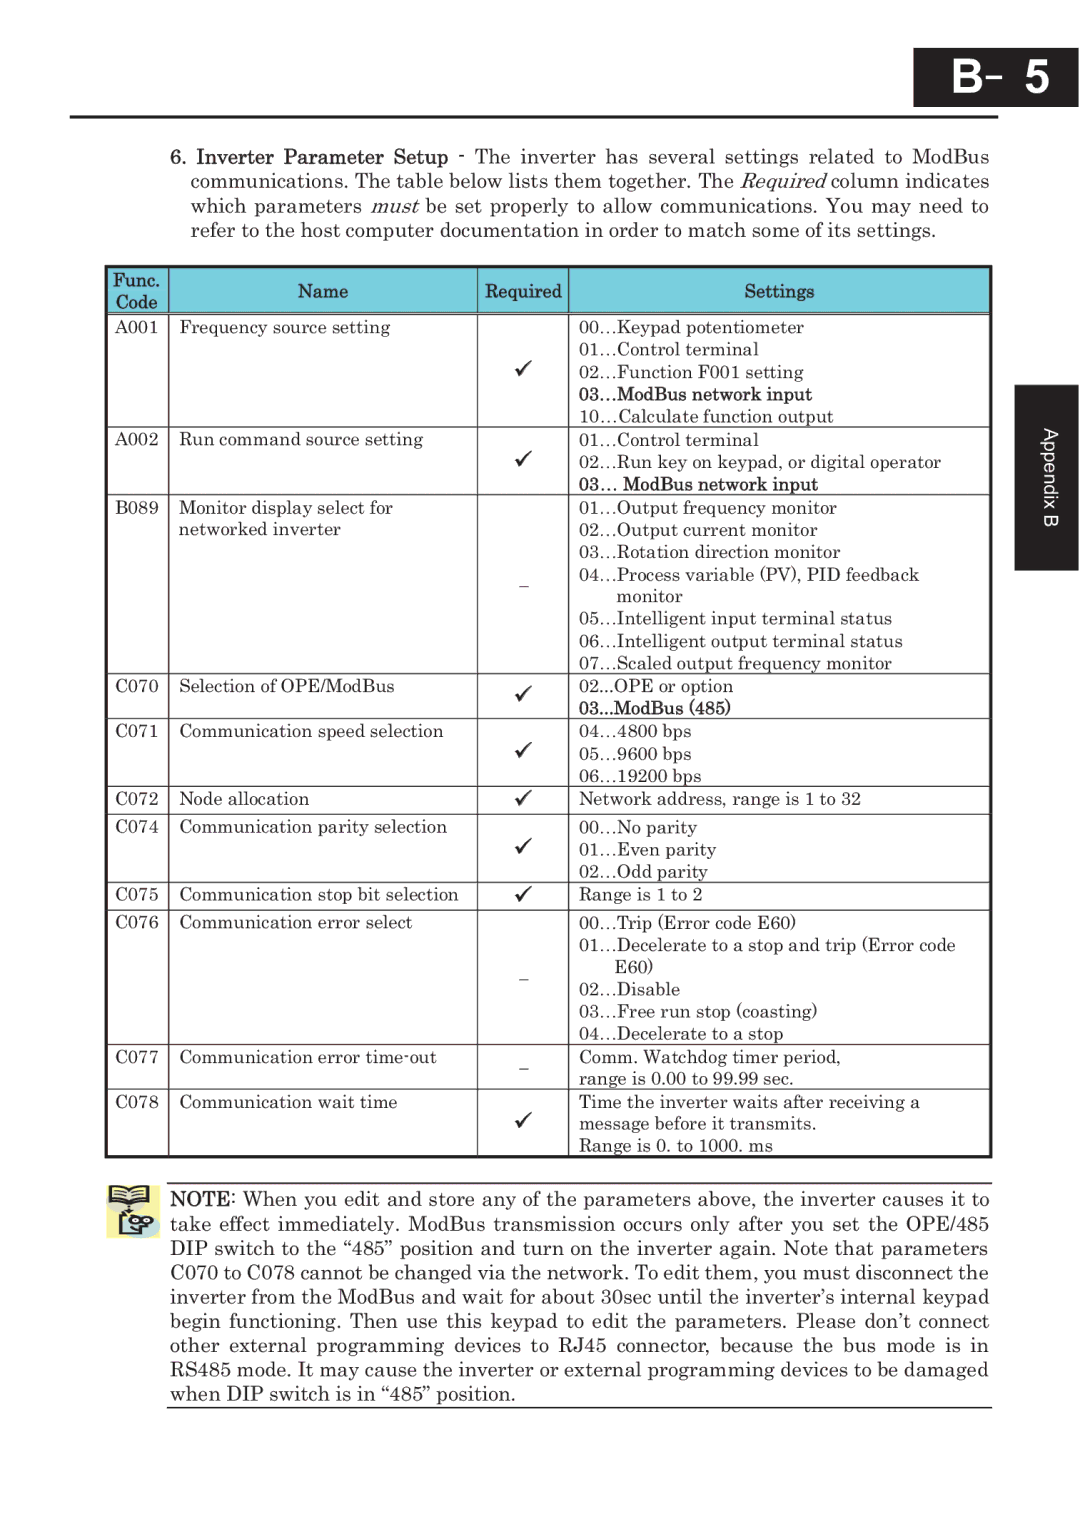
6.Inverter Parameter Setup - The inverter has several settings related to ModBus communications. The table below lists them together. The Required column indicates which parameters must be set properly to allow communications. You may need to refer to the host computer documentation in order to match some of its settings.

Func.

Name

Required

Settings

Code


A001

Frequency source setting

00

Keypad potentiometer


01

Control terminal

902 Function F001 setting

03 ModBus network input

10 Calculate function output

A002 Run command source setting

01 Control terminal

902 Run key on keypad, or digital operator

03 ModBus network input

B089

Monitor display select for


01

Output frequency monitor


networked inverter


02

Output current monitor


03

Rotation direction monitor


04

Process variable (PV), PID feedback


monitor


05

Intelligent input terminal status


06

Intelligent output terminal status


07

Scaled output frequency monitor

C070

Selection of OPE/ModBus

9

02...OPE or option


03...ModBus (485)

C071

Communication speed selection


04

4800 bps

905 9600 bps

06 19200 bps

C072

Node allocation

9

Network address, range is 1 to 32

C074

Communication parity selection


00 No parity

901 Even parity

02 Odd parity

C075

Communication stop bit selection

9

Range is 1 to 2

C076

Communication error select


00

Trip (Error code E60)


01

Decelerate to a stop and trip (Error code


E60)


02

Disable


03

Free run stop (coasting)


04

Decelerate to a stop

C077

Communication error time-out


Comm. Watchdog timer period,


range is 0.00 to 99.99 sec.


C078

Communication wait time


Time the inverter waits after receiving a

9message before it transmits. Range is 0. to 1000. ms

NOTE: When you edit and store any of the parameters above, the inverter causes it to take effect immediately. ModBus transmission occurs only after you set the OPE/485 DIP switch to the “485” position and turn on the inverter again. Note that parameters C070 to C078 cannot be changed via the network. To edit them, you must disconnect the inverter from the ModBus and wait for about 30sec until the inverter’s internal keypad begin functioning. Then use this keypad to edit the parameters. Please don’t connect other external programming devices to RJ45 connector, because the bus mode is in RS485 mode. It may cause the inverter or external programming devices to be damaged when DIP switch is in “485” position.

Appendix BAppendix B

Page 248
Image 248
Hitachi CP-X200 instruction manual Appendix BAppendix B

CP-X200 specifications

The Hitachi CP-X200 is a versatile and robust projector designed to cater to the needs of educational and business environments. It combines affordability with high-quality performance, making it an attractive option for various presentations and multimedia applications.

At the heart of the CP-X200 is its high brightness capability, with a lumen output of 3,000 ANSI lumens. This feature enables the projector to deliver clear and vibrant images even in well-lit rooms. The resolution of XGA (1024 x 768 pixels) ensures that text and graphics are sharp, making it suitable for everything from classroom lectures to corporate presentations.

One of the standout characteristics of the Hitachi CP-X200 is its advanced lamp technology. The projector uses a long-lasting lamp that can provide up to 5,000 hours of usage in standard mode, allowing for extended intervals between lamp replacements. Additionally, the ECO mode can further enhance the lamp life, extending its longevity while reducing energy consumption.

The CP-X200 is equipped with a variety of connectivity options, including HDMI, VGA, and composite inputs, allowing users to easily connect it to various devices such as laptops, DVD players, and other multimedia systems. The inclusion of USB and RS-232 interfaces ensures compatibility with different control systems, making it a flexible choice for diverse setups.

Another significant feature is the projector's built-in 10-watt speaker, which provides decent audio output, eliminating the need for external speakers in smaller venues. The speaker system enhances presentations, ensuring that audio and visuals are cohesive, promoting better audience engagement.

Portability is another key aspect of the Hitachi CP-X200, which weighs just around 3.5 kg (approximately 7.7 lbs), allowing for easy transport between locations. Its compact design makes it suitable for both fixed installations and mobile use, catering to professionals who require a projector that adapts to various environments.

The user-friendly interface and robust remote control enhance the projector's operability, providing easy access to essential functions. Additionally, features such as auto keystone correction adjust the image to maintain consistent quality even when the projector is not perfectly aligned with the screen.

In summary, the Hitachi CP-X200 is a feature-rich projector that embodies reliability, performance, and ease of use. Its combination of high brightness, various connectivity options, long lamp life, portability, and integrated audio makes it an excellent choice for education and business professionals seeking a dependable presentation solution.