INSTRUCTIONS
English
GVT0104-002A
CA-UXJ55MD
CAUTION-button
Warnings, Cautions and Others
REPRODUCTION OF LABELS
IMPORTANT FOR LASER PRODUCTS
CLASS LASER PRODUCT
Caution Proper Ventilation
Introduction
Precautions
Installation
Power sources
English
Contents
Troubleshooting
Specifications
English
Location of the Buttons and Controls
Front Panel
Front panel
English
Display window on the front panel
Display window
GROUP
English
Remote Control
FM antenna
Connecting Antennas
Getting Started
Unpacking
To connect speakers
Connecting Speakers
AM antenna
To connect an outdoor AM antenna
English
Connecting External Equipment
Putting the Batteries into the Remote Control
To connect external equipment
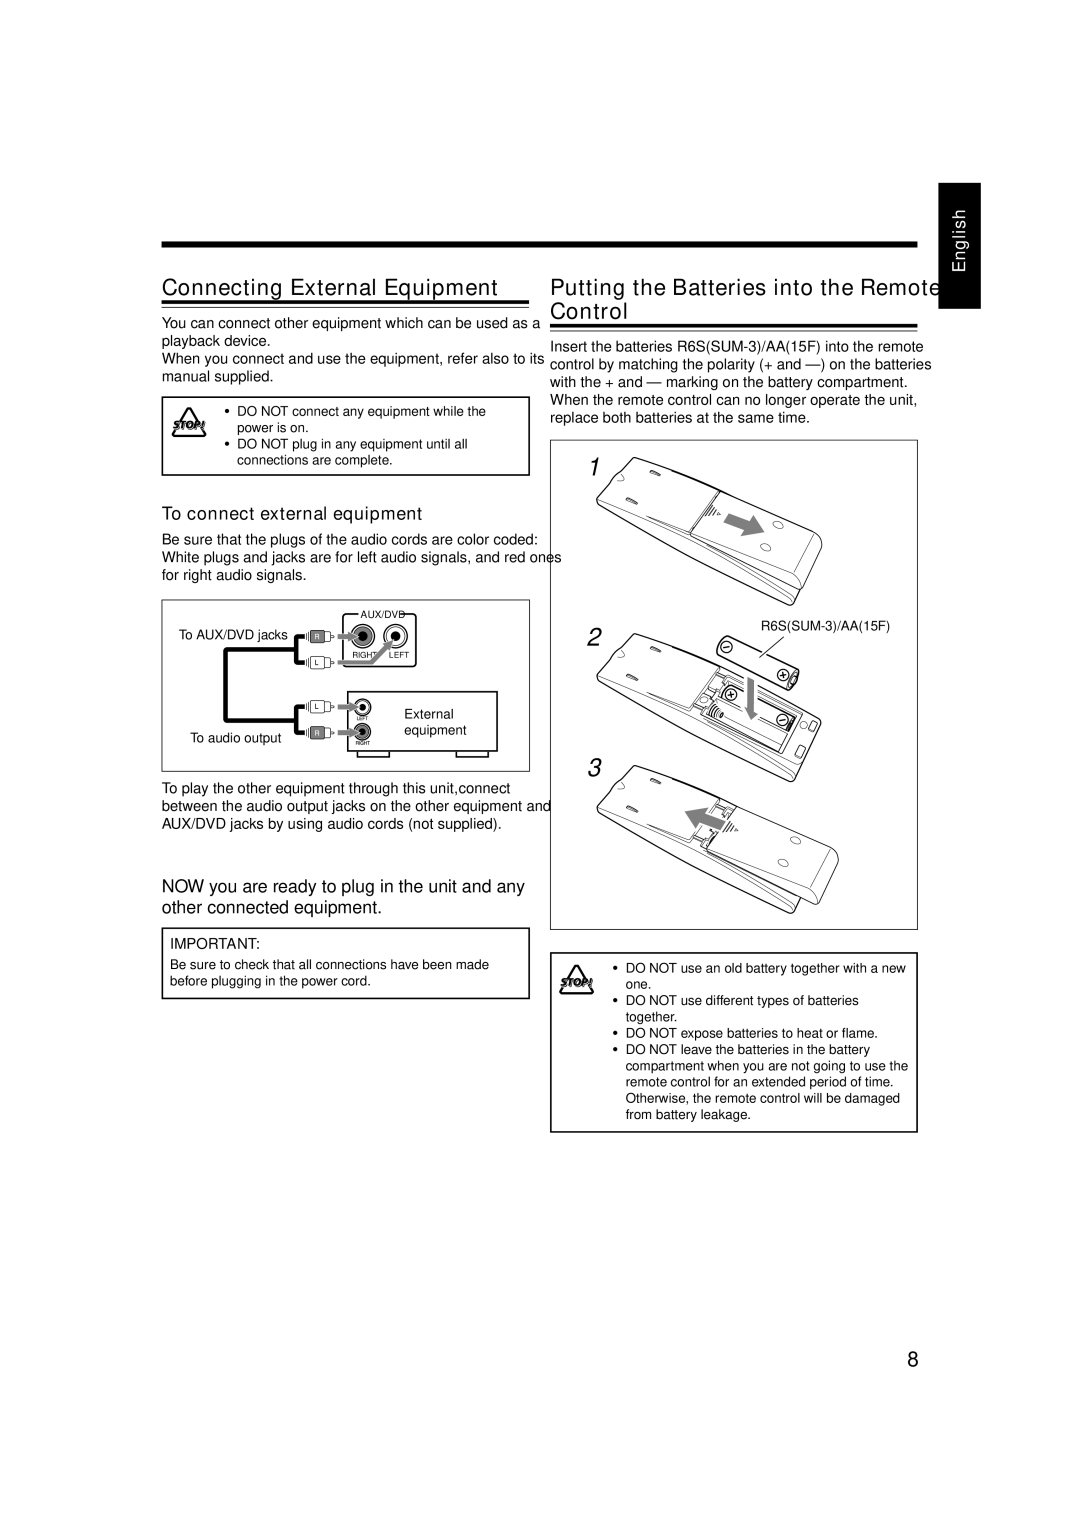
On the remote control ONLY
Setting the Clock
1 Press CLOCK/TIMER
to adjust the hour, then
Turning On/Off the Key-touchTone
Turning On the Power and Starts Playback
To turn off the clock indication Power Save
On the remote control
To increase the volume level, turn the
Adjusting the Volume Level
To increase the volume level, press
To decrease the volume level, press VOLUME
Changing the Display Brightness
Adjusting the Tone
1 Press BASS/TREBLE to adjust the BASS
2 On the remote control
Listening to FM and AM Broadcasts
Tuning in to a Station
Setting the AM Tuner Interval Spacing
Press FM MODE so that the MONO indicator
preset number
Presetting Stations
Tuning in to a Preset Station
1 Tune in to the station you want to preset
Loading Discs
When playing a CD-Ror CD-RW
Playing Back Discs on the 5-CDChanger
Playing Back All the Discs -ContinuousPlay
indication in step 1 still remains
Basic Disc Operations
To change a disc during playback of another disc
2 Press CD 6 while the
number you want to play
Programing the Track Playing Order -ProgramPlay
3 Press DISC UP or DISC
DOWN
Playing at Random-RandomPlay
To check the program contents
program contents by pressing ¢ or
programed track by pressing CANCEL
before playing
Prohibiting Disc Ejection-DiscLock
Repeating Tracks or Discs-RepeatPlay
Press REPEAT repeatedly during or
1 Insert an MD into the MD loading slot
Playing Back MDs
Playing Back the Entire MD -NormalPlay
Basic MD Operations
Press ¢or 4repeatedly
While playing or pausing
When the MD recorder stops
To change the information shown on the display
5 Press MD
program contents by pressing ¢or
1 Load an MD
until “MD PROGRAM” appears
1 Load an MD including groups
Playing Tracks in a Group-GroupPlay
until “MD RANDOM” appears
3 Press MD
3 Enter the characters to search for the track
Repeating Tracks-RepeatPlay
Searching for Tracks to Play -MDTitle Search
2 Press TITLE SEARCH
To prohibit MD ejection-MDLock
To cancel title searching, press TITLE SEARCH or
Available symbols are as follows
4 Press ENTER
To play both sides-ReverseMode
Playing Back Tapes
Playing Back a Tape
2 Press TAPE
Listening to External Equipment
To adjust the Audio Input Level
1 On the remote control
2 Turn down the volume level to “VOLUME 0.”
To avoid erasing important recordings
Recording on MDs
Before You Start Recording on an MD
About the track marks
English
Stereo Long-HourRecording MDLP
About High-SpeedRecording
To check the remaining recording time
To set “LP ”-prefixaddition mode
Setting MD Recording Modes
To set group recording mode
To set the recording length mode
recording mode
6 Press MD REC when the selected
While playing back or pausing a track you
5 Press CD REC MODE to select the CD REC
Recording Other Sources onto an MD
2 Tune in to a preset station you want see page
When the source is “FM” or “AM,” recording starts
When the source is “TAPE,” playback and recording
To demagnetize the head
Recording on Tapes
Before You Start Recording on a Tape
To protect your recordings
Recording onto a Tape
6 Press TAPE REC when the
Recording CD onto a Tape
CD-TapeSynchronized Recording
To record a single track of a CD/MD during play
When the source is “CD” or “MD,” playback and
3 Press REV.MODE to select
Reverse Mode
4 Press MD&TAPE REC
CDSynchronized Recording
Recording CD onto an MD and a Tape
3 Insert a recordable MD into the MD loading
Guidance-MDGroup Functions
Using MD Groups as a separate item
How to make up Groups
Editing MDs
Ungrouping tracks UNGROUP Page
Introducing Group Editing Functions
Forming a group FORM GR Page
Adding a track to a group ENTRY GR Page
appears on the display
Forming a Group-FORMGR
2 Press GROUP TITLE/EDIT
repeatedly until “FORM GR ?”
4while holding SHIFT to select the group
Adding a Track to a Group-ENTRYGR
repeatedly until “ENTRY GR ?”
6 Press GROUP SKIP ¢or GROUP SKIP
5 Press ¢or 4to select
Dividing a Group-DIVIDEGR
repeatedly until “DIVIDE GR?”
4 Press GROUP SKIP ¢or GROUP SKIP
On the remote control ONLY
Joining Two Groups-JOINGR
repeatedly until “JOIN GR ?”
6 Press ENTER
English
Moving a Group-MOVEGR
repeatedly until “MOVE GR ?”
you want to move
repeatedly until “UNGR ALL ?”
Ungrouping Tracks-UNGROUP
Dissolving All Groups-UNGRALL
repeatedly until “UNGROUP ?”
English
Erasing Tracks in a Group-ERASEGR
repeatedly until “ERASE GR ?”
On the remote control ONLY
Moving a track MOVE Page
Introducing Track Editing Functions
Dividing a track DIVIDE Page
Joining two tracks JOIN Page
Dividing a Track-DIVIDE
Press SET when you find the point
where you want to divide the
adjust the dividing point
until “JOIN ?” appears on the
Joining Two Tracks-JOIN
Insert an MD you want to edit into the MD
loading slot
the track you want to move
the position where you want
Moving a Track-MOVE
until “MOVE ?” appears on the
until “ERASE?” appears on the
Erasing Tracks-ERASE
Erasing All Tracks-ALLERASE
Press TITLE/EDIT repeatedly
to change the
Assigning Titles to an MD
2 Enter the unit into the title entry mode
3 Press or
title entry
7 Press CANCEL to exit from the
5 Enter characters
6 Press ENTER to finish the current
want to correct, by pressing
Changing the Title
Follow steps 1 to 4 on page
Select the character you
1 Press CLOCK/TIMER repeatedly CLOCK
Using the Timers
Using Recording Timer
How Recording Timer actually works
5 Set the start time
1Press ¢or 4repeatedly to adjust the hour
3Press ¢or 4repeatedly to adjust the minute
To turn on the Recording Timer again
until “DAILY TIMER” appears
Using Daily Timer
How Daily Timer actually works
1 Press CLOCK/TIMER repeatedly
To turn on the Daily Timer again
6 Adjust the volume level
The volume setting appears on the
to adjust the volume level
1Set the Daily Timer as explained on pages 56 and
Using Sleep Timer
Timer Priority
How Sleep Timer actually works
General Notes
Maintenance
Cleaning the unit
To clean the disc
English
Cause
Symptoms
SCMS Serial Copy Management System
HCMS High-speedCopy Management System
Signification
Solution
CD/MD Messages
Message
Action
Troubleshooting
Symptom
Possible Cause
Amplifier
Specifications
Supplied accessories
CA-UXJ55MD
VICTOR COMPANY OF JAPAN, LIMITED
EN, CS
2003 VICTOR COMPANY OF JAPAN, LIMITED
0803AIMMDWJEM