English
In the following examples of track editing, the process is explained from the very
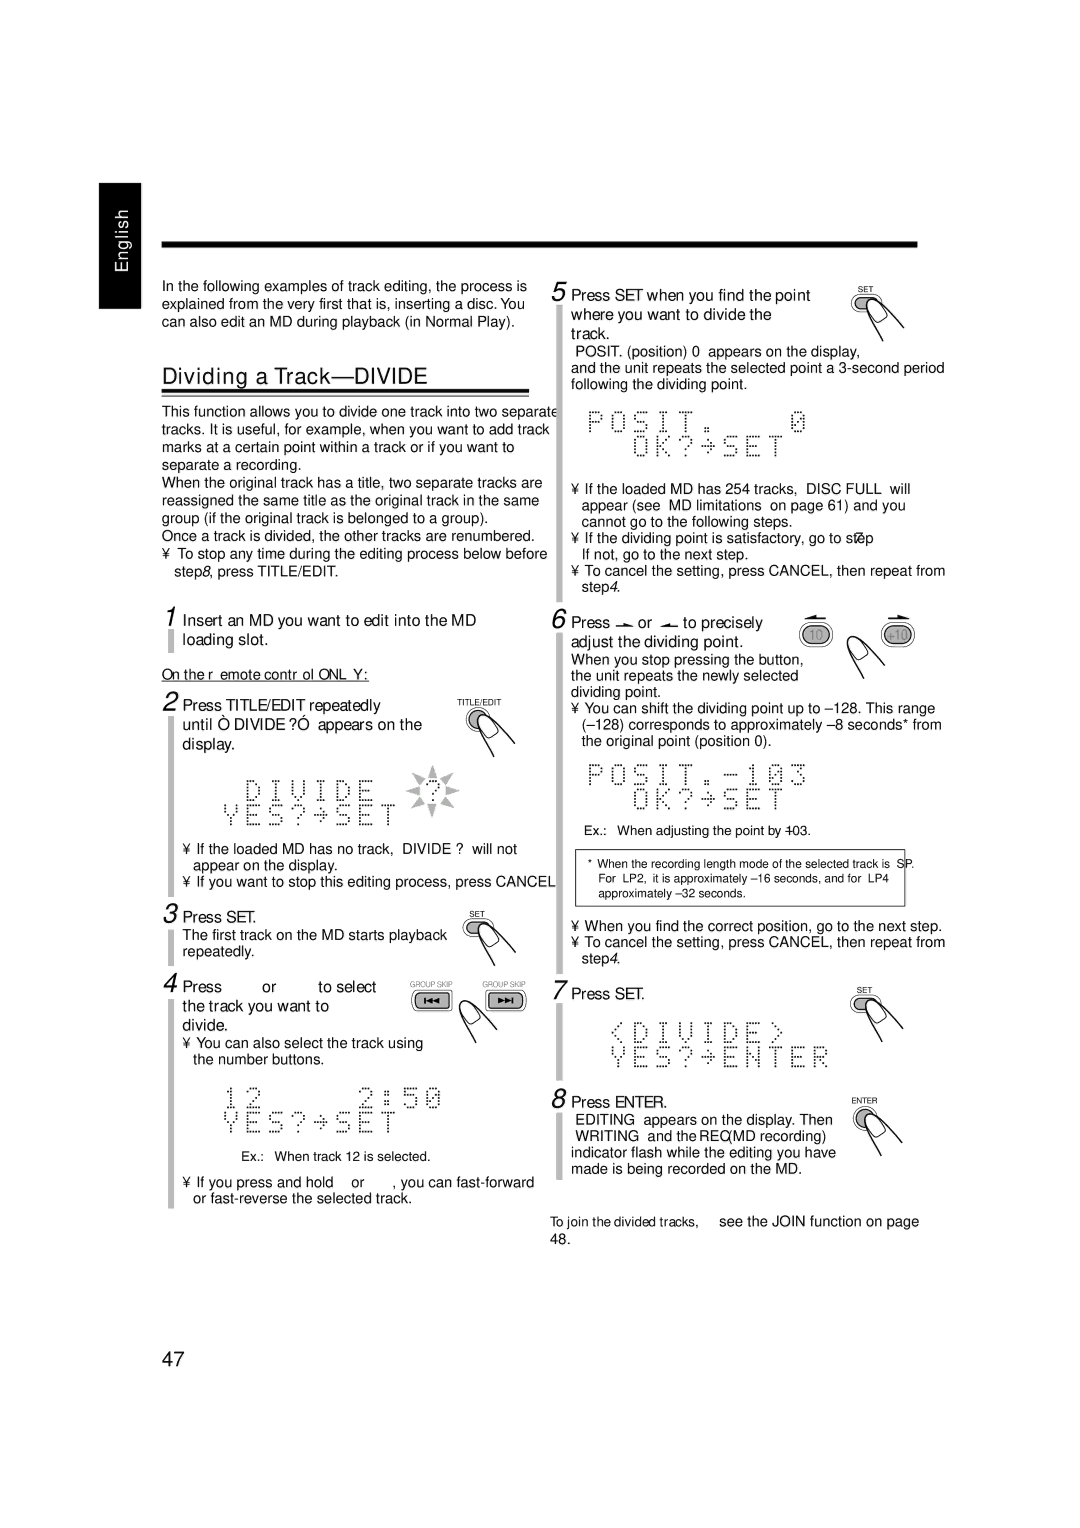
Dividing a Track—DIVIDE
This function allows you to divide one track into two separate tracks. It is useful, for example, when you want to add track marks at a certain point within a track or if you want to separate a recording.
When the original track has a title, two separate tracks are reassigned the same title as the original track in the same group (if the original track is belonged to a group).
Once a track is divided, the other tracks are renumbered.
•To stop any time during the editing process below before step 8, press TITLE/EDIT.
1 Insert an MD you want to edit into the MD loading slot.
On the remote control ONLY:
2 Press TITLE/EDIT repeatedly | TITLE/EDIT |
| |
until “DIVIDE ?” appears on the |
|
display. |
|
•If the loaded MD has no track, “DIVIDE ?” will not appear on the display.
•If you want to stop this editing process, press CANCEL.
5 | Press SET when you find the point | SET |
| ||
| where you want to divide the |
|
| track. |
|
“POSIT. (position) 0” appears on the display,
and the unit repeats the selected
•If the loaded MD has 254 tracks, “DISC FULL” will appear (see “MD limitations” on page 61) and you cannot go to the following steps.
•If the dividing point is satisfactory, go to step 7. If not, go to the next step.
•To cancel the setting, press CANCEL, then repeat from step 4.
6 Press | or | to precisely | 10 | +10 | |
adjust the dividing point. | |||||
|
| ||||
When you stop pressing the button, the unit repeats the newly selected dividing point.
•You can shift the dividing point up to ±128. This range (±128) corresponds to approximately ±8 seconds* from the original point (position 0).
Ex.: When adjusting the point by –103.
* When the recording length mode of the selected track is “SP.” |
For “LP2,” it is approximately ±16 seconds, and for “LP4” |
approximately ±32 seconds. |
3 | Press SET. |
| ||
|
|
| The first track on the MD starts playback | |
|
|
| ||
|
|
| repeatedly. |
|
|
|
| Press ¢ or 4 to select |
|
4 |
| GROUP SKIP | ||
|
|
| the track you want to |
|
|
|
| divide. |
|
•You can also select the track using the number buttons.
SET
GROUP SKIP
• When you find the correct position, go to the next step. |
• To cancel the setting, press CANCEL, then repeat from |
step 4. |
7 Press SET. | SET |
|
8 Press ENTER. | ENTER |
|
Ex.: When track 12 is selected.
•If you press and hold ¢ or 4, you can
“EDITING” appears on the display. Then “WRITING” and the REC (MD recording) indicator flash while the editing you have made is being recorded on the MD.
To join the divided tracks, see the JOIN function on page 48.
47
