38![]()
![]()
![]()
![]()
![]()
![]()
![]()
![]()
![]()
![]()
![]()
![]()
![]()
![]()
![]()
![]()
![]()
![]()
![]()
![]()
![]()
![]()
![]()
![]()
![]()
![]()
![]()
![]()
![]()
![]()
![]()
![]()
![]()
![]()
![]()
![]()
![]()
![]()
![]()
![]()
RECOR DING
DING

Advanced Features (Cont.)![]()
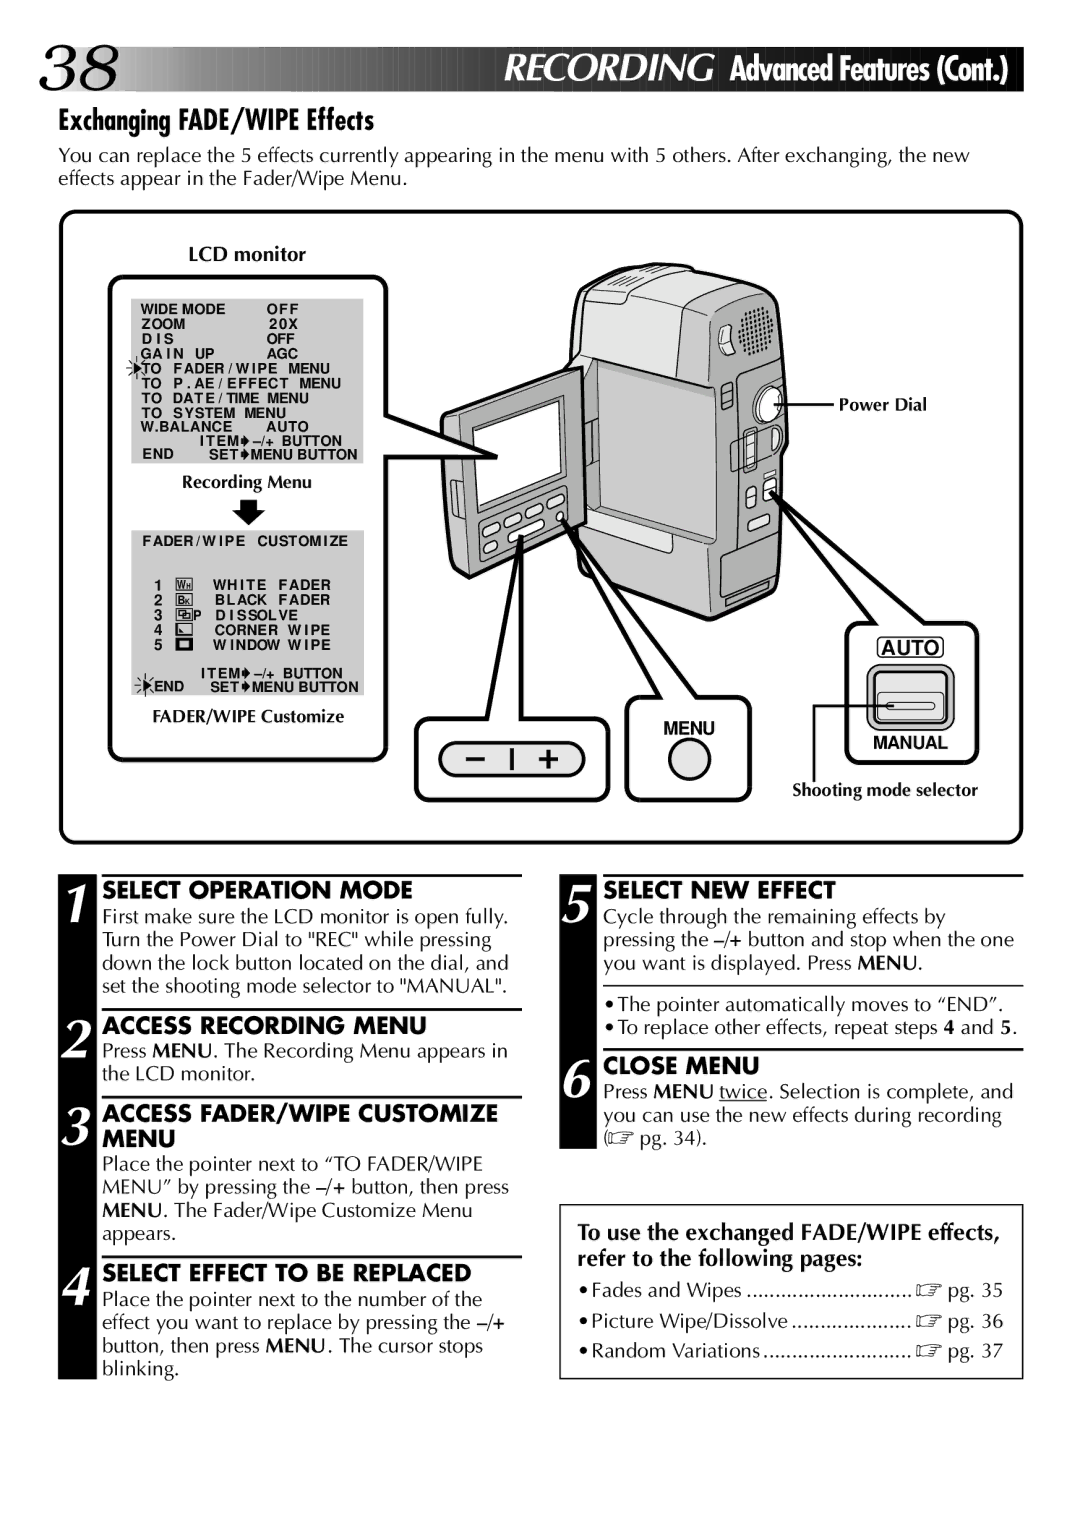
Exchanging FADE/WIPE Effects
You can replace the 5 effects currently appearing in the menu with 5 others. After exchanging, the new effects appear in the Fader/Wipe Menu.
LCD monitor
WIDE MODE | O FF |
ZOOM | 2 0X |
D I S | OFF |
GA I N UP | AGC |
TO | FADER / W IPE | MENU | ||
TO | P . AE / EFFECT | MENU | ||
TO DAT E / TIME MENU | ||||
TO SYSTEM MENU |
| |||
W.BALANCE | AUTO | |||
END | I TEM | |||
SET | MENU BUTTON | |||
Recording Menu
FADER / W IPE CUSTOM I ZE
1WH WH I TE FADER
2BK BLACK FADER
3![]()
![]()
![]()
![]() P D I SSOLVE
P D I SSOLVE
4 | CORNER W I PE | |
5 | W INDOW W I PE | |
END | I TEM | |
SET | MENU BUTTON | |
FADER/WIPE Customize
![]()
![]() Power Dial
Power Dial
AUTO
MENU
MANUAL
Shooting mode selector
1 SELECT OPERATION MODE
First make sure the LCD monitor is open fully. Turn the Power Dial to "REC" while pressing down the lock button located on the dial, and set the shooting mode selector to "MANUAL".
2 ACCESS RECORDING MENU
Press MENU. The Recording Menu appears in the LCD monitor.
3 ACCESSMENU FADER/WIPE CUSTOMIZE
Place the pointer next to “TO FADER/WIPE MENU” by pressing the
4 SELECT EFFECT TO BE REPLACED Place the pointer next to the number of the effect you want to replace by pressing the
5 SELECT NEW EFFECT
Cycle through the remaining effects by pressing the
•The pointer automatically moves to “END”. •To replace other effects, repeat steps 4 and 5.
6 CLOSE MENU
Press MENU twice. Selection is complete, and you can use the new effects during recording (☞ pg. 34).
To use the exchanged FADE/WIPE effects, refer to the following pages:
•Fades and Wipes | ☞ pg. 35 |
•Picture Wipe/Dissolve | ☞ pg. 36 |
•Random Variations | ☞ pg. 37 |
