11. MENU SCREENS
11-3 FILE MANAGE Menu Screen
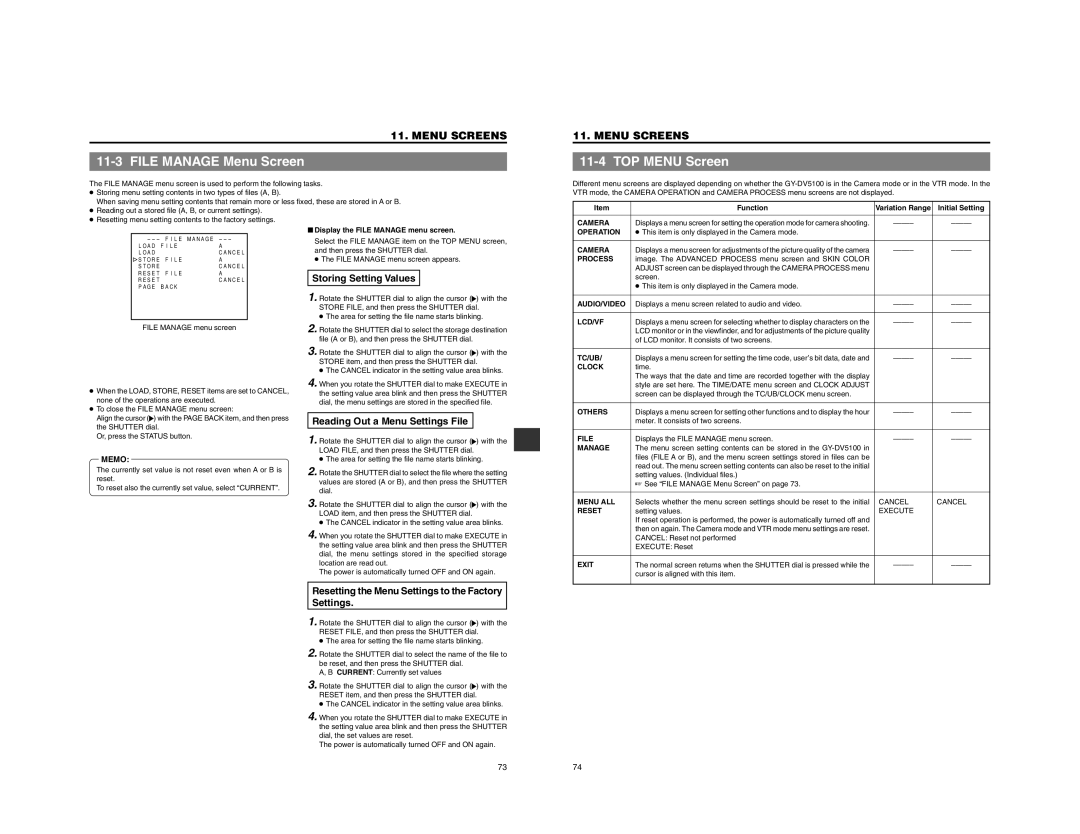
The FILE MANAGE menu screen is used to perform the following tasks.
●Storing menu setting contents in two types of files (A, B).
When saving menu setting contents that remain more or less fixed, these are stored in A or B.
●Reading out a stored file (A, B, or current settings).
●Resetting menu setting contents to the factory settings.
11. MENU SCREENS
11-4 TOP MENU Screen
Different menu screens are displayed depending on whether the
Item | Function | Variation Range | Initial Setting |
CAMERA | Displays a menu screen for setting the operation mode for camera shooting. |
LOAD FILE | A |
LOAD | CANCEL |
STORE FILE | A |
STORE | CANCEL |
RESET FILE | A |
RESET | CANCEL |
PAGE BACK |
|
■Display the FILE MANAGE menu screen.
Select the FILE MANAGE item on the TOP MENU screen, and then press the SHUTTER dial.
● The FILE MANAGE menu screen appears.
Storing Setting Values
1.Rotate the SHUTTER dial to align the cursor (![]() ) with the STORE FILE, and then press the SHUTTER dial.
) with the STORE FILE, and then press the SHUTTER dial.
● The area for setting the file name starts blinking.
OPERATION | ● This item is only displayed in the Camera mode. |
|
|
|
|
|
|
CAMERA | Displays a menu screen for adjustments of the picture quality of the camera | ||
PROCESS | image. The ADVANCED PROCESS menu screen and SKIN COLOR |
|
|
| ADJUST screen can be displayed through the CAMERA PROCESS menu |
|
|
| screen. |
|
|
| ● This item is only displayed in the Camera mode. |
|
|
|
|
|
|
AUDIO/VIDEO | Displays a menu screen related to audio and video. | ||
|
|
|
|
LCD/VF | Displays a menu screen for selecting whether to display characters on the |
FILE MANAGE menu screen
●When the LOAD, STORE, RESET items are set to CANCEL, none of the operations are executed.
●To close the FILE MANAGE menu screen:
Align the cursor (![]() ) with the PAGE BACK item, and then press the SHUTTER dial.
) with the PAGE BACK item, and then press the SHUTTER dial.
Or, press the STATUS button.
MEMO:
The currently set value is not reset even when A or B is reset.
To reset also the currently set value, select “CURRENT”.
2.Rotate the SHUTTER dial to select the storage destination file (A or B), and then press the SHUTTER dial.
3.Rotate the SHUTTER dial to align the cursor (![]() ) with the STORE item, and then press the SHUTTER dial.
) with the STORE item, and then press the SHUTTER dial.
● The CANCEL indicator in the setting value area blinks.
4.When you rotate the SHUTTER dial to make EXECUTE in the setting value area blink and then press the SHUTTER dial, the menu settings are stored in the specified file.
Reading Out a Menu Settings File
1.Rotate the SHUTTER dial to align the cursor (![]() ) with the LOAD FILE, and then press the SHUTTER dial.
) with the LOAD FILE, and then press the SHUTTER dial.
●The area for setting the file name starts blinking.
2.Rotate the SHUTTER dial to select the file where the setting values are stored (A or B), and then press the SHUTTER dial.
3.Rotate the SHUTTER dial to align the cursor (![]() ) with the LOAD item, and then press the SHUTTER dial.
) with the LOAD item, and then press the SHUTTER dial.
●The CANCEL indicator in the setting value area blinks.
4.When you rotate the SHUTTER dial to make EXECUTE in the setting value area blink and then press the SHUTTER dial, the menu settings stored in the specified storage location are read out.
The power is automatically turned OFF and ON again.
Resetting the Menu Settings to the Factory Settings.
1.Rotate the SHUTTER dial to align the cursor (![]() ) with the RESET FILE, and then press the SHUTTER dial.
) with the RESET FILE, and then press the SHUTTER dial.
●The area for setting the file name starts blinking.
2.Rotate the SHUTTER dial to select the name of the file to be reset, and then press the SHUTTER dial.
A, B CURRENT: Currently set values
3.Rotate the SHUTTER dial to align the cursor (![]() ) with the RESET item, and then press the SHUTTER dial.
) with the RESET item, and then press the SHUTTER dial.
●The CANCEL indicator in the setting value area blinks.
4.When you rotate the SHUTTER dial to make EXECUTE in the setting value area blink and then press the SHUTTER dial, the set values are reset.
The power is automatically turned OFF and ON again.
| LCD monitor or in the viewfinder, and for adjustments of the picture quality |
|
|
| of LCD monitor. It consists of two screens. |
|
|
|
|
|
|
TC/UB/ | Displays a menu screen for setting the time code, user’s bit data, date and | ||
CLOCK | time. |
|
|
| The ways that the date and time are recorded together with the display |
|
|
| style are set here. The TIME/DATE menu screen and CLOCK ADJUST |
|
|
| screen can be displayed through the TC/UB/CLOCK menu screen. |
|
|
|
|
|
|
OTHERS | Displays a menu screen for setting other functions and to display the hour | ||
| meter. It consists of two screens. |
|
|
|
|
|
|
FILE | Displays the FILE MANAGE menu screen. | ||
MANAGE | The menu screen setting contents can be stored in the |
|
|
| files (FILE A or B), and the menu screen settings stored in files can be |
|
|
| read out. The menu screen setting contents can also be reset to the initial |
|
|
| setting values. (Individual files.) |
|
|
| ☞ See “FILE MANAGE Menu Screen” on page 73. |
|
|
|
|
|
|
MENU ALL | Selects whether the menu screen settings should be reset to the initial | CANCEL | CANCEL |
RESET | setting values. | EXECUTE |
|
| If reset operation is performed, the power is automatically turned off and |
|
|
| then on again. The Camera mode and VTR mode menu settings are reset. |
|
|
| CANCEL: Reset not performed |
|
|
| EXECUTE: Reset |
|
|
|
|
|
|
EXIT | The normal screen returns when the SHUTTER dial is pressed while the | ||
| cursor is aligned with this item. |
|
|
73
74